1. Introduction
Welcome to the instruction manual for your Desview R7 7-inch Touch Screen Camera Field Monitor. This guide provides detailed information on setting up, operating, and maintaining your monitor to ensure optimal performance. The Desview R7 is designed to enhance your filmmaking experience with its high-brightness touchscreen, 4K HDMI support, and advanced monitoring features.
2. Safety Information
Please read and understand all safety instructions before using the Desview R7 monitor. Failure to follow these instructions may result in electric shock, fire, or damage to the device.
- Keep the monitor dry. Do not expose it to rain or moisture.
- Avoid extreme temperatures. Do not operate or store the device in excessively hot or cold environments.
- Handle with care. Do not drop, hit, or apply strong pressure to the monitor.
- Use only approved power adapters and accessories.
- Do not attempt to disassemble or modify the monitor. Refer all servicing to qualified personnel.
- Keep out of reach of children.
3. What's in the Box
Upon unboxing your Desview R7 monitor, please verify that all the following items are included:
- Desview R7 Monitor
- 1 Micro HDMI Cable
- 1 Mini HDMI Cable
- DC Power Plug
- Hot Shoe Mount Accessory
- USB Drive with LUTs (Look Up Tables)
- Carrying Bag
- Cleaning Cloth

Image: Contents of the Desview R7 Monitor package, showing all included accessories.
4. Product Overview and Setup
4.1 Physical Components
Familiarize yourself with the physical layout and ports of your Desview R7 monitor:
- Top Side: Features the power button, three customizable hot keys (F1, F2, Exit), and a scroll wheel for menu navigation.
- Bottom Side: Includes a USB slot for firmware updates and LUT loading, and a 1/4-inch mounting thread.
- Right Side: Equipped with HDMI input and output ports for 4K video signals, and a DC power outlet.
- Left Side: Contains an additional 1/4-inch mounting thread for versatile attachment options.
- Back Side: Features a slot for an NPF Sony battery, providing portable power for your monitor.

Image: Rear view of the Desview R7 monitor, highlighting the battery plate and port locations.

Image: The Desview R7 monitor attached via a cold shoe mount, illustrating its 180-degree vertical rotation capability.
4.2 Initial Setup
- Power On: Press and hold the power button located on the top side of the monitor for a few seconds until the Desview logo appears. The monitor will take a moment to boot up.
- Connect to Camera: Use the provided Micro HDMI or Mini HDMI cable to connect your camera's HDMI output to the monitor's HDMI input. The monitor supports 4K HDMI input/output without transmission delay.
- Power Source: Power the monitor using an NPF Sony battery inserted into the rear slot or via the DC power plug.
- Mounting: Attach the monitor to your camera rig using the hot shoe mount accessory or the 1/4-inch mounting threads. The cold shoe mount allows for 180-degree vertical rotation.
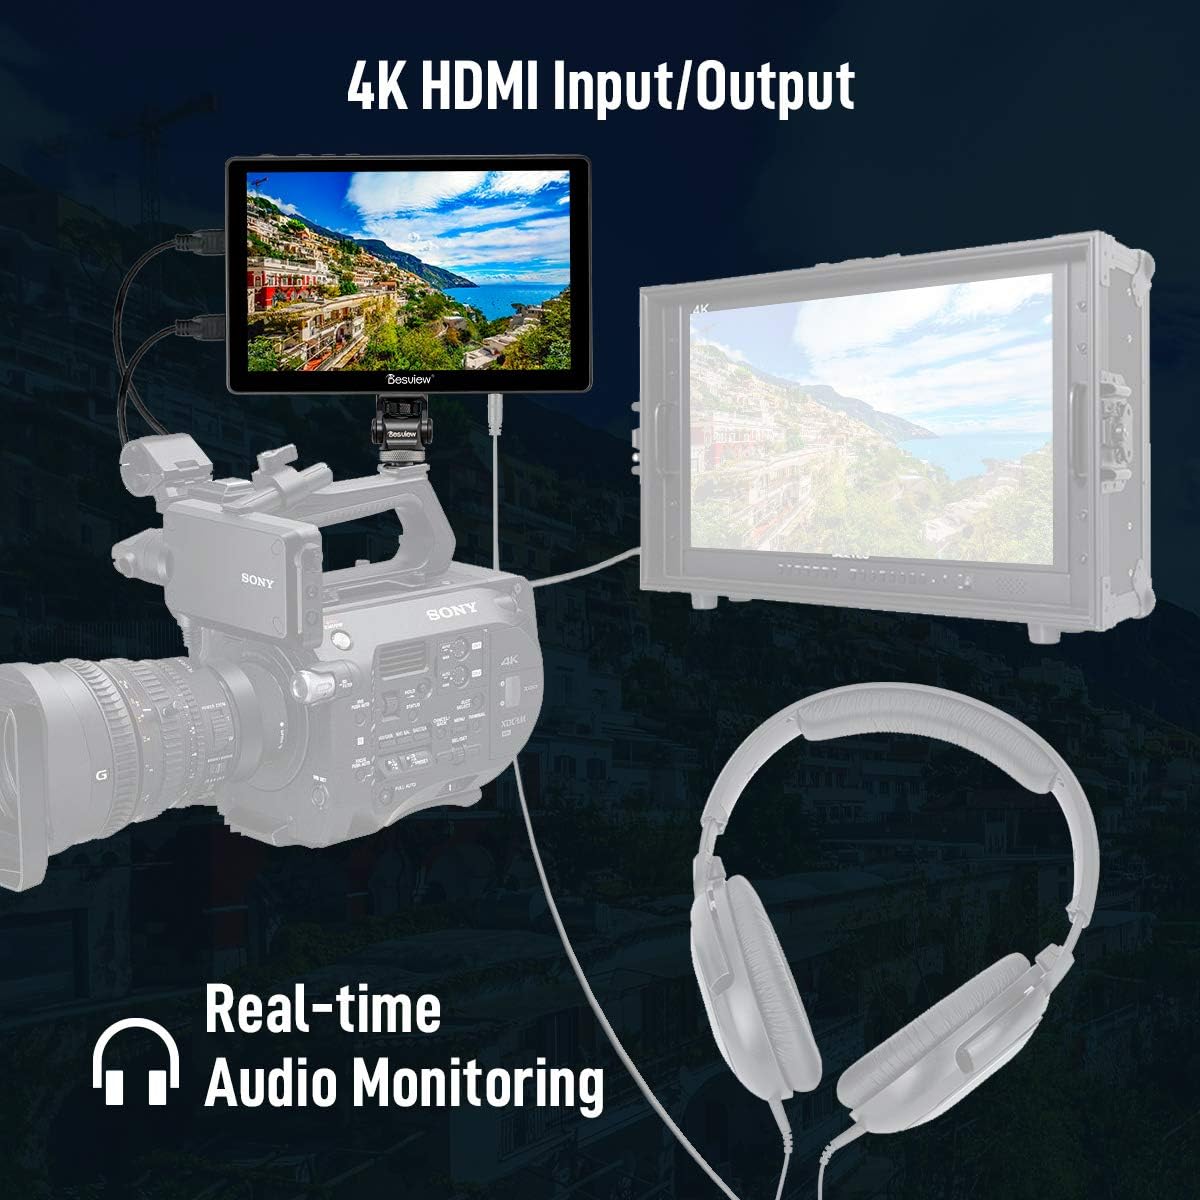
Image: Desview R7 monitor connected to a camera, demonstrating 4K HDMI input/output and real-time audio monitoring.
5. Operating Instructions
The Desview R7 features a 7-inch full touchscreen with a 178° wide viewing angle and 1000nit daylight viewable brightness, making it suitable for outdoor shooting. Navigation is intuitive via touch or the jog wheel.

Image: The Desview R7 monitor showcasing its full touch screen and wide viewing angle.
Image: Comparison of 1000nit daylight viewable brightness on the Desview R7 monitor.
5.1 Menu Navigation
The monitor's menu can be accessed and navigated using the touchscreen or the jog wheel on the top side. Tap the power button to toggle the touchscreen on/off.
5.2 Exposure Assist Features
- False Color: Displays different colors to represent exposure levels. Options include Spectrum and ARRI.
- Zebra: Highlights overexposed areas with zebra stripes. Adjustable from 75% to 100% IRE.
- Histogram: Visualizes the tonal distribution of your image. Can display Brightness or RGB histograms, with adjustable position and transparency.
- Waveform: Shows the luminance or RGB levels across the image. Adjustable position and transparency.
- Vectorscope: Displays color saturation and hue. Adjustable position and transparency.
- Log/HDR: (Feature may be grayed out depending on input signal).
5.3 Focus & Composition Features
- Single Color: Applies a single color overlay (Red, Green, Blue, Gray) to the entire image.
- Peaking: Highlights in-focus areas with a colored outline. Adjustable strength (Weak, Average, Strong) and color (Red, Green, Blue, White).
- Center Mark: Displays a crosshair in the center of the screen. Customizable colors (Red, Green, Blue, White, Black).
- Safe Area: Overlays a frame to indicate safe areas for broadcast or specific aspect ratios. Adjustable from 80% to 95% and customizable colors (Red, Green, Blue, White, Black).
- Mark Ratio: Displays various aspect ratio guides. Adjustable transparency and colors (Red, Green, Blue, White, Black). Ratios include 1:1, 4:3, 16:9, 1.85:1, 2.35:1, 2.4:1.
- Grid Lines: Overlays a grid for composition assistance. Options from 2x2 to 8x8.
- Audio Meters: Displays audio levels for left and right channels.

Image: The Desview R7 monitor's interface showing various professional software features for exposure and focus assist.
5.4 LUT Configuration
The monitor supports loading custom 3D-LUTs via the USB slot. The included USB drive contains pre-loaded LUTs. To load a LUT, navigate to the LUT Config menu, select 'Custom LUT USB', and double-tap on the desired LUT file. The monitor can store multiple LUTs.
5.5 Display Settings
- Aspect Ratio: Adjusts the display aspect ratio (e.g., Auto, 4:3, 16:10, 1.85:1, 2.35:1).
- Display Flip: Flips the image horizontally or vertically, useful for gimbal or inverted setups.
- Zooming: Magnifies the image from 1.4x up to 10x. This is for viewing magnification, not for focus assist.
- Pixel-to-Pixel: Displays the image at its native resolution without scaling.
- HV Delay: Adjusts horizontal and vertical delay.
- Still Frame: (Self-explanatory, for displaying a frozen frame).
- Battery Notification: Toggles the on-screen battery level display.
- Nine Grid: Displays a 3x3 grid overlay.
5.6 System Configuration
- Menu Config: Allows changing the menu language and duration settings.
- Color: Adjusts image parameters such as Brightness, Contrast, Sharpness, and Saturation.
- Color Temperature: Sets the color temperature of the display (e.g., 5600K, 6500K, 9300K, User-defined).
- Backlight: Controls the backlight intensity (Standard, High, Custom). The monitor features 1000nit brightness for outdoor visibility.
- Sound: Adjusts the volume or mutes the monitor's sound output.
- Hotkey: Customizes the functions assigned to the F1, F2, and Exit hot keys.
- Reset: Resets all monitor settings to factory defaults.
- Update: For updating the monitor's firmware via USB.
- Status: Displays current monitor settings and input information.
Video: A detailed walkthrough of the Desview R7 monitor's features and menu navigation, demonstrating various settings and functions.
6. Specifications
| Feature | Specification |
|---|---|
| Product Dimensions | 7.01 x 4.61 x 8.74 inches |
| Item Weight | 2.01 pounds |
| Item Model Number | R7 |
| Standing Screen Display Size | 7 Inches |
| Aspect Ratio | 16:10 |
| Voltage | 24 Volts |
| Resolution | 1920 x 1200 |
| Image Brightness | 1000nit |
| Screen Surface Description | Glossy |
| Manufacturer | Desview |
| Date First Available | June 17, 2019 |
7. Maintenance
To ensure the longevity and optimal performance of your Desview R7 monitor, follow these maintenance guidelines:
- Cleaning: Use the provided cleaning cloth or a soft, lint-free cloth to gently wipe the screen and body of the monitor. For stubborn smudges, slightly dampen the cloth with water or a screen-safe cleaning solution. Avoid harsh chemicals or abrasive materials.
- Storage: When not in use, store the monitor in its carrying bag to protect it from dust, scratches, and impacts. Store in a cool, dry place away from direct sunlight and extreme temperatures.
- Battery Care: If using an NPF battery, ensure it is charged regularly and stored properly when not in use. Remove the battery if the monitor will not be used for an extended period.
- Port Protection: Keep all ports (HDMI, USB, DC) free from dust and debris. Use port covers if available.
8. Troubleshooting
If you encounter any issues with your Desview R7 monitor, please refer to the following common troubleshooting steps:
- No Power: Ensure the battery is charged and correctly inserted, or that the DC power adapter is securely connected to a working power outlet.
- No Signal: Verify that the HDMI cable is securely connected to both the camera and the monitor. Check the camera's output settings to ensure it's sending a video signal. Try a different HDMI cable if possible.
- Touchscreen Unresponsive: Tap the power button once to toggle the touchscreen on/off. If the issue persists, power cycle the monitor.
- Image Issues (Color/Brightness): Navigate to the 'Color' and 'Color Temperature' settings in the System Configuration menu to adjust. Consider performing a 'Reset' to factory defaults if settings seem incorrect.
- Firmware Update Issues: Ensure the USB drive is correctly formatted and contains the correct firmware files. Follow the update instructions carefully.
If the problem persists after attempting these steps, please contact customer support.
9. Warranty and Support
The Desview R7 monitor comes with a manufacturer's warranty. Please refer to the warranty card included in your product packaging for specific terms and conditions. For technical support, service, or warranty claims, please contact Desview customer service through their official channels or the retailer where you purchased the product.
For further assistance, visit the Desview Store.


