1. Introduction
This instruction manual provides detailed guidance for the assembly, operation, and maintenance of your PERLESMITH Universal Swivel TV Stand Base (Model PSTVS13). This stand is designed to securely hold most 37-75 inch LCD, LED, and curved TVs, offering height adjustment and swivel functionality for optimal viewing. Please read this manual thoroughly before installation and use to ensure safe and correct operation.
2. Safety Information
WARNING: Failure to read and follow all instructions may result in personal injury or property damage. If you do not understand these instructions or have doubts about the safety of the installation, please contact PERLESMITH customer service.
- Do not exceed the maximum weight capacity of 99 lbs (45 kg).
- Ensure the TV size is within the recommended range of 37-75 inches.
- Verify VESA compatibility (200x100mm to 600x400mm) before installation.
- Use all provided hardware. Do not substitute parts.
- Install the stand on a stable, level surface that can support the combined weight of the stand and the television.
- Keep children and pets away during assembly. Small parts can be a choking hazard.
- Two people are recommended for safe assembly and TV mounting.
- Regularly check all connections and fasteners to ensure they remain secure.
3. Package Contents
Before beginning assembly, ensure all components are present and undamaged. If any parts are missing or defective, do not proceed with assembly. Contact PERLESMITH customer service for assistance.
- 1 x TV Stand Base
- 1 x Mounting Hardware Kit (includes various screws, washers, spacers, and tools)
- 1 x Instruction Manual

Figure 3.1: Included Labeled Hardware. The image displays various components of the TV stand, including the base, vertical support, TV brackets, and bags of labeled screws, washers, and tools, indicating a complete set for assembly.
4. Specifications
| Feature | Specification |
|---|---|
| Model Number | PSTVS13 |
| Compatible TV Sizes | 37 - 75 inches |
| Maximum Load Capacity | 99 lbs (45 kg) |
| VESA Compatibility (Min) | 200x100mm |
| VESA Compatibility (Max) | 600x400mm |
| Swivel Range | ±30° (60° total) |
| Height Adjustment | 9 positions, total 8 inches of movement |
| Base Material | Tempered Glass |
| Frame Material | High-quality Steel |
| Item Weight | 13.35 lbs (6.06 kg) |
| Dimensions (Base) | 16.54" (W) x 11.02" (D) |

Figure 4.1: Product Dimensions. This image illustrates the overall dimensions of the assembled TV stand, including the height of the central pillar and the width and depth of the tempered glass base.
5. Setup and Installation
Follow these steps carefully for proper assembly. It is recommended to have a second person assist with the TV mounting step.
5.1. Check TV Compatibility
Ensure your TV meets the size and VESA pattern requirements. This stand supports TVs from 37 to 75 inches and VESA patterns from 200x100mm to 600x400mm.

Figure 5.1.1: TV Compatibility Overview. This image visually confirms the wide range of TV sizes (37-75 inches) and VESA mounting patterns supported by the stand, along with its maximum weight capacity.

Figure 5.1.2: Compatible VESA Patterns. This diagram helps users identify the VESA mounting holes on their television, crucial for ensuring compatibility with the stand's brackets.
5.2. Assemble the Base and Pillar
- Carefully unbox all components and lay them out on a soft, clean surface to prevent scratches.
- Attach the main support pillar to the tempered glass base using the provided screws and tools. Ensure the pillar is securely fastened and aligned.
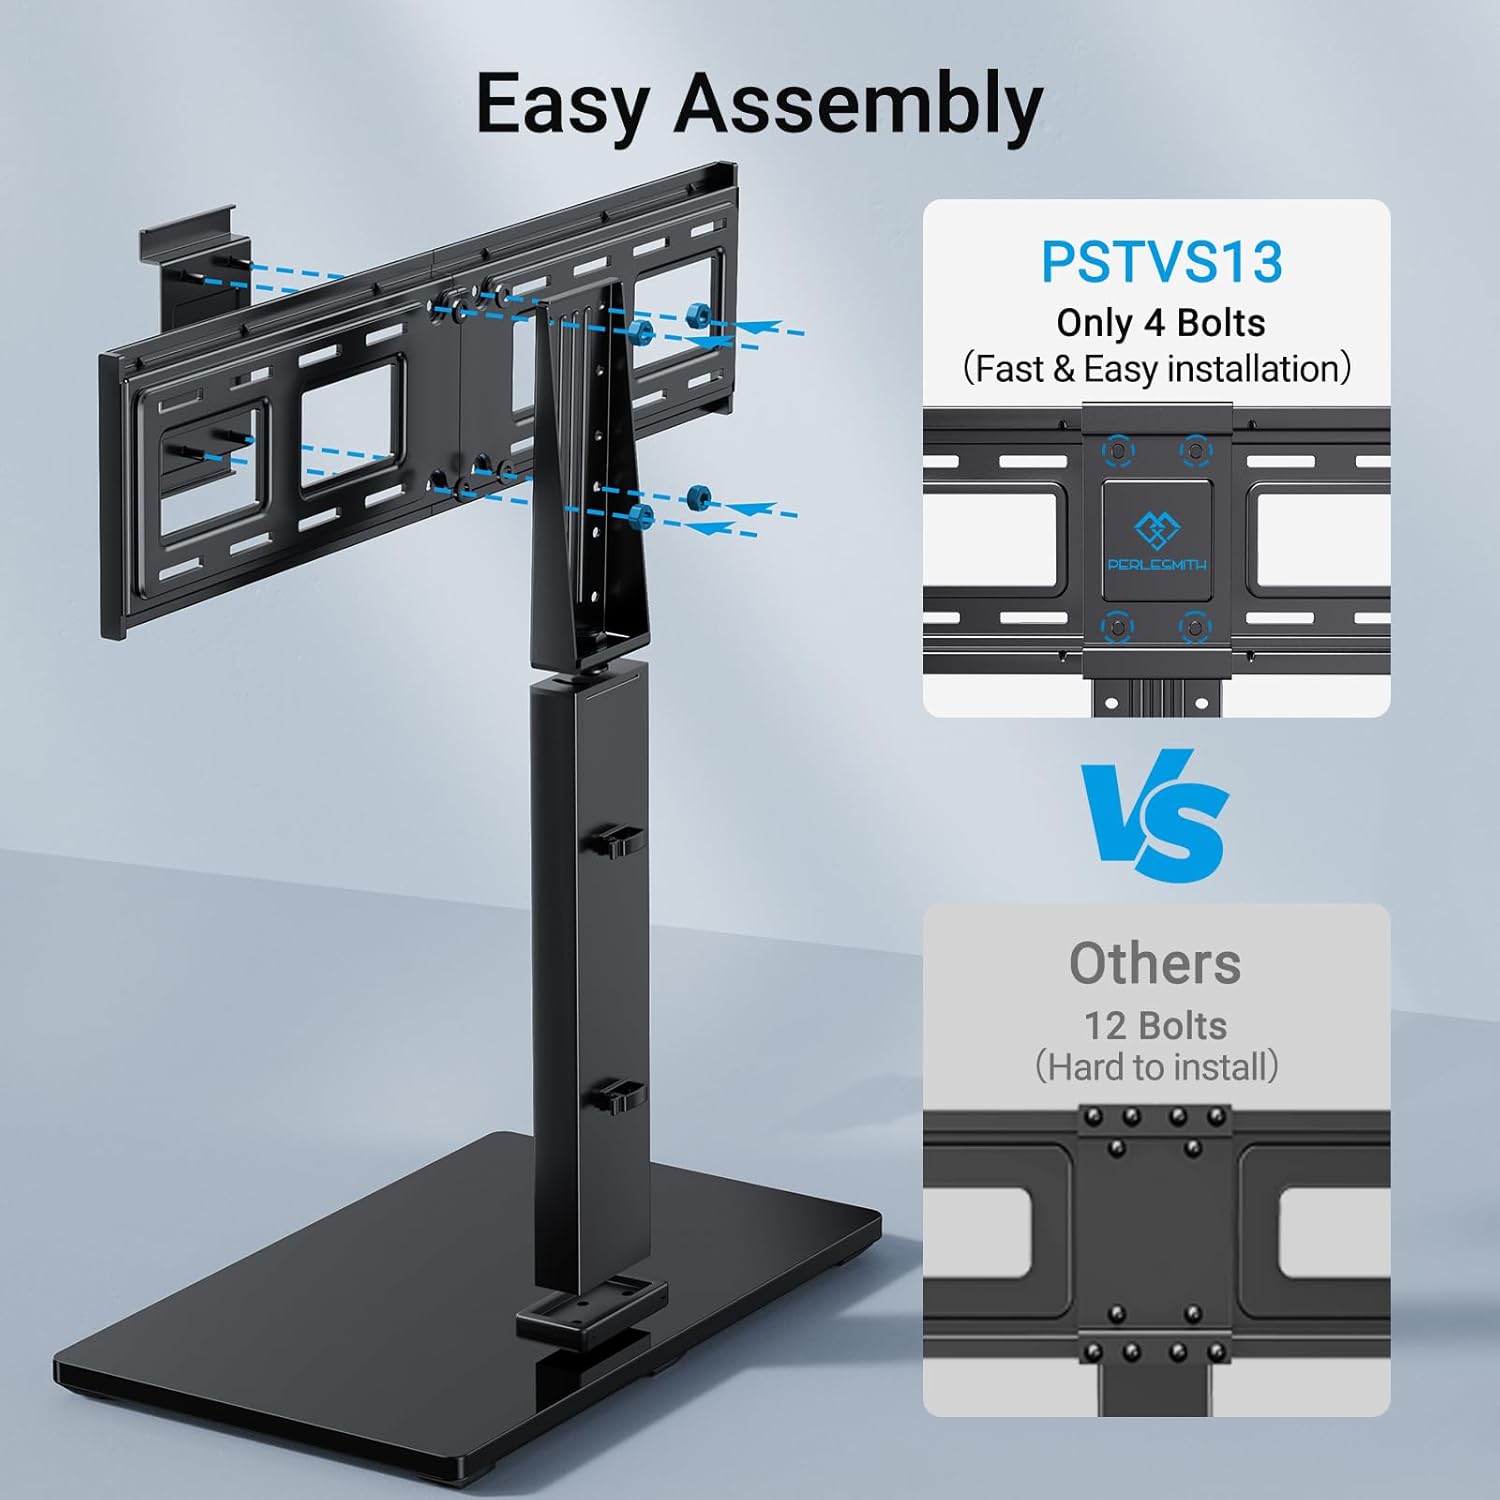
Figure 5.2.1: Easy Assembly Process. This image demonstrates the simplicity of assembling the PSTVS13 stand, emphasizing its minimal bolt requirement for quick setup.
5.3. Attach TV Brackets to Your TV
- Identify the correct screws, washers, and spacers for your TV's VESA mounting holes. Refer to your TV's manual if unsure.
- Attach the two vertical TV brackets to the back of your television. Ensure they are level and securely tightened. The brackets should be positioned to allow for desired height adjustment once mounted on the stand.
5.4. Mount TV onto the Stand
- With assistance, carefully lift the television and hook the attached TV brackets onto the main support pillar of the stand.
- Ensure the TV is securely seated on the stand. Engage the security locks on the TV brackets to prevent accidental dislodgement.

Figure 5.4.1: Security Locks and Cable Management. This image demonstrates the security locks that hold the TV firmly in place on the stand and the integrated cable management clips for organizing wires.
5.5. Verify Intended Location Fit
Before finalizing placement, ensure the stand with the TV fits your intended location, considering the base dimensions and overall height.

Figure 5.5.1: Stand Dimensions for Placement. This diagram provides critical measurements of the stand's base and height range, allowing users to confirm it will fit their desired furniture or space.
6. Operating Instructions
6.1. Swivel Function
The PERLESMITH TV stand features a convenient swivel function, allowing you to rotate your television up to 30 degrees to the right or left (60 degrees total). This enables optimal viewing from various positions in your room.
- To swivel, gently grasp the sides of your television and rotate it to the desired angle.
- Ensure no cables are snagged or pulled during rotation.

Figure 6.1.1: Swivel Functionality. This image demonstrates the stand's ability to swivel the TV ±30 degrees, providing flexible viewing angles for different seating arrangements.
6.2. Height Adjustment
The stand offers 9 different height adjustment positions, providing a total of 8 inches of vertical movement. This allows you to customize the TV height for comfortable viewing or to accommodate a soundbar underneath.
- To adjust the height, you will need to temporarily remove the TV from the stand.
- Adjust the position of the TV brackets on the main support pillar to one of the available height settings.
- Re-mount the TV and ensure security locks are engaged.
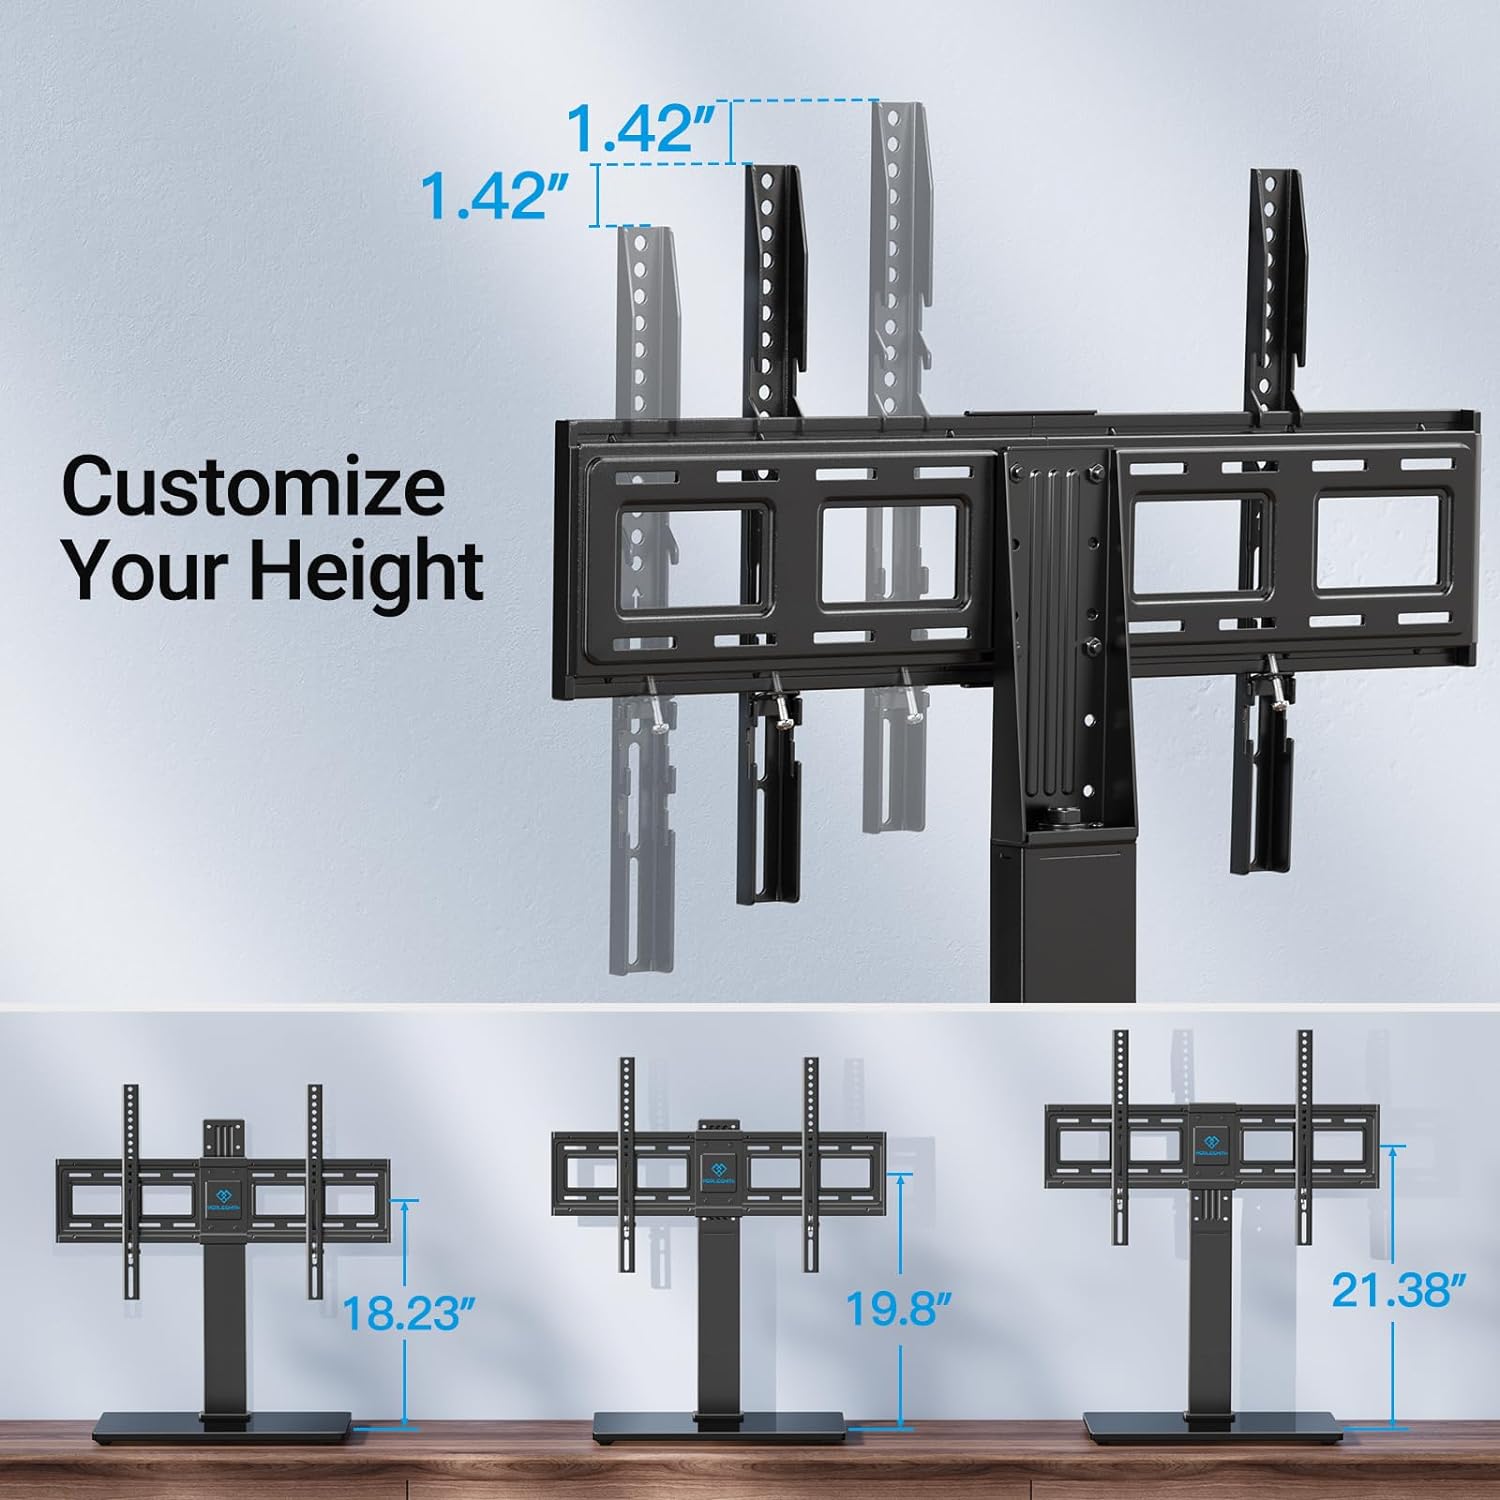
Figure 6.2.1: Height Adjustment Options. This diagram illustrates the multiple height settings available, allowing users to customize the TV's vertical position for optimal viewing or to fit other components like soundbars.
6.3. Cable Management
Utilize the integrated cable management clips on the central pillar to organize and conceal your TV and device cables, maintaining a tidy appearance.

Figure 6.3.1: Integrated Cable Management. This image highlights the built-in clips on the stand's central column, designed to keep TV and accessory cables organized and out of sight.
7. Maintenance
- Cleaning: Use a soft, dry cloth to wipe down the stand. For the tempered glass base, a glass cleaner can be used. Avoid abrasive cleaners or solvents that may damage the finish.
- Inspection: Periodically check all screws and connections to ensure they remain tight and secure. Re-tighten if necessary.
- Non-Slip Pads: The base includes non-slip pads to protect your furniture and prevent sliding. Ensure these pads are intact and clean for optimal performance.

Figure 7.1: Non-Slip Pads. This image illustrates the non-slip pads located on the underside of the stand's base, designed to protect surfaces and provide stability.
8. Troubleshooting
If you encounter issues with your PERLESMITH TV stand, refer to the common problems and solutions below. If the problem persists, contact customer support.
| Problem | Possible Cause | Solution |
|---|---|---|
| TV does not fit the stand. | Incorrect TV size or VESA pattern. | Verify your TV's size (37-75 inches) and VESA pattern (200x100mm to 600x400mm) against the stand's specifications. |
| Stand feels unstable or wobbly. | Screws are loose; stand is on an uneven surface; TV weight exceeds capacity. | Ensure all assembly screws are tightened. Place the stand on a flat, level surface. Confirm TV weight is within 99 lbs. |
| Difficulty during assembly. | Instructions unclear; parts misidentified. | Review the instruction manual carefully, paying attention to diagrams. Ensure all parts are correctly identified using the labeled hardware. Consider having a second person assist. |
| TV is tilted after mounting. | TV brackets not level or screws unevenly tightened. | Ensure the TV brackets are perfectly level when attached to the TV. Re-check and evenly tighten all screws securing the brackets. |
9. Warranty and Support
PERLESMITH products are manufactured with quality and durability in mind. While specific warranty details may vary by region or retailer, PERLESMITH generally offers support for product defects and manufacturing issues. Please retain your proof of purchase.
For technical assistance, missing parts, or warranty inquiries, please contact PERLESMITH customer service through their official website or the retailer where the product was purchased. Provide your model number (PSTVS13) and a detailed description of the issue for faster service.


