1. Introduction
This instruction manual provides comprehensive guidance for the installation, maintenance, and troubleshooting of your PartsBroz Dryer Drum Roller Kit. This kit is designed to replace worn or damaged dryer drum rollers in compatible LG, Kenmore, and General Electric dryer models, restoring quiet operation and proper drum rotation.

Image 1.1: PartsBroz Dryer Drum Roller Kit (4-Pack)
2. Product Overview
The PartsBroz Dryer Drum Roller Kit includes four high-quality replacement rollers essential for the smooth operation of your dryer drum. Each roller is constructed with a durable plastic body, a robust metal shaft/axle, and tri-ring retainers for secure fitting.
- Kit Contents: 4 x Dryer Drum Rollers, 4 x Nuts, 4 x Washers.
- Roller Dimensions: Approximately 3.1 inches in width and 2.4 inches in height.
- Key Features: Durable, Easy to Install, High-Quality Material.

Image 2.1: Roller Dimensions (3.1 in x 2.4 in)

Image 2.2: Kit Components

Image 2.3: Durability and Function
3. Compatibility
This PartsBroz Dryer Drum Roller Kit is compatible with numerous dryer models from LG, Kenmore, and General Electric. It replaces the following part numbers:
- AGM75510755
- 4581EL2002L
- 4581EL2002C
- AP7220429
- PS17269866
- 4581EL2002H
- 4581EL2002A
- 4581EL2002D
- 4581EL2002E
- 4581EL3001A
- 4581EL3001C
- 4581EL3001F
For a detailed list of compatible dryer models, please refer to the compatibility checklist below or consult your dryer's original manual.
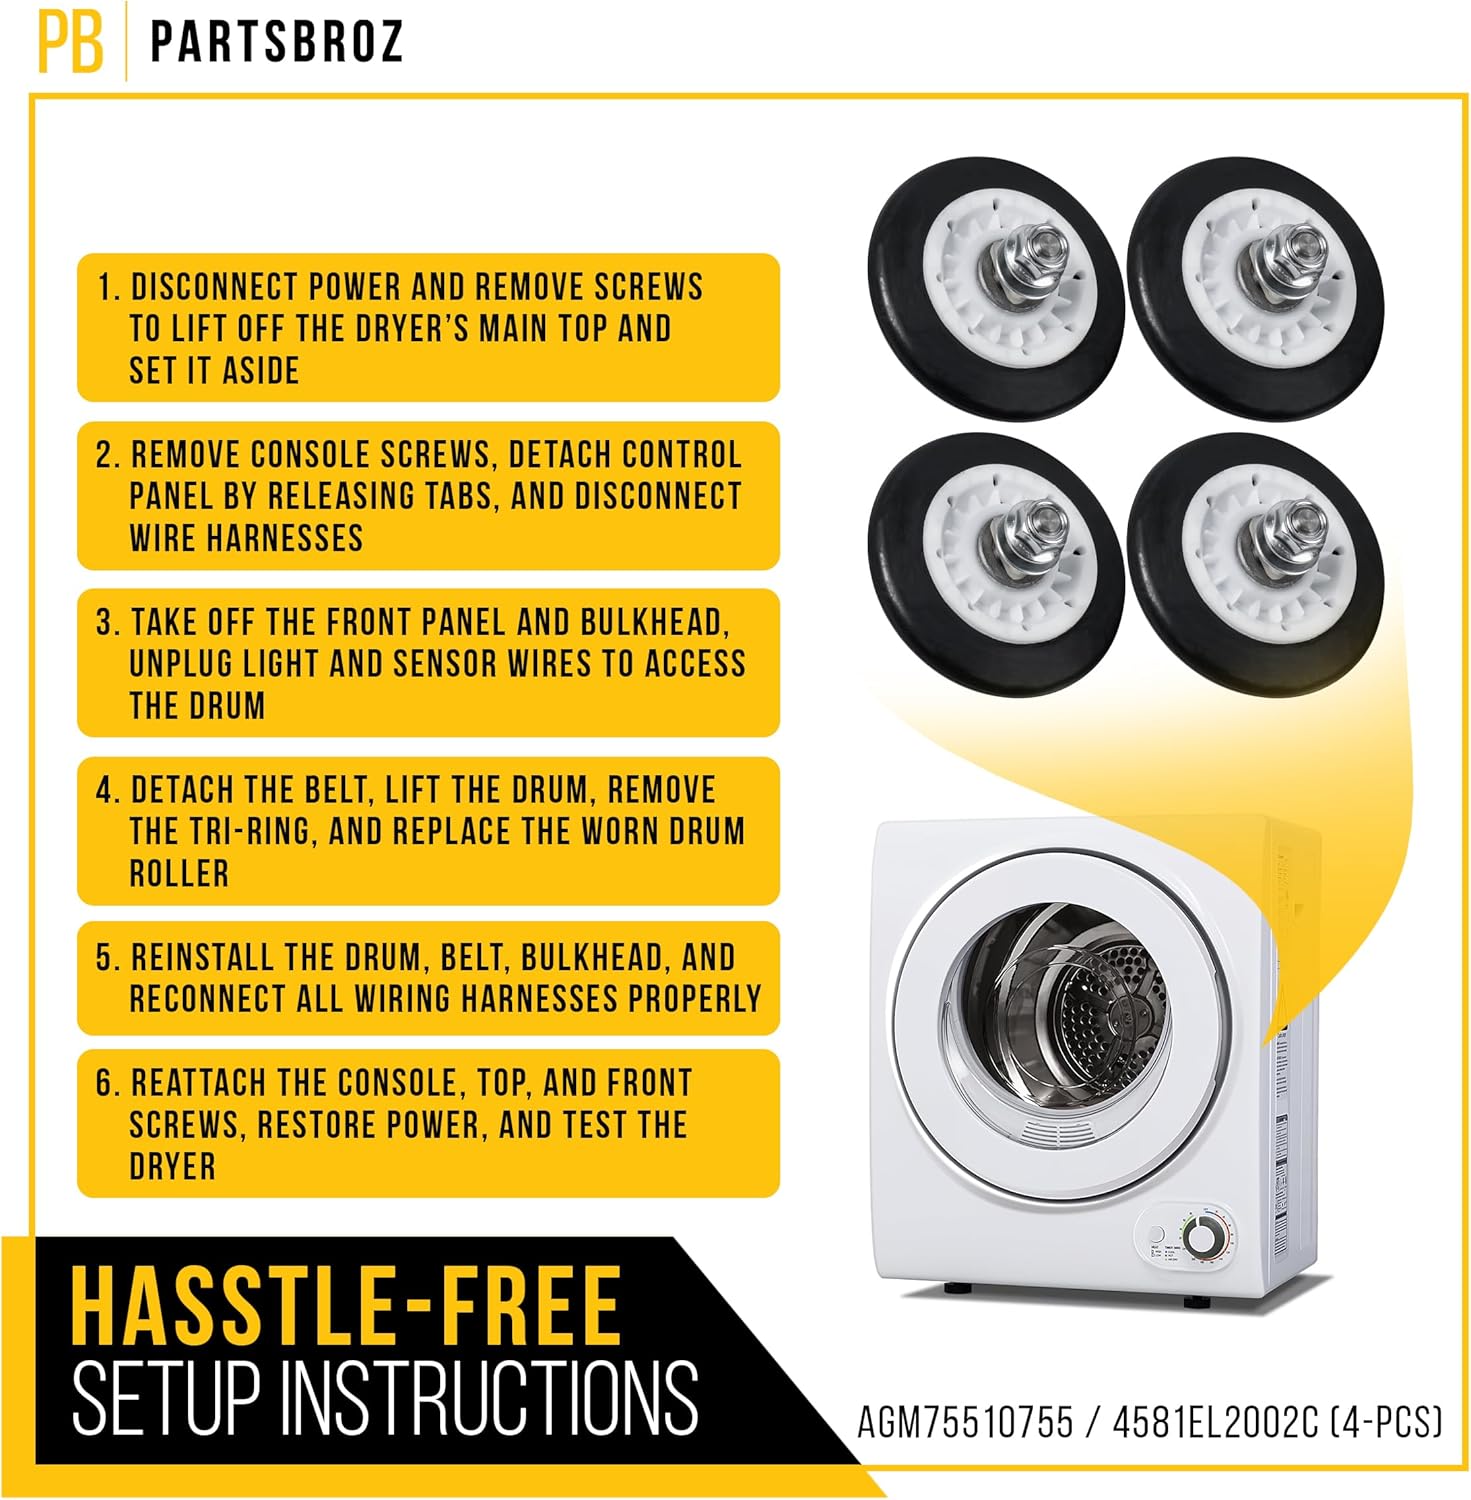
Image 3.1: Replaced Part Numbers and Compatible Brands

Image 3.2: Detailed Compatibility Checklist
4. Safety Information
Before attempting any repair or installation, please observe the following safety precautions:
- Disconnect Power: Always unplug the dryer from the electrical outlet or turn off the circuit breaker before beginning any work.
- Wear Protective Gear: Use appropriate personal protective equipment, including gloves and eye protection, to prevent injury.
- Follow Manufacturer Guidelines: Refer to your specific dryer model's service manual for detailed disassembly and reassembly instructions.
- Professional Assistance: If you are unsure about any step or uncomfortable performing the repair, consult a qualified appliance technician.
- Sharp Edges: Be aware of sharp edges and components inside the dryer.
5. Installation Instructions
Replacing dryer drum rollers typically involves disassembling parts of the dryer. The following steps provide a general overview. Always refer to your specific dryer model's service manual or a reliable repair guide for detailed instructions.

Image 5.1: General Setup Instructions for Dryer Drum Roller Replacement
- Disconnect Power: Unplug the dryer and move it away from the wall.
- Access Top Panel: Remove screws securing the dryer's main top and lift it off. Set it aside carefully.
- Remove Control Panel: Detach the control panel by removing its screws, releasing tabs, and disconnecting any wire harnesses.
- Access Drum: Remove the front panel and bulkhead. Unplug any light and sensor wires to gain access to the dryer drum.
- Replace Rollers: Detach the drive belt, lift the drum, remove the old tri-rings, and replace the worn drum rollers with the new PartsBroz rollers. Ensure all washers and nuts are correctly installed and tightened.
- Reassembly: Reinstall the drum, belt, bulkhead, and reconnect all wiring harnesses. Reattach the control panel, top panel, and front screws.
- Test: Restore power to the dryer and perform a test cycle to ensure proper function and quiet operation.
Installation Video Guide
Video 5.2: Official PartsBroz guide for replacing 4581EL2002H / 4581EL2002C Dryer Drum Roller Assembly.
6. Operating Instructions
Once the PartsBroz Dryer Drum Roller Kit is correctly installed, the rollers will facilitate the smooth and quiet rotation of your dryer drum. Continue to operate your dryer according to its original manufacturer's instructions for drying cycles, settings, and load capacities.
7. Maintenance
To ensure the longevity and optimal performance of your new dryer drum rollers, consider the following maintenance tips:
- Regular Cleaning: Periodically clean any lint or debris that may accumulate around the rollers and their shafts. Lint buildup can impede smooth rotation.
- Inspect for Wear: Every few years, or if unusual noises return, inspect the rollers for signs of wear, flat spots, or damage.
- Proper Loading: Avoid consistently overloading your dryer, as this can put excessive strain on the drum rollers and other components.
- Ventilation: Ensure your dryer's exhaust vent is clean and unobstructed. Poor ventilation can lead to overheating, which may prematurely wear out internal components, including rollers.
8. Troubleshooting
If you experience issues after installing the new drum rollers, refer to the table below for common symptoms and solutions:
| Symptom | Possible Cause | Solution |
|---|---|---|
| Loud banging, thumping, or squeaking noise during operation. | Worn, seized, or damaged drum rollers. | Inspect all four rollers. Replace any that show signs of wear, flat spots, or damage. Ensure proper lubrication if applicable (check dryer manual). |
| Dryer drum not tumbling smoothly or getting stuck. | One or more rollers are broken or seized. | Disassemble and check all rollers. Replace the entire set if multiple rollers are affected to ensure even wear. |
| Excessive vibration. | Uneven wear on rollers or improper installation. | Ensure all rollers are installed correctly and are in good condition. Consider replacing all four rollers for balanced support. |
If the issue persists after troubleshooting, it may indicate a problem with other dryer components or require professional service.
9. Specifications
| Feature | Detail |
|---|---|
| Brand Name | PartsBroz |
| Model Info | Rollers Kit |
| Part Number | AGM75510755 |
| Item Weight (Package) | 1.43 pounds |
| Product Dimensions (Package) | 5 x 4 x 5 inches |
| Roller Dimensions (Approx.) | 3.1 inches (width) x 2.4 inches (height) |
| Special Features | Durable, Easy to Install, High-Quality Material |
| Material Type | Other (Rubber, Plastic, Metal) |
| Included Components | AGM75510755 Rollers Kit (4-Pack) |
10. Warranty and Support
PartsBroz stands behind the quality of its products. This Dryer Drum Roller Kit comes with a Limited 1 Year Warranty.

Image 10.1: PartsBroz Warranty Information
PartsBroz also offers a money-back guarantee for most parts, ensuring customer satisfaction. For any questions, concerns, or to claim warranty service, please refer to the PartsBroz official website or contact their customer support directly.
Money-Back Guarantee Information
Video 10.2: PartsBroz Money-Back Guarantee for Most Parts.