1. Important Safety Information
This product is intended for children aged 3 years and above. Adult supervision is required during assembly and play to ensure safe operation and prevent misuse.
- Keep small parts away from children under 3 years during assembly to avoid choking hazards.
- Ensure all components are securely assembled before use.
- Do not use the product near open flames or heat sources.
- Only use clean water in the boiling effect pot and sink tap.
2. Package Contents
The Smoby Studio Bubble Kitchen package includes the main kitchen unit and 26 accessories. Please verify all components are present before beginning assembly.
- Main kitchen structure (various plastic parts)
- 1 Pot with lid
- 1 Pan
- Plates, cutlery, and glasses
- Play food items (e.g., fish, meat, pasta)
- Salt and pepper shakers
- Other assorted kitchen utensils

Image: The product box for the Smoby Studio Bubble Kitchen, illustrating the main unit and included accessories.
3. Setup and Assembly
Assembly of the Smoby Studio Bubble Kitchen is required. Please follow the detailed instructions provided in the separate assembly guide included in the package. Assembly typically takes approximately 1 to 2 hours.
3.1 Battery Installation
The kitchen requires 3 x 1.5V-LR03 (AAA) batteries for the electronic features (boiling water effect). Batteries are not included.
- Locate the battery compartment, typically on the underside of the hob unit.
- Using a screwdriver, open the battery compartment cover.
- Insert 3 new 1.5V-LR03 (AAA) batteries, ensuring correct polarity (+/-).
- Replace the battery compartment cover and secure it with the screw.
3.2 Accessory Preparation
Some accessories, such as cutlery and play food, may need to be detached from their plastic frames or have stickers applied. Carefully cut or snap off parts and apply stickers as indicated in the assembly guide.

Image: The Smoby Studio Bubble Kitchen fully assembled, showcasing its various features and accessories.
4. Operating Instructions
The Smoby Studio Bubble Kitchen offers various interactive features for an engaging play experience.
4.1 Magical Boiling Water Effect
- Fill the designated pot with a small amount of clean water.
- Place the pot onto the electronic hob.
- Press the button located on the hob. The water will appear to boil with a bubbling effect (note: the water remains cold).

Image: A child interacting with the hob, demonstrating the placement of the pot for the boiling water effect.
4.2 Working Tap and Sink
- Ensure the sink basin contains clean water.
- Press the button on the tap multiple times. This action activates a pump mechanism that draws water from the sink and dispenses it from the tap.
- It may require several presses to prime the pump and start the water flow.

Image: A child operating the tap, illustrating the water pumping function in the sink area.
4.3 Oven, Refrigerator, and Dishwasher
- The kitchen includes an oven, refrigerator, and dishwasher with opening doors for imaginative play.
- Use these compartments to store play food and accessories.
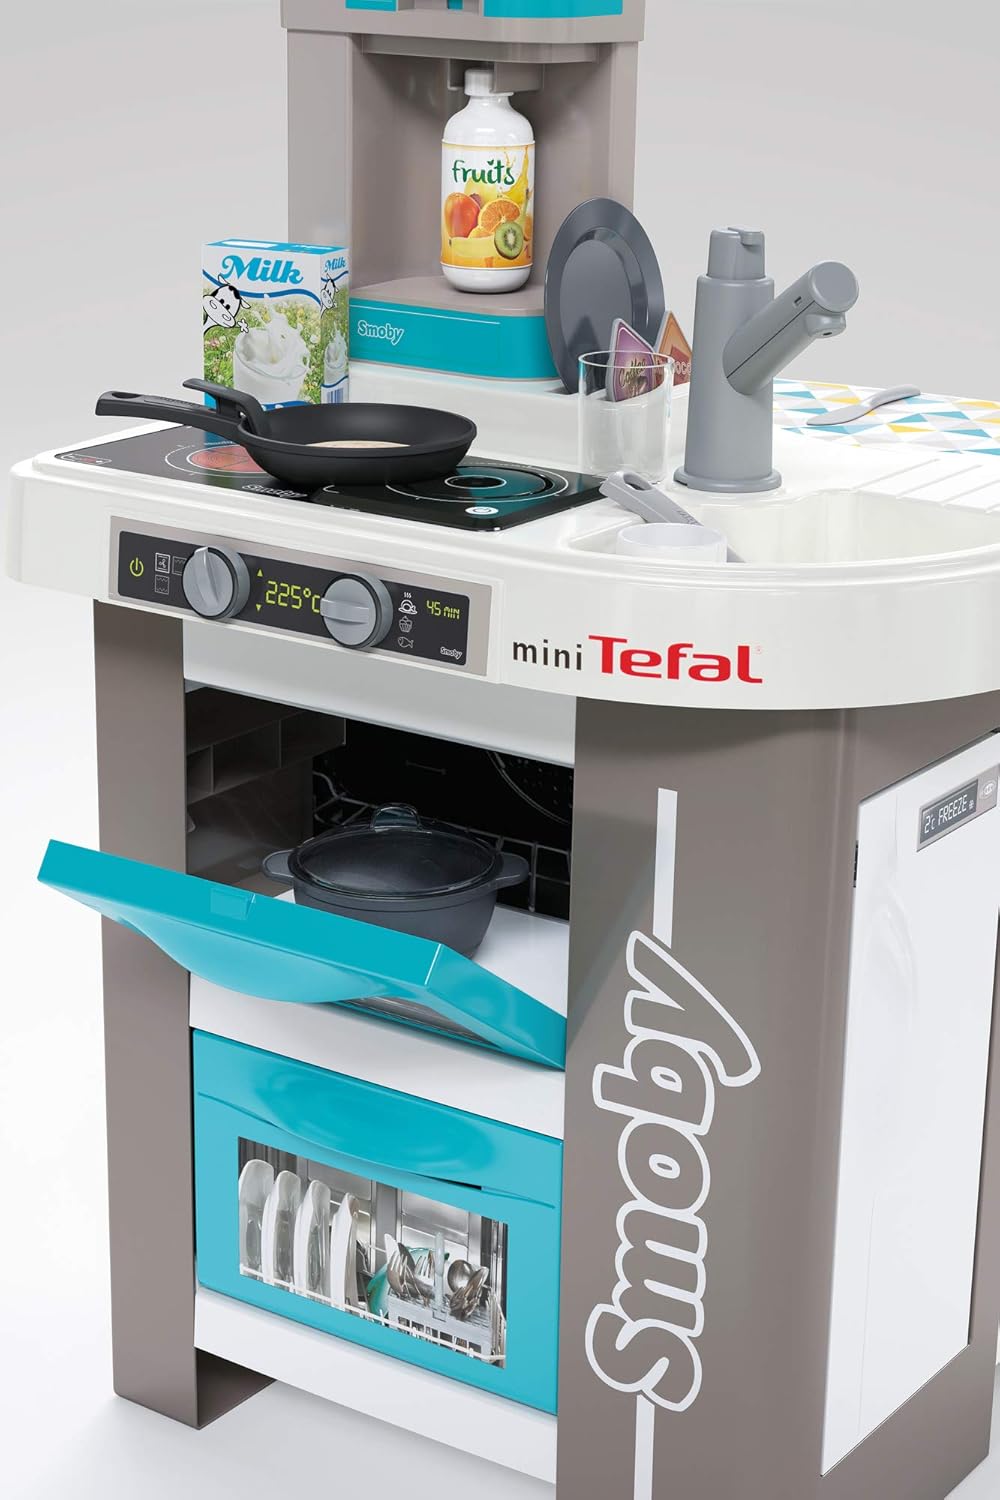
Image: A detailed view of the oven and dishwasher sections of the kitchen, showing their design and functionality.

Image: A close-up of the refrigerator and side storage shelves, designed for holding play food and accessories.
5. Maintenance and Care
To ensure the longevity of your Smoby Studio Bubble Kitchen, follow these maintenance guidelines:
- Cleaning: Wipe all plastic surfaces with a damp cloth and mild soap. Avoid abrasive cleaners or solvents. Ensure all electronic components are dry before use.
- Battery Replacement: Replace batteries when the boiling water effect weakens or stops functioning. Always use new, good quality 1.5V-LR03 (AAA) batteries. Remove batteries if the toy will not be used for an extended period.
- Storage: Store the kitchen in a clean, dry place away from direct sunlight and extreme temperatures.
6. Troubleshooting
| Problem | Possible Cause | Solution |
|---|---|---|
| Boiling water effect not working. | Batteries are low or incorrectly installed. No water in the pot. | Check battery polarity and replace with new batteries. Ensure a small amount of water is in the pot. |
| Tap is not dispensing water. | No water in the sink. Pump needs priming. | Fill the sink with water. Press the tap button repeatedly to prime the pump until water flows. |
| Parts feel loose after assembly. | Components not fully clicked into place. | Refer to the assembly guide and ensure all parts are securely fastened. |
7. Product Specifications
- Model Number: 311043
- Product Dimensions: 99 x 48 x 50.5 cm (Length x Width x Height)
- Weight: 998 grams
- Recommended Age: 3 months - 8 years (Manufacturer's recommendation, but 3+ years for full interactive play)
- Materials: Plastic
- Batteries Required: Yes, 3 x 1.5V-LR03 (AAA) (not included)
- Assembly Required: Yes
- Number of Pieces: 1 (main unit) + 26 accessories
- Color: Grey/Azure
- Worktop Height: 50.5 cm

Image: A diagram illustrating the key dimensions of the Smoby Studio Bubble Kitchen, including height, width, and depth.
8. Warranty and Support
Warranty Information: For details regarding the product warranty, please refer to the information provided on the product packaging or visit the official Smoby website. Warranty terms may vary by region.
Customer Support: If you encounter any issues or have questions not covered in this manual, please contact Smoby customer service. Contact information can typically be found on the product packaging or the official Smoby website.
Online Resources: Additional support and product information may be available on the Smoby official website.


