1. Introduction
Thank you for choosing the Dimplex Sierra 60-inch Electric Linear Fireplace. This versatile electric fireplace heater is designed to enhance your living space with its modern aesthetic and functional heating capabilities. This manual provides essential information for safe installation, operation, and maintenance of your new fireplace.

Figure 1.1: Front view of the Dimplex Sierra 60-inch Electric Fireplace Heater with realistic flames.
2. Important Safety Information
Please read all instructions carefully before installation and operation. Failure to follow these instructions may result in electric shock, fire, or personal injury.
- Always disconnect power before cleaning or performing any maintenance.
- Do not operate the fireplace with a damaged cord or plug.
- Keep combustible materials at least 3 feet (0.9 m) from the front of the fireplace.
- The glass panel remains cool to the touch, making it safe for households with children and pets. However, the heater outlet can become hot.
- Ensure the fireplace is plugged into a standard 120V, 15 Amp dedicated circuit.
- Do not block the air vents.
3. Package Contents
Verify that all components are present before beginning installation:
- 1 x Dimplex Sierra 60-Inch Electric Fireplace Unit
- 1 x Multi-function Remote Control
- 3 x Ember Bed Options (Realistic Logs, Vibrant Crystals, Versatile Pebbles)
- 1 x Table Stand (for tabletop installation)
- Mounting Hardware (screws, drywall anchors)
- User Manual
4. Installation
The Dimplex Sierra fireplace offers flexible installation options: wall-mounted, recessed, or tabletop.
4.1 Dimensions and Planning
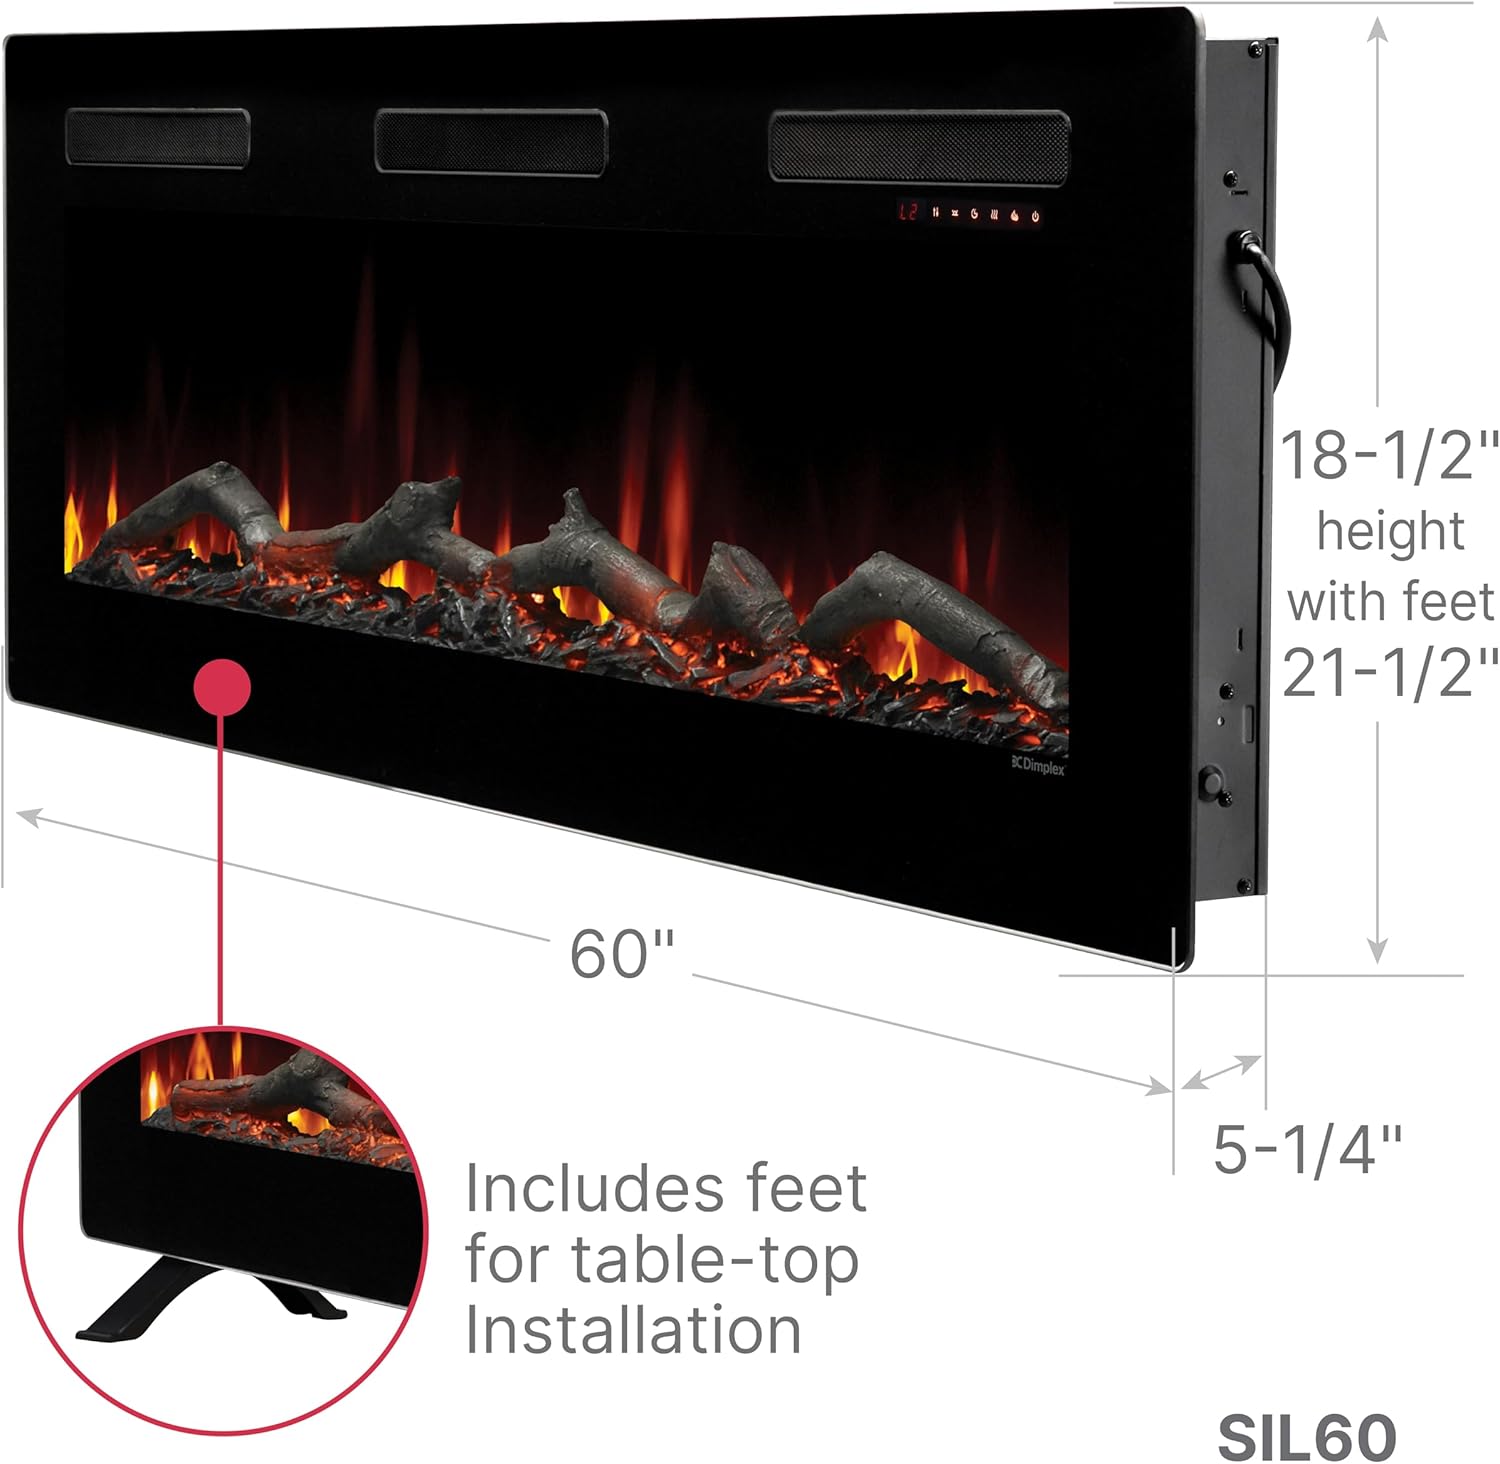
Figure 4.1: Product dimensions for installation planning. The unit measures 60"W x 19.5"H x 5.2"D (with feet, 21.5"H).
4.2 Installation Options

Figure 4.2: The fireplace can be used as a tabletop unit, fully recessed into a wall, or wall-mounted.
4.2.1 Wall-Mounted Installation
- Select a suitable location on a wall, ensuring it is near a standard 120V outlet.
- Remove the mounting bracket from the back of the fireplace unit.
- Mark the desired height and center point on the wall. Use a level to ensure the bracket is straight.
- Secure the mounting bracket to the wall using the provided screws and drywall anchors (if not mounting into a stud).
- Carefully lift the fireplace unit and hook it onto the installed mounting bracket. Ensure it is securely seated.
- Secure the unit to the bottom of the mounting bracket with the provided screws to prevent accidental lifting.
4.2.2 Recessed Installation
- Construct a framed opening in the wall according to the fireplace dimensions (60"W x 19.5"H x 5.2"D). Ensure adequate clearance for ventilation.
- Run electrical wiring to the opening, ensuring it meets local electrical codes.
- Carefully slide the fireplace unit into the framed opening.
- Secure the unit to the framing using appropriate screws.
4.2.3 Tabletop Installation
- Attach the provided table stand feet to the bottom of the fireplace unit using the designated screws.
- Place the unit on a stable, flat surface.
- Ensure proper clearance around the unit for ventilation.
5. Setup
5.1 Media Bed Options
Your Dimplex Sierra fireplace includes three interchangeable media bed options to customize your ambiance.

Figure 5.1: Choose from vibrant crystals, realistic logs, or versatile pebbles for your ember bed.
- Carefully remove the front glass panel by unscrewing the retaining screws.
- Place your desired media (crystals, logs, or pebbles) into the ember bed tray.
- Replace the front glass panel and secure it with the retaining screws.
6. Operating Instructions
Your fireplace can be operated using the multi-function remote control or the hidden touch controls on the unit.
6.1 Remote Control Functions

Figure 6.1: Multi-function remote control for convenient operation.
- Power ON/OFF: Turns the fireplace on or off.
- Flame Control: Adjusts flame color and intensity.
- Heat ON/OFF: Activates or deactivates the heating function (1400W heater, warms up to 1,000 sq. ft.).
- Timer: Sets an automatic shut-off timer.
- Ember Bed: Changes the color of the ember bed.
- Level Selection: Adjusts various settings like brightness or heat level.
6.2 Touch Controls
Hidden touch controls are located on the unit's front panel, mirroring the remote control functions.
6.3 Heat Settings
The fireplace features a 1400-watt heater capable of warming rooms up to 1,000 square feet. The heat function can be operated independently of the flame effects, allowing for year-round ambiance.
6.4 Flame and Ember Bed Customization
Personalize your fireplace experience by adjusting flame and ember bed colors. Multiple color options are available to match your mood or decor.

Vibrant Crystals

Realistic Logs

Versatile Pebbles
7. Maintenance
Regular maintenance ensures optimal performance and longevity of your fireplace.
- Cleaning: Wipe the exterior surfaces with a soft, damp cloth. Do not use abrasive cleaners or solvents.
- Glass Cleaning: For the glass panel, use a glass cleaner and a soft cloth.
- Ventilation: Ensure the air intake and outlet vents are free from dust and obstructions. Periodically vacuum the vents.
- Light Bulbs: The LED flame effect system is designed for long life and typically does not require replacement.
8. Troubleshooting
If you experience issues with your fireplace, refer to the following common problems and solutions:
| Problem | Possible Cause | Solution |
|---|---|---|
| Fireplace does not turn on. | No power to the unit. | Check if the power cord is securely plugged into a working outlet. Check the circuit breaker. |
| No flame effect. | Flame motor or LED lights malfunction. | Ensure the flame effect button is pressed. If issue persists, contact customer support. |
| No heat output. | Heater is off or thermostat setting is too low. | Press the heat button on the remote/control panel. Increase the thermostat setting. Ensure vents are not blocked. |
| Remote control not working. | Dead batteries or obstruction. | Replace batteries (2 AAA batteries required). Ensure no obstructions between remote and unit. |
9. Specifications
| Feature | Detail |
|---|---|
| Brand | DIMPLEX |
| Model Name | Sierra 60" Linear (SIL60) |
| Power Source | Electric |
| Product Dimensions (D x W x H) | 5.2" x 60" x 19.5" (21.5"H with feet) |
| Material | Glass, Metal |
| Heat Output | 4777 British Thermal Units |
| Power Consumption | 1400 Watts |
| Heating Coverage | Up to 1,000 sq. ft. |
| Installation Type | Built-In, Wall Mount, Tabletop |
| Included Components | Remote Control, 3 Ember Bed Options |
| Item Weight | 63 Pounds |
| UPC | 781052132757 |
10. Official Product Video
Watch this official video from Glen Dimplex Americas Company for an overview of the Sierra Series Heater.
Video 10.1: Sierra Series Heater Overview by Glen Dimplex Americas Company.
11. Warranty and Support
The Dimplex Sierra Electric Fireplace Heater comes with a 90-day limited warranty. For warranty claims, technical support, or replacement parts, please contact Dimplex customer service. Keep your purchase receipt as proof of purchase.
For further assistance, please visit the official Dimplex website or contact their customer support line.