1. Introduction
The Godox X2T-C E-TTL II Wireless Flash Trigger is a versatile device designed to control Godox flashes equipped with the integrated Godox X wireless system. This trigger is compatible with Canon DSLR cameras, providing stable, reliable, and efficient signal transmission for various photographic lighting setups. It features an improved user interface and dedicated controls for ease of use.
2. Product Overview
Key Features
- User-friendly design with a clear LCD screen.
- Dedicated group setting buttons (A, B, C, D, E) and three function buttons for quick adjustments.
- Bluetooth support for smartphone or tablet control via the 'GodoxPhoto' app (iOS/Android).
- Control flash mode, power output, modeling light, and Godox flash beep via the mobile application.
- 5 groups, 32 channels, and 99 wireless ID settings to minimize interference.
- Full support for TTL auto flash, 1/8000s High-Speed Sync (HSS), multi-flash mode, manual mode, and flash exposure compensation.
- Quick lock hot-shoe for secure mounting.
- Precise power output setting from 1/256 to 1/1 in 0.1 stop increments.
- Backlit group and function buttons for operation in low-light environments.
- Type-C USB port for firmware updates and a 3.5mm sync cord jack.
- AF Assist Lamp switch and power switch located on opposite sides for convenience.
Components Included
- 1 x Godox X2T-C TTL Wireless Flash Trigger
- 1 x User Manual
3. Setup
3.1 Battery Installation
The X2T-C trigger is powered by two AA batteries. To install, slide open the battery compartment cover located on the bottom of the unit. Insert two AA batteries, ensuring correct polarity (+/-), then close the cover securely.

Figure 3.1: Battery installation in the Godox X2T-C.
3.2 Mounting on Camera
Slide the X2T-C trigger onto your Canon camera's hot shoe. Secure it in place using the quick lock hot-shoe mechanism. Ensure it is firmly attached to prevent accidental dislodgement during use.

Figure 3.2: Godox X2T-C mounted on a Canon camera.
3.3 Power On/Off
Locate the power switch on the side of the trigger. Slide it to the 'ON' position to power on the device. The LCD screen will illuminate. To power off, slide the switch to the 'OFF' position.

Figure 3.3: Power switch location.
3.4 Initial Settings
Upon powering on, the LCD screen will display current settings. Use the dedicated group buttons (A-E) and the dial to select and adjust channels (CH) and wireless IDs (ID) to match your Godox flashes. This ensures proper communication and minimizes interference from other systems.
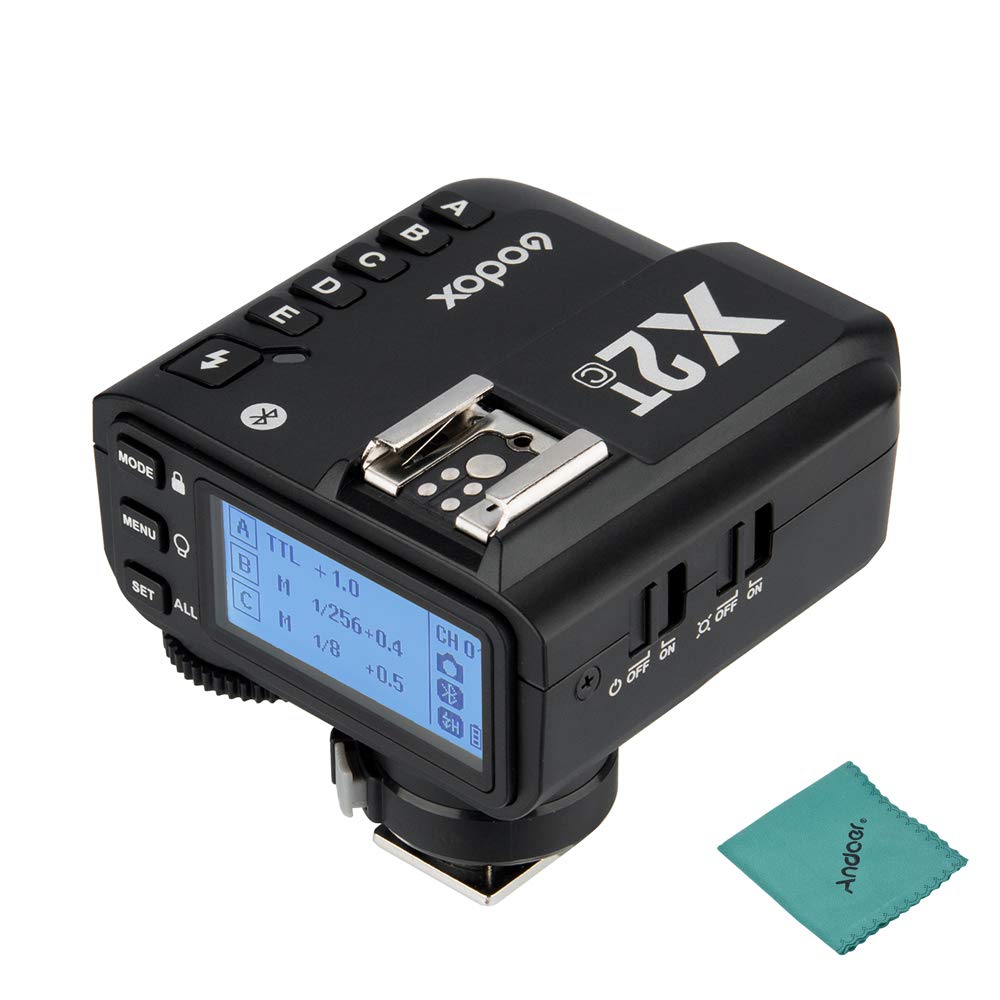
Figure 3.4: Overview of Godox X2T-C controls and display.
4. Operating Instructions
4.1 Mode Selection
Press the 'MODE' button to cycle through flash modes: TTL (Through-The-Lens), M (Manual), and Multi (Stroboscopic). The selected mode will be displayed on the LCD screen.

Figure 4.1: LCD screen displaying mode and group settings.
4.2 Group Control and Power Adjustment
Press the dedicated group buttons (A, B, C, D, E) to select individual flash groups. Once a group is selected, use the dial to adjust the flash power output (e.g., 1/1 to 1/256 in 0.1 stop increments) or flash exposure compensation (FEC) in TTL mode. The 'ALL' button allows for simultaneous adjustment of all groups in manual mode.

Figure 4.2: Group selection buttons.
4.3 Modeling Lamp Control
Press the 'MENU' button (which also functions as the Modeling Lamp Control button) to adjust the modeling lamp settings on compatible Godox flashes. This allows you to preview the lighting effect before taking a shot.
4.4 Bluetooth Control (Smartphone App)
Download the 'GodoxPhoto' app from your smartphone's app store (iOS or Android). Enable Bluetooth on your phone and the X2T-C trigger. Pair the devices through the app. Once connected, you can control flash modes, power output, modeling light, and other settings directly from your smartphone or tablet.
4.5 High-Speed Sync (HSS)
The X2T-C supports High-Speed Sync up to 1/8000s, allowing you to use wider apertures in bright conditions or freeze fast-moving subjects with flash. Ensure your camera and compatible flashes are also set to HSS mode.
4.6 Test Flash
Press the test flash button (lightning bolt icon) located below the group buttons to fire a test flash. This confirms connectivity and allows for quick light checks.
4.7 Official Tutorial Video
Video 4.7: An official tutorial demonstrating the features and operation of the Godox X2T Wireless Flash Trigger, including its user-friendly design, quick lock hot-shoe, precise power output settings, and dedicated group buttons. This video highlights the improvements over its predecessor and provides visual guidance on its use.
5. Maintenance
- Keep the device dry. Do not expose it to water or high humidity.
- Clean the trigger with a soft, dry cloth. Avoid using solvents or harsh chemicals.
- Remove batteries if the device will not be used for an extended period to prevent leakage.
- Avoid extreme temperatures and direct sunlight.
- Do not attempt to disassemble or repair the unit yourself. Refer to qualified service personnel.
6. Troubleshooting
6.1 Flash Not Firing
- Ensure the trigger is securely mounted on the camera's hot shoe.
- Check if the trigger and flashes are powered on and have sufficient battery life.
- Verify that the channel (CH) and wireless ID (ID) settings on the trigger match those on your flashes.
- Confirm that the flash mode (TTL/M/Multi) is correctly set on both the trigger and flashes.
- Check the camera's flash settings and ensure external flash is enabled.
6.2 Incorrect Exposure
- In TTL mode, check the Flash Exposure Compensation (FEC) settings on both the camera and the trigger.
- In Manual mode, adjust the power output of the flashes directly from the trigger.
- Ensure the flash is within effective range and not obstructed.
6.3 Interference or Unreliable Connection
- Change the wireless channel (CH) and ID settings to avoid interference from other wireless devices.
- Ensure there are no large metallic objects or other strong radio sources between the trigger and the flashes.
- Update the firmware of the X2T-C trigger via the Type-C USB port if available.
7. Specifications
| Feature | Specification |
|---|---|
| Brand | GODOX |
| Model | X2T-C |
| Color | Black |
| Connectivity Technology | Wireless (2.4G Transmission) |
| Mounting Type | Hot Shoe Mount |
| Compatible Devices | Canon EOS cameras (Bluetooth for iPhone, Huawei, Samsung app control) |
| Minimum Shutter Speed | 1/8000 seconds |
| Maximum Shutter Speed | 1/8000 seconds |
| Product Dimensions (L x W x H) | 5.8 x 7 x 5.8 cm |
| Package Dimensions (L x W x H) | 10.9 x 10.6 x 7.1 cm |
| Weight | 150 grams (package) |
| Water Resistance Level | Not waterproof |
| Power Source | 2x AA batteries |
8. Warranty and Support
Godox products typically come with a standard manufacturer's warranty. Please refer to the warranty card included with your product or visit the official Godox website for detailed warranty terms and conditions.
For technical support, troubleshooting assistance, or service inquiries, please contact Godox customer support through their official website or authorized service centers. Keep your purchase receipt and product serial number handy when seeking support.


