1. Introduction
This manual provides essential information for the proper installation, operation, and maintenance of your Lewmar 89400108 Control Mechanism DF Cranked Handle. Please read these instructions carefully before proceeding with installation or use to ensure safe and efficient operation and to maximize the lifespan of your product.
2. Product Overview
The Lewmar 89400108 Control Mechanism is a non-magnetic unit designed for marine applications, featuring a durable stainless steel crank handle. It is intended for mounting with an optional control pod at the guardrail of a Lewmar/Whitlock pedestal.
Key Features:
- Lewmar/Whitlock Control Mechanism (Non-Magnetic)
- Stainless Steel Crank Handle
- Includes Mounting Kit
- Designed for mounting with optional control pod at the guardrail of a Lewmar/Whitlock Pedestal
- Compatible with kickback guardrail for additional instrument pod options
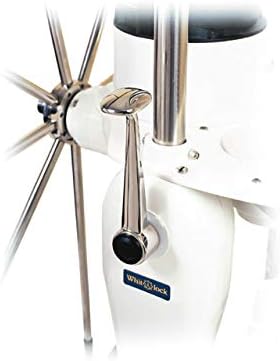
This image displays the Lewmar 89400108 Control Mechanism DF Cranked Handle. It is shown installed on a white marine pedestal, adjacent to a multi-spoke steering wheel. The polished stainless steel crank handle is prominently featured, with a black grip at its end. A 'Whitlock' label is visible on the pedestal below the handle. The mechanism is designed for integration with marine steering systems.
3. Setup and Installation
Installation of the Lewmar 89400108 Control Mechanism requires careful attention to detail to ensure proper function and safety. It is recommended that installation be performed by a qualified marine technician.
3.1 Pre-Installation Checks
- Verify all components of the mounting kit are present.
- Ensure the intended mounting location on the Lewmar/Whitlock pedestal guardrail is clean and free from obstructions.
- Confirm compatibility with any optional control pod or instrument pod you intend to integrate.
3.2 Mounting Procedure
- Position the control mechanism on the guardrail of the Lewmar/Whitlock pedestal at the desired location.
- If using an optional control pod, ensure it aligns correctly with the mechanism and the pedestal.
- Use the provided mounting kit to secure the mechanism firmly to the pedestal. Follow the specific instructions provided with your pedestal and control pod for torque specifications and fastener types.
- Attach the stainless steel crank handle to the mechanism, ensuring it is securely fastened and operates smoothly without binding.
- Perform a functional check to ensure the mechanism moves freely and engages correctly with the steering system or other controlled components.
4. Operating Instructions
The Lewmar 89400108 Control Mechanism is designed for intuitive operation. The cranked handle provides a tactile interface for controlling various marine functions, typically related to steering or other mechanical adjustments on a vessel.
4.1 Basic Operation
- To engage the control function, grasp the cranked handle firmly.
- Rotate the handle in the desired direction to initiate the corresponding action (e.g., steering adjustments, throttle control, or other mechanical linkages).
- The non-magnetic properties ensure minimal interference with sensitive navigation equipment.
4.2 Safety Precautions
- Always ensure the area around the control mechanism is clear before operation.
- Avoid applying excessive force to the handle, as this may damage the mechanism or connected components.
- Regularly check for smooth operation and any signs of wear or damage.
5. Maintenance
Proper maintenance is crucial for the longevity and reliable performance of your Lewmar Control Mechanism.
5.1 Routine Cleaning
- Clean the stainless steel crank handle and the mechanism housing regularly with fresh water and a mild soap solution.
- Rinse thoroughly to remove all soap residue.
- Avoid abrasive cleaners or solvents that could damage the finish or internal components.
5.2 Inspection
- Periodically inspect all fasteners for tightness. Re-tighten as necessary, but do not overtighten.
- Check the crank handle for any signs of bending, cracking, or excessive play.
- Inspect the mechanism for smooth operation. If stiffness or grinding is noted, consult a qualified technician.
- Examine the mounting area for corrosion or structural fatigue, especially in a marine environment.
6. Troubleshooting
This section addresses common issues you might encounter with your control mechanism.
6.1 Handle Stiffness or Binding
- Cause: Accumulation of dirt, salt, or corrosion; misaligned components; worn internal parts.
- Solution: Clean the mechanism thoroughly. Check for proper alignment during installation. If the issue persists after cleaning and alignment checks, professional inspection may be required.
6.2 Loose Handle or Excessive Play
- Cause: Loose fasteners; worn shaft or bearing.
- Solution: Check and tighten all mounting fasteners. If the handle itself is loose on its shaft, inspect the connection point for wear. If wear is significant, replacement of the handle or internal components may be necessary.
6.3 Mechanism Not Responding
- Cause: Disconnected linkage; internal component failure.
- Solution: Verify that all linkages between the control mechanism and the controlled device are securely connected. If the issue is internal, professional service is recommended.
7. Specifications
The following specifications are provided for the Lewmar 89400108 Control Mechanism DF Cranked Handle:
| Attribute | Value |
|---|---|
| Manufacturer | Lewmar |
| Brand | Lewmar |
| Model | Lewmar 89400108: Ctrl Mech Df Cranked Handle |
| Item Weight | 1 pounds |
| Package Dimensions | 9 x 5.75 x 0.38 inches |
| Item Model Number | 89400108 |
| Manufacturer Part Number | 89400108 |
| ASIN | B07SMSDZSK |
| Date First Available | August 1, 2019 |
8. Warranty Information
Specific warranty details for the Lewmar 89400108 Control Mechanism DF Cranked Handle are not provided within this manual. For comprehensive warranty terms and conditions, please refer to the official Lewmar website or contact Lewmar customer service directly. Retain your proof of purchase for any warranty claims.
9. Customer Support
For technical assistance, spare parts, or further inquiries regarding your Lewmar 89400108 Control Mechanism, please visit the official Lewmar website or contact their customer support department. Contact information can typically be found on the manufacturer's website or product packaging.


