1. Introduction
Thank you for choosing the H.Koenig SMOO9 Mini Blender. This compact and powerful 300W blender is designed for preparing smoothies, shakes, and other beverages quickly and conveniently. Its portable design, featuring two 570mL BPA-free bottles, allows you to blend and take your drinks on the go. Please read this manual carefully before using the appliance to ensure safe and optimal operation.
2. Safety Instructions
To prevent personal injury or damage to the appliance, always observe basic safety precautions when using electrical appliances.
- Read all instructions before use.
- Ensure the voltage indicated on the appliance corresponds to your local mains voltage before connecting.
- Unplug the appliance from the power outlet when not in use, before assembling or disassembling parts, and before cleaning.
- Do not immerse the motor unit, cord, or plug in water or any other liquid.
- Keep hands and utensils out of the blending bottle while blending to reduce the risk of severe injury to persons or damage to the blender.
- Blades are sharp. Handle with care when assembling, disassembling, or cleaning.
- Do not blend hot liquids, as this may cause pressure buildup and result in scalding.
- Do not operate the blender with an empty bottle.
- Do not use the appliance for more than 1 minute continuously. Allow a cooling period between cycles.
- This appliance is not intended for use by persons (including children) with reduced physical, sensory, or mental capabilities, or lack of experience and knowledge, unless they have been given supervision or instruction concerning use of the appliance by a person responsible for their safety.
- Children should be supervised to ensure that they do not play with the appliance.
- Do not use attachments not recommended or sold by the manufacturer.
- Do not operate any appliance with a damaged cord or plug, or after the appliance malfunctions or has been dropped or damaged in any manner.
3. Product Components
The H.Koenig SMOO9 Mini Blender includes the following parts:
- Motor Unit: The base of the blender containing the 300W motor and control button.
- Blade Assembly: A detachable unit with four sharp stainless steel blades.
- 570mL Blending Bottles (x2): BPA-free plastic bottles for blending and serving.
- Travel Lids (x2): Lids designed for portability, featuring a drinking spout.
- Silicone Contours: Bands around the bottles for improved grip and aesthetics.

Image Description: This image displays the individual components of the H.Koenig SMOO9 Mini Blender. From left to right, it shows a clear blending bottle with the blade assembly attached, the stainless steel motor unit with the H.Koenig logo and power button, and a second clear blending bottle with a grey travel lid attached. This illustrates the complete set of parts included with the blender.
4. Setup and Assembly
Follow these steps to set up your H.Koenig SMOO9 Mini Blender:
- Prepare Ingredients: Wash and cut your desired fruits and vegetables into small pieces (approximately 2-3 cm). Add liquids such as water, milk, or juice. Do not exceed the maximum fill line on the bottle.
- Assemble Bottle: Place the ingredients into one of the 570mL blending bottles.
- Attach Blade Assembly: Carefully screw the blade assembly onto the open end of the blending bottle until it is securely tightened. Ensure the seal is firm to prevent leaks.
- Position on Motor Unit: Invert the assembled bottle (with the blade assembly facing down) and place it onto the motor unit. Align the tabs on the bottle with the slots on the motor unit and twist clockwise until it locks into place.
- Connect Power: Plug the power cord into a suitable electrical outlet.
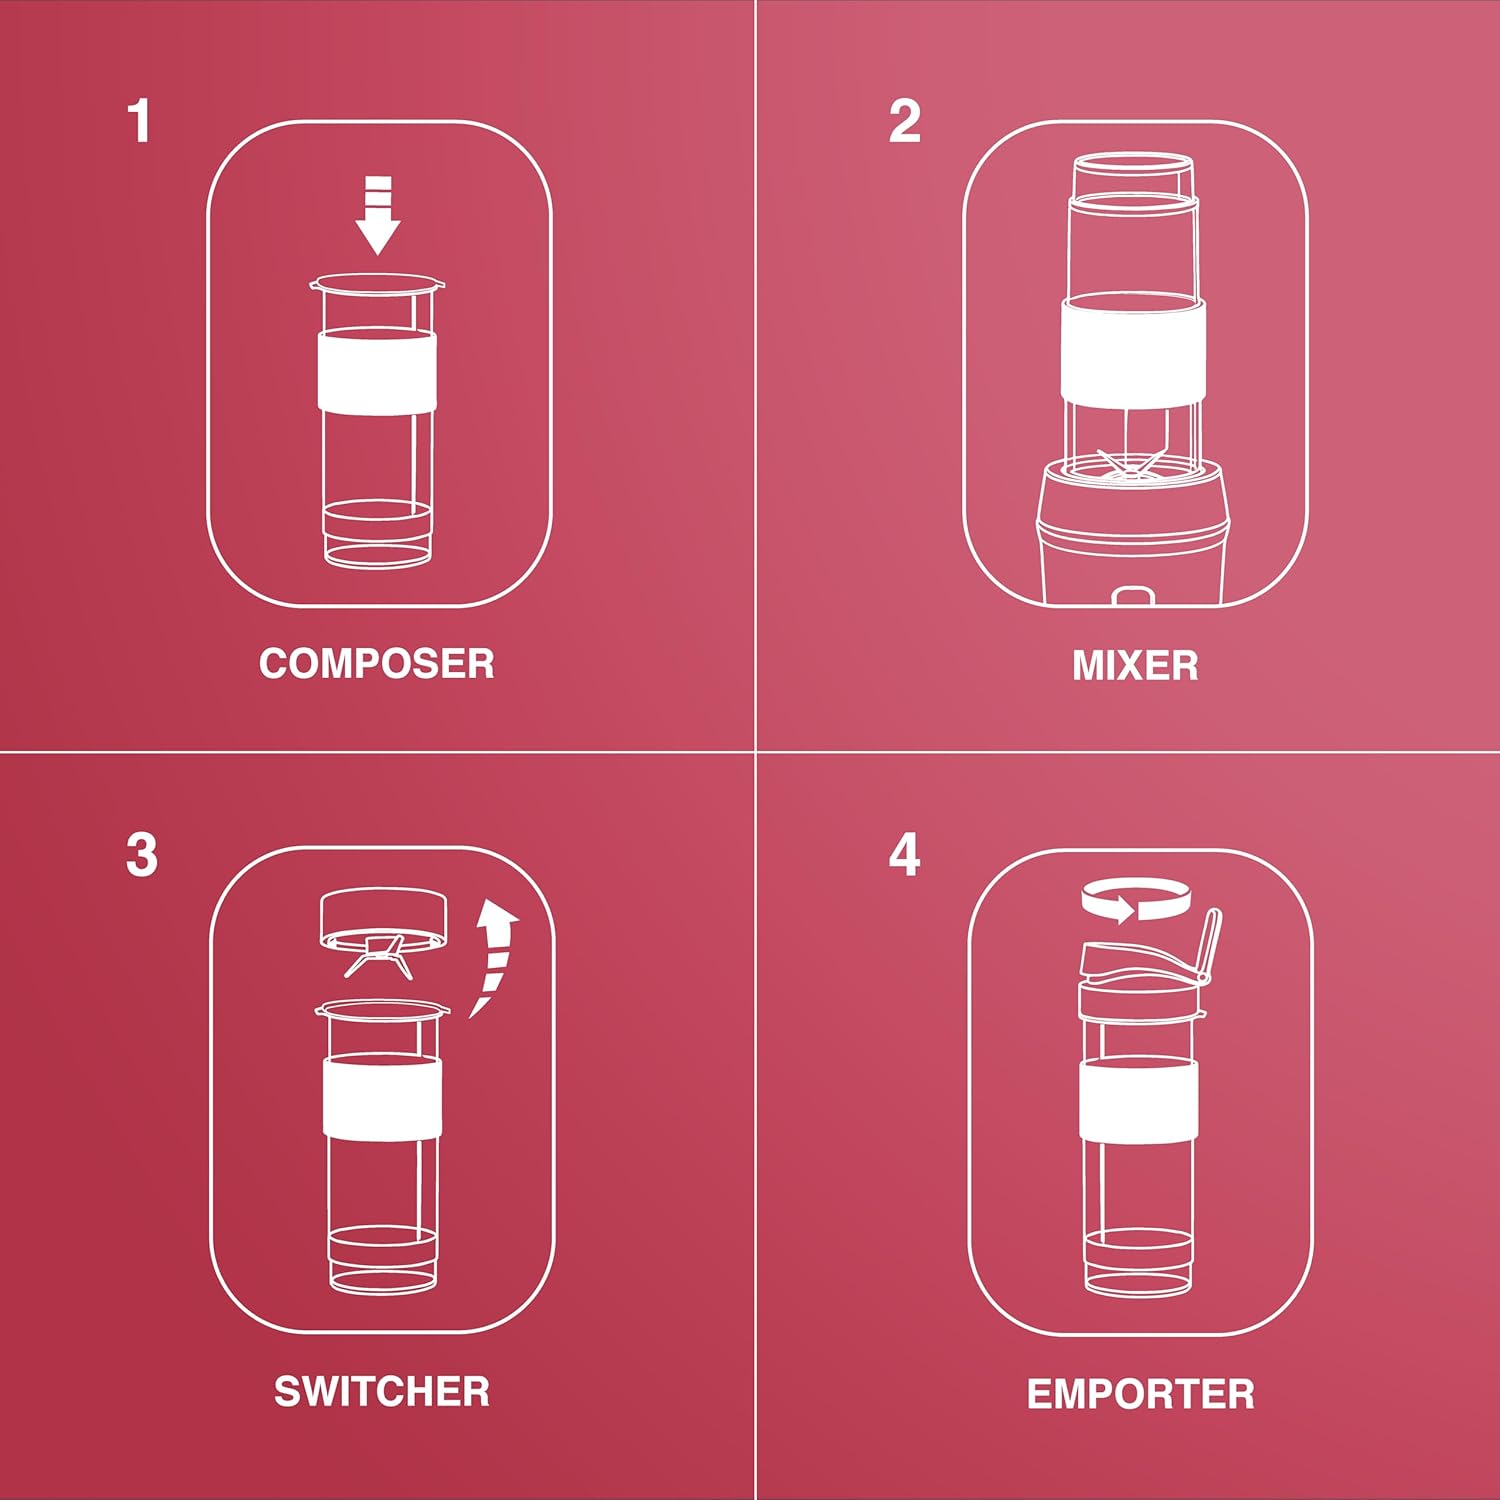
Image Description: This diagram illustrates the four main steps for using the blender. Step 1 ("COMPOSER") shows adding ingredients to the bottle. Step 2 ("MIXER") depicts the bottle attached to the motor unit for blending. Step 3 ("SWITCHER") shows removing the blade assembly and attaching the travel lid. Step 4 ("EMPORTER") shows carrying the portable bottle.
5. Operating Instructions
Once the blender is assembled and plugged in:
- Start Blending: Press and hold the power button on the motor unit to begin blending. The blender will operate as long as the button is held down.
- Blending Duration: Blend until your desired consistency is achieved. Do not operate the blender continuously for more than 1 minute. If more blending is needed, release the button, wait a few seconds, and then press again.
- Stop Blending: Release the power button to stop the blending process.
- Remove Bottle: Twist the blending bottle counter-clockwise to unlock it from the motor unit, then lift it off.
- Prepare for Travel: Unscrew the blade assembly from the bottle. Carefully replace it with a travel lid, ensuring it is securely fastened.
- Unplug: Always unplug the appliance from the power outlet after use.

Image Description: This image shows the H.Koenig SMOO9 Mini Blender actively blending fruits in one of its clear bottles, which is attached to the stainless steel motor unit. Next to it, a second portable bottle contains a finished red smoothie, ready for consumption. The scene suggests ease of use and the convenience of preparing and transporting beverages.
6. Cleaning and Maintenance
Proper cleaning ensures the longevity and hygiene of your blender.
- Before Cleaning: Always unplug the blender from the power outlet before cleaning.
- Motor Unit: Wipe the motor unit with a soft, damp cloth. Do not immerse the motor unit in water or any other liquid.
- Bottles, Lids, and Blade Assembly: The blending bottles, travel lids, and blade assembly are dishwasher-safe. Alternatively, they can be washed by hand with warm, soapy water. Rinse thoroughly and dry.
- Stubborn Residue: For stubborn residue in the bottle, fill it with warm water and a drop of dish soap, attach the blade assembly, and blend for a few seconds. Then rinse.
- Storage: Store the blender in a dry place, away from direct sunlight and out of reach of children.

Image Description: This image shows the interior of an open dishwasher, with several plates, glasses, and two clear blending bottles and a blade assembly from the H.Koenig SMOO9 Mini Blender placed inside. This visually confirms that the bottles and blade assembly are safe for dishwasher cleaning, simplifying maintenance.
7. Troubleshooting
If you encounter issues with your H.Koenig SMOO9 Mini Blender, refer to the following common problems and solutions:
| Problem | Possible Cause | Solution |
|---|---|---|
| Blender does not start. |
|
|
| Ingredients are not blending smoothly or blades are stuck. |
|
|
| Leakage from the bottle. |
|
|
8. Specifications
| Brand | H.Koenig |
| Model Number | SMOO9 |
| Power | 300 Watts |
| Voltage | 230 Volts |
| Capacity | 2 x 570 Milliliters |
| Material | Stainless Steel (motor unit), BPA-free Plastic (bottles) |
| Number of Speeds | 1 |
| Dimensions (L x W x H) | 11.3 x 15 x 35 cm |
| Item Weight | 1.36 Kilograms |
| Special Features | Mix & Go, Dishwasher Safe Components (bottles, lids, blades) |
9. Warranty and Support
The H.Koenig SMOO9 Mini Blender comes with an extended 2-year warranty. This warranty covers manufacturing defects and ensures reliable operation under normal use.
Additionally, H.Koenig is committed to product longevity and offers 10-year availability of spare parts. This commitment supports the repairability of your appliance, reducing waste and extending its lifespan.
For warranty claims, technical support, or to inquire about spare parts, please contact H.Koenig customer service or visit their official website. Keep your proof of purchase for warranty validation.

Image Description: This image features the H.Koenig SMOO9 Mini Blender, highlighting its key features with graphical icons. On the right side, there are two circular logos: one indicating "BPA FREE" with a leaf icon, and another stating "PRODUIT RÉPARABLE 10 ANS" (Product Repairable 10 Years) with a star icon, emphasizing the product's durability and environmental commitment.


