
1. Introduction
Thank you for choosing the Teka RS15 71.40 Under-Counter Stainless Steel Sink. This manual provides essential information for the safe and efficient installation, operation, and maintenance of your new sink. Please read these instructions carefully before installation and retain them for future reference.

Image 1.1: Top view of the Teka RS15 71.40 stainless steel sink.
2. Safety Information
Please observe the following safety precautions to prevent injury or damage to the product:
- Always ensure the water supply is turned off before beginning any installation or maintenance work.
- Wear appropriate personal protective equipment (PPE) such as gloves and safety glasses during installation.
- Handle the sink with care to avoid scratches or damage to the stainless steel surface.
- Ensure all connections are watertight to prevent leaks and water damage.
- If you are unsure about any part of the installation process, consult a qualified professional.
3. Product Overview
The Teka RS15 71.40 sink is a high-quality under-counter single bowl sink designed for modern kitchens. It features durable 18/10 stainless steel construction and a SilentSmart system to reduce noise.
3.1 Key Features
- Material: High-quality 18/10 Stainless Steel.
- Design: Under-counter installation, single bowl.
- Noise Reduction: SilentSmart technology reduces noise by 50%.
- Easy Cleaning: R15 radius corners facilitate cleaning and water drainage.
- Drainage System: Includes a 3½" basket valve and siphon.
- Depth: Bowl depth of 200 mm.

Image 3.1: The Teka RS15 71.40 sink seamlessly integrated into a kitchen countertop with a faucet.

Image 3.2: Angled view of the Teka RS15 71.40 sink, highlighting its under-counter design.
4. Installation Instructions
This section outlines the general steps for installing your Teka RS15 71.40 sink. It is recommended to have a professional perform the installation.
4.1 Pre-Installation Checklist
- Verify all components are present: sink, drain assembly (basket valve, siphon), and fixing accessories.
- Ensure the cabinet opening is correctly sized for an 80 cm under-counter sink. Refer to the dimensions diagram.
- Gather necessary tools: sealant, drill, screwdriver, wrench, measuring tape.
4.2 Installation Steps
- Prepare the Countertop: Ensure the countertop cutout is clean, dry, and correctly sized for under-counter mounting.
- Apply Sealant: Apply a continuous bead of silicone sealant around the rim of the sink where it will meet the underside of the countertop.
- Position the Sink: Carefully lift the sink and align it with the countertop opening from below. Press firmly to ensure good adhesion with the sealant.
- Secure with Fixing Accessories: Use the provided fixing clips and screws to secure the sink to the underside of the countertop. Tighten evenly to create a strong seal.
- Install Drain Assembly:
- Insert the basket valve into the sink's drain opening, ensuring a watertight seal with gaskets and sealant.
- Connect the siphon to the basket valve and then to the household drainage system. Ensure all connections are tight and leak-free.
- Connect Faucet (if applicable): If installing a new faucet, follow the faucet manufacturer's instructions.
- Test for Leaks: Once installation is complete, turn on the water supply and fill the sink. Check all connections for any signs of leakage.
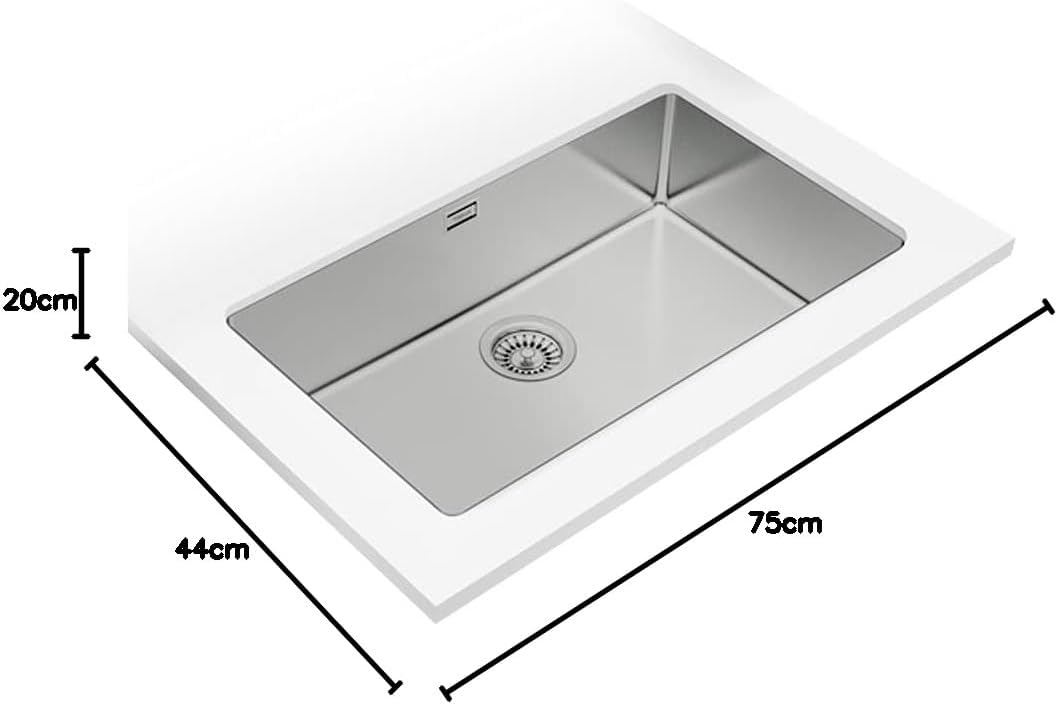
Image 4.1: Dimensional drawing of the Teka RS15 71.40 sink, indicating key measurements for installation.
5. Operation
The Teka RS15 71.40 sink operates like any standard kitchen sink. Use it for washing dishes, preparing food, and other kitchen tasks. The R15 radius corners and SilentSmart technology enhance the user experience by making cleaning easier and reducing operational noise.
- Ensure the basket valve is open for drainage or closed to retain water in the bowl.
- Avoid placing extremely hot items directly into the sink without protection, as sudden temperature changes can affect the material over time.
6. Care and Maintenance
Proper care will ensure the longevity and appearance of your stainless steel sink.
6.1 Daily Cleaning
- After each use, rinse the sink thoroughly with water to remove food particles and soap residue.
- Wipe the sink dry with a soft cloth to prevent water spots and mineral buildup, especially in hard water areas.
- For general cleaning, use a mild dish soap and a soft sponge or cloth.
6.2 Avoiding Damage
- Avoid Abrasive Cleaners: Do not use steel wool, abrasive pads, or harsh chemical cleaners (e.g., bleach, ammonia-based products) as these can scratch or stain the stainless steel.
- Prevent Scratches: While stainless steel is durable, it can scratch. Use a sink grid or mat to protect the bottom of the sink from heavy pots and pans.
- Rust Prevention: Although stainless steel is resistant to rust, prolonged contact with iron objects (e.g., cast iron pans, steel wool fragments) can cause surface rust stains. Remove these promptly with a non-abrasive stainless steel cleaner.
- Chemical Exposure: Avoid direct contact with strong acids or alkalis, as these can damage the finish.
7. Troubleshooting
This section addresses common issues you might encounter with your sink.
| Problem | Possible Cause | Solution |
|---|---|---|
| Water leaks from drain connections. | Loose connections or improperly seated gaskets. | Tighten connections. Check and reseat gaskets, apply plumber's putty or sealant if necessary. |
| Slow drainage. | Partial clog in the drain or siphon. | Remove the basket valve and clear any debris. If necessary, disassemble the siphon to remove blockages. |
| Water spots or stains on sink surface. | Hard water deposits or residue from certain foods/liquids. | Clean with a mixture of vinegar and water, then rinse and dry thoroughly. For stubborn stains, use a specialized stainless steel cleaner. |
| Surface scratches. | Abrasive cleaning or contact with sharp objects. | Minor scratches can sometimes be buffed out with a stainless steel scratch removal kit. Prevent future scratches by using sink grids and avoiding abrasive materials. |
8. Specifications
| Feature | Detail |
|---|---|
| Brand | Teka |
| Model Number | 115000004 |
| Product Dimensions | 75 x 44 x 20 cm (Length x Width x Depth) |
| Weight | 5.02 kg |
| Material | Stainless Steel 18/10 |
| Color | Grey (Stainless Steel finish) |
| Style | 1 Bowl (Seno) |
| Finish | Polished |
| Installation Method | Under-mount (Montaje inferior) |
| Number of Products | 1 |
| Drain Type | Grid (Rejilla) |
| Bowl Depth | 200 mm |
| Corner Radius | R15 |
| Cabinet Size Recommendation | 80 cm |
9. Warranty and Support
Teka products are manufactured to high-quality standards and come with a manufacturer's warranty. For specific warranty details, please refer to the warranty card included with your purchase or visit the official Teka website. For technical support or service inquiries, please contact Teka customer service through their official channels.
Contact Information: Please refer to your purchase documentation or the Teka official website for the most up-to-date contact information for your region.

