
1. Introduction
The Godox X2T-N is a versatile 2.4G wireless flash trigger designed for Nikon cameras, providing comprehensive control over Godox flashes equipped with the built-in Godox X wireless system. This transmitter supports i-TTL autoflash, high-speed sync (HSS) up to 1/8000s, multi-flash, manual flash, and flash exposure compensation. Its user-friendly interface, featuring a large LCD panel and dedicated group buttons, ensures efficient and precise lighting control for various photographic scenarios.

Figure 1.1: Top view of the Godox X2T-N Wireless Flash Trigger.
2. Safety Information
- Do not disassemble or modify the device.
- Keep the device dry. Do not handle with wet hands or immerse in water.
- Do not use in the presence of flammable gases or liquids.
- Avoid extreme temperatures. Do not expose to direct sunlight or heat sources.
- Use only specified batteries and accessories.
3. What's in the Box
- Godox X2T-N 2.4G Wireless Flash Trigger Transmitter
4. Product Overview
The Godox X2T-N features a compact design with intuitive controls for ease of use. Key components include:
- LCD Panel: Large, clear display for settings and status.
- Group Buttons (A-E): Dedicated buttons for quick access to individual flash groups.
- Test Button: For manual flash testing.
- Control Wheel: For adjusting values and navigating menus.
- Hot Shoe Mount: For mounting on a camera's hot shoe.
- Type-C USB Port: For firmware upgrades.

Figure 4.1: Close-up view of the X2T-N's LCD control panel and buttons.
5. Setup
- Battery Installation: Open the battery compartment and insert two AA batteries, ensuring correct polarity.
- Mounting on Camera: Slide the X2T-N onto your Nikon camera's hot shoe. Secure it by rotating the locking ring until it is firm.
- Power On: Press the power button to turn on the transmitter. The LCD screen will illuminate.
- Initial Settings: Set the channel and ID on the X2T-N to match your Godox flashes. Refer to the 'Operating Instructions' section for detailed steps on setting channels and IDs.
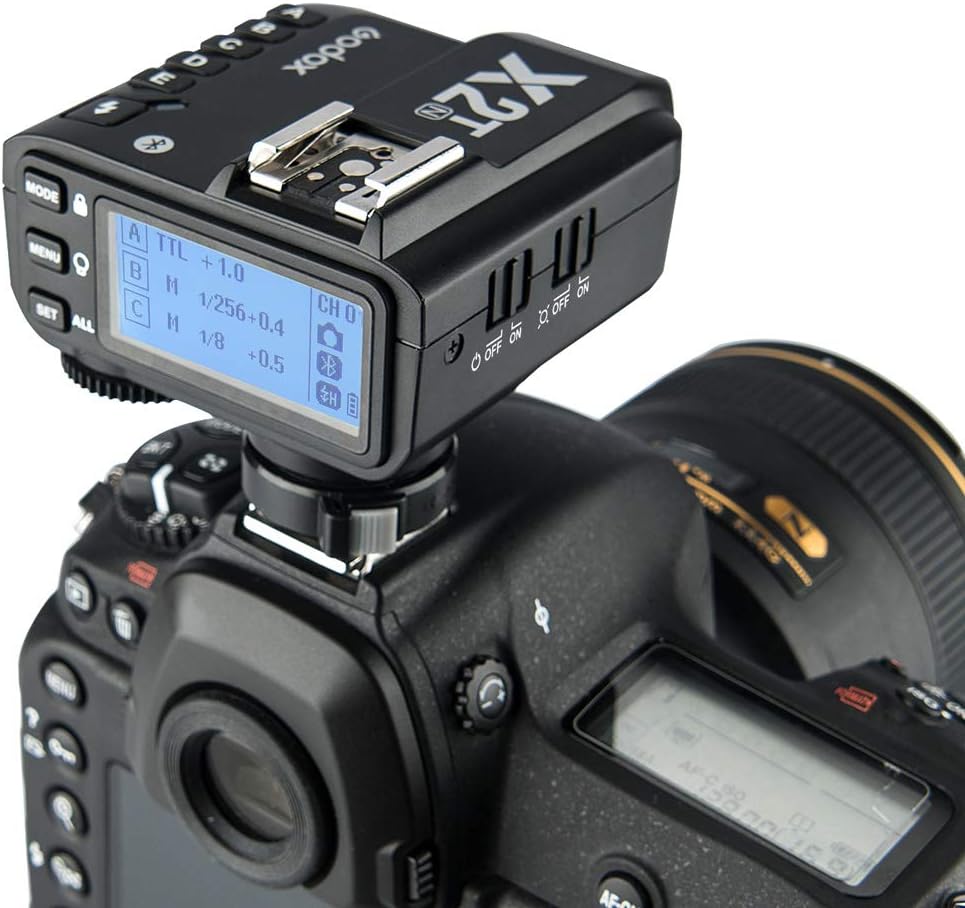
Figure 5.1: The Godox X2T-N mounted on a compatible Nikon camera.
6. Operating Instructions
6.1 Basic Flash Triggering
Once the X2T-N is mounted and powered on, and your flashes are set to the same channel and ID, you can trigger them by pressing the camera's shutter button or the test button on the transmitter.
6.2 TTL Autoflash and HSS
The X2T-N fully supports TTL autoflash for automatic exposure control and High-Speed Sync (HSS) up to 1/8000s, allowing you to use flash at faster shutter speeds to freeze action or overpower ambient light.

Figure 6.1: The X2T-N supports TTL Auto Flash and High-Speed Sync up to 1/8000s.
6.3 Group Function
Control up to 5 groups (A, B, C, D, E) of flashes independently. Use the dedicated group buttons on the side of the transmitter to select and adjust the output of each group.
6.4 App Control (Bluetooth)
The X2T-N features Bluetooth connectivity, allowing you to control flash settings via a smartphone app. Download the GodoxPhoto app from your device's app store. Pair the transmitter with your smartphone to remotely adjust flash power, group settings, and more.

Figure 6.2: Control your Godox X2T-N and flashes remotely via the smartphone app using Bluetooth.
6.5 Video Demonstration
Video 6.1: A detailed overview of the Godox X2T-N, demonstrating its features and comparison with other models. This video highlights the physical design, button layout, LCD display, control wheel, and the hot shoe mount, explaining how these elements contribute to its functionality in various shooting scenarios, including event photography with on-camera flash.
7. Maintenance
- Cleaning: Use a soft, dry cloth to clean the device. Do not use detergents or solvents.
- Storage: Store the device in a dry, cool place away from direct sunlight. Remove batteries if storing for extended periods.
- Firmware Updates: Periodically check the Godox official website for firmware updates to ensure optimal performance and compatibility. Updates can be installed via the Type-C USB port.
8. Troubleshooting
| Problem | Possible Cause | Solution |
|---|---|---|
| Flash not triggering | Incorrect channel/ID; Low battery; Loose connection | Ensure transmitter and flash channels/IDs match; Replace batteries; Securely mount transmitter on hot shoe. |
| Inconsistent triggering | Interference; Distance too far | Change channel/ID to avoid interference; Reduce distance between transmitter and flash. |
| LCD screen not displaying | No power; Device malfunction | Check battery installation and charge; Contact customer support if issue persists. |
9. Specifications
| Feature | Detail |
|---|---|
| Brand | GODOX |
| Model Number | X2T-N |
| Product Dimensions | 2.83 x 2.76 x 2.28 inches |
| Item Weight | 3.17 ounces |
| Compatible Mountings | Nikon Camera |
| Flash Sync Speed | 1/8000s |
| Wireless Transmission | 2.4G |
| Operating Distance | Up to 100 meters |
| Groups | Max. 5 groups (A, B, C, D, E) |
| Channels | 32 channels |
| Firmware Upgrade | Type-C USB Port |
10. Warranty and Support
This product is covered by the manufacturer's standard warranty. For detailed warranty information, technical support, or service inquiries, please visit the official Godox website or contact your authorized dealer. Keep your purchase receipt as proof of purchase for warranty claims.
Godox Official Website: www.godox.com