1. Product Overview
The CURT 11567 Class 1 Trailer Hitch is designed for specific Toyota Corolla and C-HR models, providing a reliable towing solution. This hitch features a 1-1/4-inch receiver, suitable for various towing applications within its weight limits. It is constructed from durable carbon steel with a dual-coat finish for enhanced protection against corrosion.

Image 1.1: The CURT 11567 Class 1 Trailer Hitch, showcasing its robust construction and black powder coat finish.
Key Features:
- Dependable Strength: Rated for 2,000 lbs. gross trailer weight (GTW) and 200 lbs. tongue weight (TW), limited by the lowest-rated towing component.
- Versatile Receiver: Features a standard 1-1/4-inch receiver hitch. Note: Not compatible with vertical hanging bike racks.
- Dual-Coat Finish: Submersed in a liquid A-coat and co-cured with a durable black powder coat for superior rust, chip, and UV resistance.
- Easy Installation: Designed for a factory fit on select Toyota Corolla and C-HR model years.
- Safety Tested: Each design is thoroughly tested to SAE J684 specifications using real vehicles in real-world conditions.
2. Specifications
| Specification | Detail |
|---|---|
| Model Number | 11567 |
| Receiver Tube Size | 1-1/4 inches |
| Gross Trailer Weight (GTW) | 2,000 lbs |
| Tongue Weight (TW) | 200 lbs |
| Material | Carbon Steel |
| Finish Type | Gloss Black Powder Coat |
| Item Weight | 30 Pounds |
| Product Dimensions | 45 x 13 x 10 inches |
| Vehicle Service Type | Car, Marine-Personal-Craft, Trailer |

Image 2.1: Diagram illustrating the 1-1/4 inch receiver tube size.
3. Installation Guide
Installation of the CURT 11567 trailer hitch is designed to be vehicle-specific and may require removal of certain vehicle components. While some users may perform the installation themselves, professional installation is recommended to ensure proper fitment and safety.
General Installation Steps:
- Preparation: Park the vehicle on a level surface and engage the parking brake. Refer to your vehicle's owner's manual for specific instructions on accessing the installation area, which may involve removing the rear fascia or bumper beam.
- Positioning: Carefully position the trailer hitch according to the vehicle's frame. The CURT 11567 is designed for a factory fit and typically requires no drilling.

Image 3.1: Graphic indicating that no drilling is required for the installation of this hitch.
- Securing the Hitch: Attach the hitch to the vehicle frame using the provided hardware. Ensure all bolts are correctly aligned before tightening to prevent cross-threading. Torque all fasteners to the specifications provided in the detailed installation instructions that accompany the product.
- Reassembly: Reinstall any vehicle components that were removed. When reassembling, consider future access to components behind the bumper beam, as the hitch's placement may affect this.
Safety Note: Always refer to the specific installation instructions included with your CURT 11567 hitch for detailed, step-by-step guidance and torque specifications. Incorrect installation can lead to product failure and safety hazards.

Image 3.2: A technician using a scanning arm to ensure precise vehicle measurements for hitch design and fitment.
4. Operating Instructions
Once installed, the CURT 11567 Class 1 Trailer Hitch allows for the attachment of various towing accessories, such as ball mounts, cargo carriers, or bike racks, provided they are compatible with a 1-1/4-inch receiver and do not exceed the hitch's weight capacity.
Connecting a Trailer or Accessory:
- Insert Accessory: Slide the shank of your chosen accessory (e.g., ball mount) into the 1-1/4-inch receiver tube.
- Secure with Pin: Align the pin hole on the accessory shank with the corresponding hole on the hitch receiver. Insert a hitch pin and secure it with a clip or lock.
- Attach Safety Chains: If towing a trailer, always attach the trailer's safety chains to the designated chain loops on the hitch. Cross the chains under the trailer tongue to prevent it from dropping to the ground if it separates from the hitch.
- Verify Connections: Before driving, ensure all connections are secure, including the hitch pin, safety chains, and any electrical connections for trailer lights.

Image 4.1: Close-up view of the standard hitch receiver with safety chains properly attached to the designated loops.
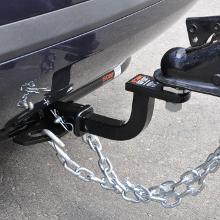
Image 4.2: A CURT trailer hitch installed on a vehicle, with a ball mount and safety chains connected, ready for towing.
Important: Never exceed the stated gross trailer weight (2,000 lbs) or tongue weight (200 lbs) of this hitch, or the towing capacity of your vehicle, whichever is lower.
5. Maintenance
Regular maintenance ensures the longevity and safe operation of your CURT trailer hitch.
Maintenance Tips:
- Regular Inspection: Periodically inspect the hitch for any signs of wear, damage, or corrosion, especially after heavy use or exposure to harsh weather conditions. Check all bolts and fasteners for tightness.
- Cleaning: Clean the hitch regularly with mild soap and water to remove dirt, salt, and road grime. Rinse thoroughly and dry.
- Corrosion Protection: The hitch features a dual-coat finish for excellent corrosion resistance. However, if any scratches or chips occur, touch up the affected areas with a rust-inhibiting paint to prevent further corrosion.
- Receiver Tube Care: Keep the inside of the receiver tube clean and free of debris. A light coat of grease can be applied to the inside of the receiver tube to prevent rust and ease accessory insertion.

Image 5.1: Components of the CURT hitch undergoing the dual-coat finishing process, which provides enhanced durability and corrosion resistance.
6. Troubleshooting
This section addresses common issues that may arise with your trailer hitch.
Common Issues and Solutions:
- Difficulty with Installation/Fitment:
- Ensure the hitch model is correct for your specific vehicle year and model.
- Verify that all vehicle components (e.g., bumper fascia) are properly aligned before attempting to install the hitch.
- If bolts are difficult to thread, ensure they are correctly aligned and not cross-threading. Do not force bolts.
- Consider professional installation if you encounter significant difficulties.
- Rattling or Noise:
- Check all mounting bolts for proper tightness.
- Ensure the hitch pin and clip are securely in place.
- If using an accessory, ensure it fits snugly in the receiver. Anti-rattle devices can be used to reduce movement between the receiver and accessory.
- Inspect any wire harness clips or other components that may have been dislodged during installation and secure them.
- Corrosion:
- Refer to the maintenance section for tips on cleaning and touching up the finish.
7. Warranty and Support
For information regarding the product warranty, please refer to the official CURT website or the warranty documentation included with your purchase. For technical support or further assistance, contact CURT customer service directly.
Manufacturer: CURT
Website: www.curtmfg.com


