
1. Product Overview
This manual provides instructions for the SCREENARAMA N156HCA-EAB FHD 1920x1080 IPS Matte LCD LED Display Replacement. This product is designed to replace a damaged or non-functional laptop screen, offering a Full High Definition (FHD) resolution of 1920x1080 pixels, In-Plane Switching (IPS) technology for wide viewing angles, and a matte finish to reduce glare. It is a non-touch display and requires a 30-pin video connector.

Image: The SCREENARAMA N156HCA-EAB replacement screen, packaged with a set of complimentary installation tools.
Key Features:
- Resolution: FHD 1920x1080 pixels.
- Connector Type: 30-pin non-touch. Compatibility requires matching this specification.
- Screen Size: 15.6 inches.
- Display Type: IPS (In-Plane Switching) for wide viewing angles and vivid colors.
- Surface Finish: Matte, to minimize reflections and glare.
- Included Accessories: Complimentary set of installation tools and adhesive tape.

Image: Visual comparison illustrating the superior viewing angles and color reproduction of an IPS screen compared to a TN screen.
2. Important Compatibility Information
Before proceeding with installation, it is crucial to verify that this replacement screen is compatible with your laptop. Incorrect specifications will result in a non-functional display.
- Resolution Match: This screen is designed for FHD 1920x1080 resolution only. It is not compatible with 1366x768, 1600x900, or 3840x2160 resolutions.
- Connector Type: The screen uses a 30-pin video connector. Verify your original screen also uses a 30-pin connector. It is not compatible with 40-pin connectors.
- Non-Touch Display: This is an LCD screen only and does not support touch functionality. It will not work as a replacement for a touchscreen display.
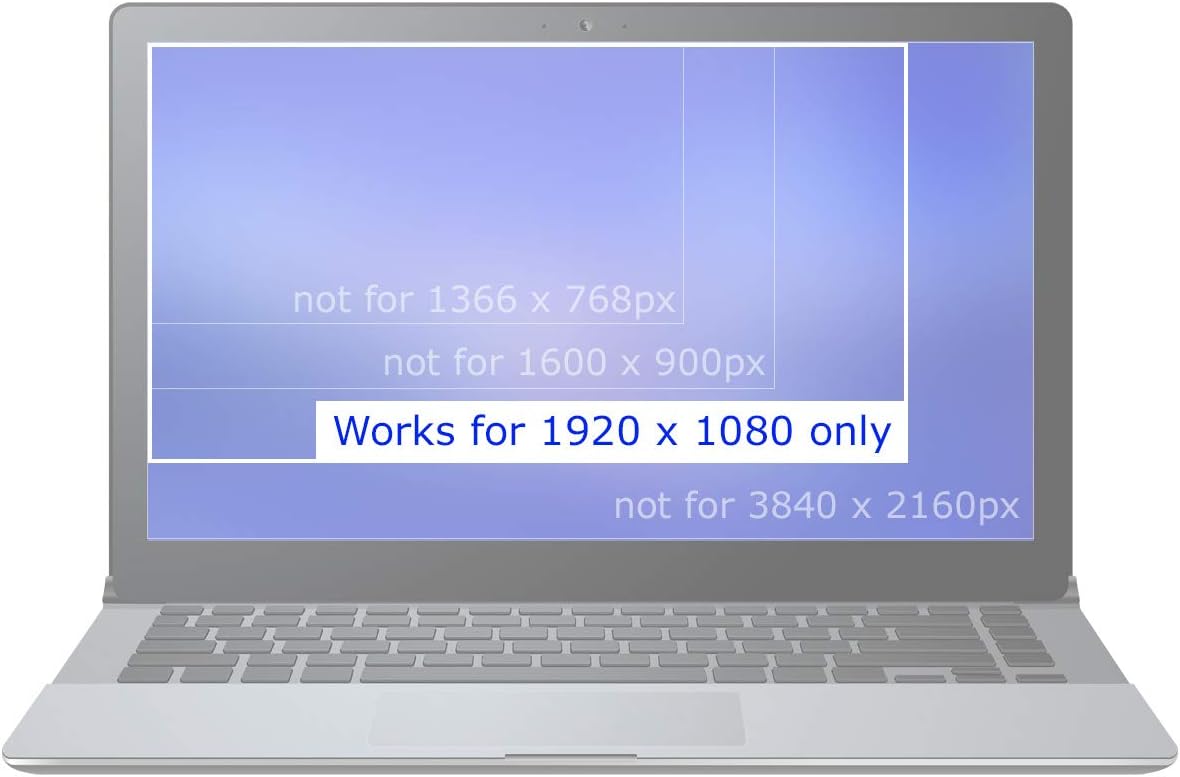
Image: A visual guide indicating that the screen is compatible only with 1920x1080 resolution, explicitly excluding other resolutions.

Image: An alert indicating that the product is an LCD screen only and does not include touchscreen functionality. A standard LCD is shown, with a touchscreen display crossed out below it.

Image: The rear view of a 15.6-inch FHD screen, highlighting the location of the 30-pin video connector.

Image: A detailed comparison showing the appearance of a 30-pin video connector and a 40-pin video connector, with the 40-pin version marked as incompatible.
3. Installation Guide
This section provides general guidance for replacing your laptop screen. Specific steps may vary depending on your laptop model. It is recommended to consult your laptop's service manual or a reputable online tutorial for your specific model before beginning.
Safety Precautions:
- Always power off your laptop and disconnect it from the power adapter.
- Remove the laptop battery before starting any disassembly.
- Work on a clean, static-free surface. Consider using an anti-static wrist strap.
- Handle the new screen by its edges to avoid touching the display surface or internal components.
Included Tools:
The replacement screen comes with a complimentary set of tools to assist with the installation process.

Image: A collection of tools provided with the screen replacement kit, typically including screwdrivers, prying tools, and tweezers.
General Installation Steps:
- Disassemble Laptop Bezel: Carefully remove the front bezel around your laptop screen. This may involve prying clips or removing small screws hidden under rubber pads.
- Remove Old Screen: Unscrew the old screen from its mounting brackets. Gently lay the screen face down on the keyboard.
- Disconnect Video Cable: Carefully peel back any tape securing the video cable connector on the back of the old screen. Unlock the connector latch and gently pull the 30-pin video cable to disconnect it.
- Transfer Brackets (if necessary): If your old screen has metal mounting brackets, you may need to carefully remove them (often with heat to loosen adhesive) and attach them to the new screen using the provided adhesive strips.
- Connect New Screen: Connect the 30-pin video cable to the new screen. Ensure it is fully seated and secure the latch. Apply new adhesive tape if necessary.
- Mount New Screen: Position the new screen into the laptop lid and secure it with screws to the mounting brackets.
- Test Functionality: Before reattaching the bezel, temporarily reconnect the battery and power adapter to test the new screen. Power on the laptop to ensure the display functions correctly.
- Reassemble: If the screen functions correctly, disconnect power and battery, then reattach the screen bezel and any other removed components.
4. Operating Instructions
Once installed, the SCREENARAMA N156HCA-EAB display operates as a standard laptop screen. No special operating procedures are required beyond the normal use of your laptop. The display will automatically function upon successful installation and power-on of your device.
5. Maintenance
To ensure the longevity and optimal performance of your SCREENARAMA display, follow these maintenance guidelines:
- Cleaning: Use a soft, lint-free cloth specifically designed for electronics. For stubborn smudges, lightly dampen the cloth with water or a screen-safe cleaning solution. Avoid harsh chemicals, abrasive materials, or spraying liquid directly onto the screen.
- Protection: Avoid applying pressure to the screen surface. When closing your laptop, ensure no objects are left on the keyboard that could press against the display.
- Temperature: Operate and store the laptop within recommended temperature ranges to prevent damage to the LCD panel.
6. Troubleshooting
If you encounter issues after installing your new screen, refer to the following troubleshooting steps:

Image: A visual guide outlining common troubleshooting steps for issues encountered after a laptop screen replacement.
- No Display / Blank Screen:
- External Monitor Test: Connect an external monitor to your laptop. If the external monitor displays an image, the laptop's internal components (motherboard, GPU) are likely functional, indicating the issue is with the screen or its connection.
- Check Connector: Power off the laptop, disconnect the battery, and carefully re-open the display assembly. Reconnect the video cable from both sides (screen and motherboard, if accessible) ensuring it is fully seated and the latch is secured. Use tape to reinforce the connection if needed. Verify the connector itself is not damaged.
- Dim Image / No Backlight:
- Test Old LCD: If possible, reconnect the original LCD (even if broken) to see if its backlight illuminates. If both the old and new LCDs do not light up, the problem might be with the laptop's backlight circuit or a fuse on the motherboard, usually located near the video connector.
- Image Artifacts / Distorted Display:
- Verify Cable Connection: Ensure the video cable is securely connected at both ends and not pinched or damaged during reassembly.
- Driver Check: Ensure your laptop's graphics drivers are up to date.
- Issue Persists: If the problem is identical to the issue experienced with the old LCD, the fault is likely with another component of the laptop (e.g., graphics card, motherboard, video cable itself) rather than the replacement screen.
7. Specifications
| Model Number | N156HCA-EAB |
| Brand | SCREENARAMA |
| Screen Size | 15.6 inches |
| Resolution | FHD (Full High Definition) 1920x1080 |
| Display Technology | IPS (In-Plane Switching) |
| Surface Finish | Matte |
| Connector Type | 30-pin (Non-touch) |
| Item Weight | 0.01 ounces |
| Package Dimensions | 16.45 x 10.47 x 1.38 inches |
8. Warranty Information
The SCREENARAMA N156HCA-EAB replacement screen comes with a 2-year warranty from the date of purchase. This warranty covers manufacturing defects and ensures guaranteed compatibility as per the product specifications. Please retain your proof of purchase for warranty claims.
9. Support
For further assistance, technical support, or warranty claims, please contact SCREENARAMA customer service through their official channels. Refer to the contact information provided with your purchase or on the SCREENARAMA website.