
Introduction
This manual provides detailed instructions for the assembly, operation, and maintenance of your Auhagen 13344 DIY Construction Site Accessory. This product is a model kit designed for hobbyists and enthusiasts to enhance their model railway layouts or dioramas. Please read these instructions carefully before beginning assembly to ensure correct construction and long-lasting enjoyment of your model.
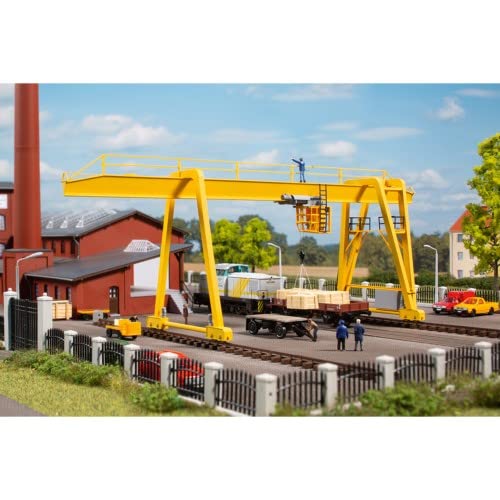
Figure 1: Overview of the Auhagen 13344 DIY Construction Site Accessory kit. This image shows the various components included in the model kit, ready for assembly.
Setup and Assembly
The Auhagen 13344 is a DIY model kit requiring assembly. Follow these steps for proper construction:
- Unpack Components: Carefully remove all parts from the packaging. Verify that all components listed in the kit's parts diagram (usually found on the packaging or an included sheet) are present and undamaged.
- Prepare Workspace: Set up a clean, well-lit workspace. You will need a hobby knife, plastic cement (not included), and possibly small tweezers or clamps for precise assembly.
- Review Instructions: Before gluing any parts, thoroughly review the assembly diagrams and instructions provided with your kit. Understand the sequence of steps.
- Assemble Base Structure: Begin by assembling the main structural components. Ensure parts fit together without force. If a part does not fit, check for excess plastic (flash) and carefully trim it with a hobby knife.
- Attach Details: Once the main structure is stable, proceed to attach smaller details and accessories. Pay attention to orientation and alignment.
- Allow Curing Time: After assembly, allow sufficient time for the plastic cement to fully cure according to the adhesive manufacturer's instructions. This ensures a strong and durable bond.
Note: This model is hand-operated and does not require batteries or external power sources for its primary function as a static display piece.
Operating and Placement
As a static model, the "operation" of the Auhagen 13344 involves its integration into your model environment. Consider the following for optimal display:
- Placement: Position the construction site accessory on a flat, stable surface within your model railway layout or diorama. Ensure it complements the surrounding scenery.
- Securing the Model: For permanent placement, you may use a small amount of adhesive (e.g., white glue or model adhesive) to secure the base of the model to your layout.
- Environmental Integration: Enhance realism by adding miniature figures, vehicles, or other construction-related details around the accessory.
Maintenance
Proper maintenance will preserve the appearance and integrity of your Auhagen 13344 model:
- Cleaning: Dust the model regularly using a soft brush or a can of compressed air. Avoid using harsh chemicals or abrasive materials, which can damage the plastic or paint.
- Storage: If storing the model, place it in a protective container to prevent dust accumulation and accidental damage. Store in a cool, dry place away from direct sunlight to prevent material degradation or color fading.
- Repairs: In case of accidental damage, use appropriate plastic cement for repairs. Handle delicate parts with care.
Troubleshooting
Here are solutions to common issues encountered during assembly or display:
| Problem | Possible Cause | Solution |
|---|---|---|
| Parts do not fit together | Excess plastic (flash) on parts; incorrect orientation; warped part. | Carefully trim flash with a hobby knife. Double-check assembly diagrams for correct orientation. If a part is warped, gentle heat (e.g., from warm water) may help reshape it, but proceed with caution. |
| Model appears unstable after assembly | Insufficient curing time for adhesive; uneven base; incorrect assembly of structural components. | Ensure adhesive has fully cured. Place the model on a perfectly flat surface. Re-examine structural connections and reinforce with additional adhesive if necessary. |
| Missing or damaged parts | Manufacturing defect; packaging error; accidental loss during unpacking. | Carefully check packaging and workspace. If parts are genuinely missing or damaged, contact Auhagen customer support with your model number and purchase details. |
Specifications
Key technical details for the Auhagen 13344 DIY Construction Site Accessory:
- Model Number: 13344
- Brand: Auhagen
- Product Type: DIY Model Kit, Construction Site Accessory
- Power Source: Hand-operated (no electrical components)
- Product Dimensions: 38.4 x 9.8 x 25 cm
- Item Weight: 120 g
- Included Components: 1 item (model kit)
- Batteries Required: No
- Date First Available: July 30, 2019
Warranty Information
Auhagen products are manufactured to high-quality standards. Specific warranty details for the 13344 model kit are typically provided with the product packaging or can be found on the official Auhagen website. Generally, warranties cover manufacturing defects. Please retain your proof of purchase for any warranty claims.
Customer Support
For further assistance, missing parts, or technical inquiries regarding your Auhagen 13344 model, please refer to the contact information provided on the product packaging or visit the official Auhagen website. When contacting support, please have your model number (13344) and purchase details readily available.
Official Auhagen Website: www.auhagen.de
© 2026 Auhagen. All rights reserved.