1. Introduction
This user manual provides essential information for the safe and effective installation, operation, and maintenance of the Noark SHT22N Circuit Breaker Accessory. Please read this manual thoroughly before using the product.
The SHT22N is designed as an accessory for circuit breakers, providing specific functionality within an electrical system. It operates within a voltage range of AC 480-500V at 50/60Hz and has a power consumption of 10VA.
2. Safety Information
WARNING: Electrical shock hazard. Installation and maintenance should only be performed by qualified personnel. Disconnect power before installation or servicing.
- Always follow local and national electrical codes.
- Ensure the power supply is completely disconnected and locked out before working on the circuit.
- Verify the accessory's voltage and current ratings match your application.
- Do not operate the device if it appears damaged.
- Use appropriate personal protective equipment (PPE).
3. Product Overview and Features
The Noark SHT22N is a compact and robust circuit breaker accessory. Its primary features include:
- Model: SHT22N
- Voltage Rating: AC 480-500V
- Frequency: 50Hz/60Hz
- Power Consumption: 10VA
- Current Rating: 10 Amps
- Mounting Type: Plug-In Mount
- Number of Poles: 1
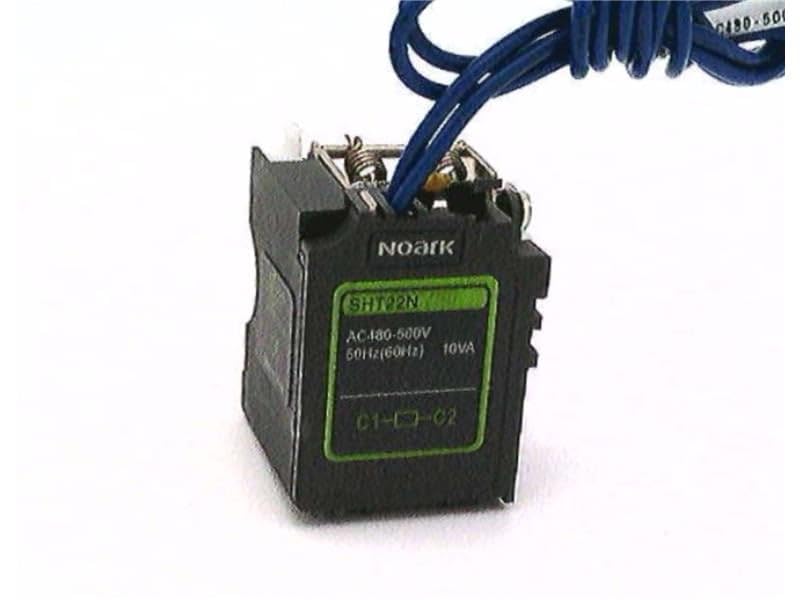
Figure 3.1: The Noark SHT22N Circuit Breaker Accessory. This image shows the compact black unit with green labeling indicating "Noark", "SHT22N", "AC 480-500V", "50Hz(60Hz)", and "10VA". Blue wires are connected to the top terminals of the accessory.
4. Setup and Installation
The SHT22N is designed for plug-in mounting, typically into a compatible circuit breaker or distribution board. Follow these general steps for installation:
- Power Disconnection: Ensure all power to the circuit where the accessory will be installed is completely disconnected and verified using a voltage tester. Implement lockout/tagout procedures.
- Identify Mounting Location: Locate the designated slot or connection points on the compatible circuit breaker or panel for the SHT22N accessory.
- Plug-In Installation: Carefully align the accessory with the mounting interface and firmly push it into place until it is securely seated.
- Wiring Connections: Connect the necessary control or signal wires to the terminals of the SHT22N. The image shows blue wires connected to the top. Refer to the specific wiring diagram of your main circuit breaker or system for correct terminal assignments (e.g., C1, C2 as indicated on the unit).
- Verify Connections: Double-check all connections for tightness and correct polarity.
- Restore Power: Once installation is complete and verified, safely restore power to the circuit.
Note: Specific wiring diagrams and installation procedures may vary depending on the main circuit breaker model and system configuration. Always consult the documentation for the primary circuit breaker.
5. Operating Instructions
The Noark SHT22N functions as an accessory to a main circuit breaker. Its operation is typically integrated with the circuit breaker's functionality, such as shunt tripping or auxiliary contact signaling. The accessory itself does not have user-operable controls.
- Ensure the accessory is correctly installed and wired according to the system's requirements.
- Monitor the overall system for proper operation.
- The accessory's function (e.g., remote tripping) will be activated by external signals or conditions as designed within the electrical system.
6. Maintenance
The SHT22N circuit breaker accessory is designed for minimal maintenance. However, periodic checks are recommended to ensure continued reliable operation:
- Visual Inspection: Periodically inspect the accessory for any signs of physical damage, discoloration, or loose connections.
- Connection Integrity: Ensure all wiring connections remain tight and secure. Loose connections can lead to overheating or intermittent operation.
- Cleaning: If necessary, gently clean the exterior of the accessory with a dry, lint-free cloth. Do not use solvents or abrasive cleaners.
- Environmental Conditions: Ensure the operating environment remains within the specified temperature and humidity ranges to prevent premature failure.
Note: Any internal servicing or repair should only be performed by the manufacturer or authorized service personnel.
7. Troubleshooting
If you experience issues with the SHT22N accessory, consider the following common troubleshooting steps:
| Problem | Possible Cause | Solution |
|---|---|---|
| Accessory not functioning | Incorrect wiring No power supply Damaged unit | Verify all wiring connections against the system diagram. Check power supply to the circuit. Inspect for physical damage. If damaged, replace the unit. |
| Intermittent operation | Loose connections Voltage fluctuations | Tighten all terminal connections. Ensure stable power supply within specified voltage range. |
| Overheating | Overload Poor ventilation Loose connections | Ensure current does not exceed 10 Amps. Verify adequate airflow around the unit. Check and tighten all connections. |
If the problem persists after attempting these steps, contact qualified service personnel or Noark customer support.
8. Specifications
| Attribute | Detail |
|---|---|
| Model | SHT22N |
| Brand | Noark |
| Voltage Rating | AC 480-500V |
| Frequency | 50Hz/60Hz |
| Power Consumption | 10VA |
| Current Rating | 10 Amps |
| Circuit Breaker Type | Standard |
| Mounting Type | Plug-In Mount |
| Number Of Poles | 1 |
| Package Dimensions | 1 x 1 x 1 inches |
| Weight | 1.44 Pounds |
| Manufacturer | NOARK |
| Date First Available | January 1, 2016 |
9. Warranty Information
Noark products are manufactured to high-quality standards. For specific warranty terms and conditions, please refer to the official Noark warranty statement available on their website or contact their customer support. Typically, warranties cover defects in materials and workmanship under normal use.
10. Customer Support
For technical assistance, product inquiries, or service requests, please contact Noark customer support. Have your product model (SHT22N) and any relevant purchase information ready when contacting support.
You can typically find contact information (phone, email, website) on the official Noark website or product packaging.


