
1. Introduction
This manual provides detailed instructions for the installation, setup, and operation of your ChiliTec Pilota Casa Wireless Wall Switch and Built-in Radio Receiver. This system allows for convenient wireless control of lighting and other electrical devices up to 2300W (incandescent) or 300W (LED) at 230V.
The system operates on a 433.92 MHz radio frequency and offers a range of up to 70 meters in open areas. It is designed for use with other ChiliTec Pilota Casa series components.
2. Safety Instructions
WARNING: Electrical installation should only be performed by a qualified electrician. Incorrect installation can lead to electric shock, fire, or damage to the device.
- Always disconnect power at the main circuit breaker before installing or servicing the receiver.
- Ensure the voltage supply matches the device's requirements (230V AC).
- Do not exceed the maximum load capacity: 2300W for incandescent bulbs, 300W for LED bulbs.
- This product is designed for indoor use. Ensure the installation location is dry and protected from moisture.
- Keep out of reach of children.
- Do not attempt to repair or modify the device. Contact qualified personnel for service.
3. Product Components
The ChiliTec Pilota Casa system consists of two main components:
- Wireless Wall Switch: A battery-operated switch for remote control.
- Built-in Radio Receiver: A compact module installed behind a light fixture or in a flush-mounted box, which receives signals from the wall switch and controls the connected device.

Figure 1: The ChiliTec Pilota Casa Wireless Wall Switch (left) and the Built-in Radio Receiver (right).

Figure 2: Overview of the Pilota Casa wireless system, showing the receiver's central role in connecting various optional wireless transmitters like motion detectors, magnetic contacts, and remote controls.
4. Setup and Installation
4.1 Receiver Installation
- Disconnect Power: Before starting, turn off the main power supply at the circuit breaker to prevent electric shock.
- Prepare Wiring: The receiver requires a phase (L) and a neutral (N) conductor for operation, and outputs switched phase (L') to the load.
- Connect Wires:
- Connect the incoming phase wire to the 'L' terminal on the receiver.
- Connect the incoming neutral wire to the 'N' terminal on the receiver.
- Connect the load (e.g., light fixture) phase wire to the 'L'' terminal on the receiver.
- Connect the load neutral wire directly to the incoming neutral wire.
- Mount Receiver: Place the receiver into a standard flush-mounted wall box (dimensions: 50 x 50 x 25 mm). Ensure it fits securely and wires are not pinched.
- Restore Power: Once all connections are secure and the receiver is mounted, restore power at the circuit breaker.

Figure 3: Wiring diagram for the built-in radio receiver, showing connections for phase (L), neutral (N), and switched phase (L') to the load. Optional wireless components are also shown.
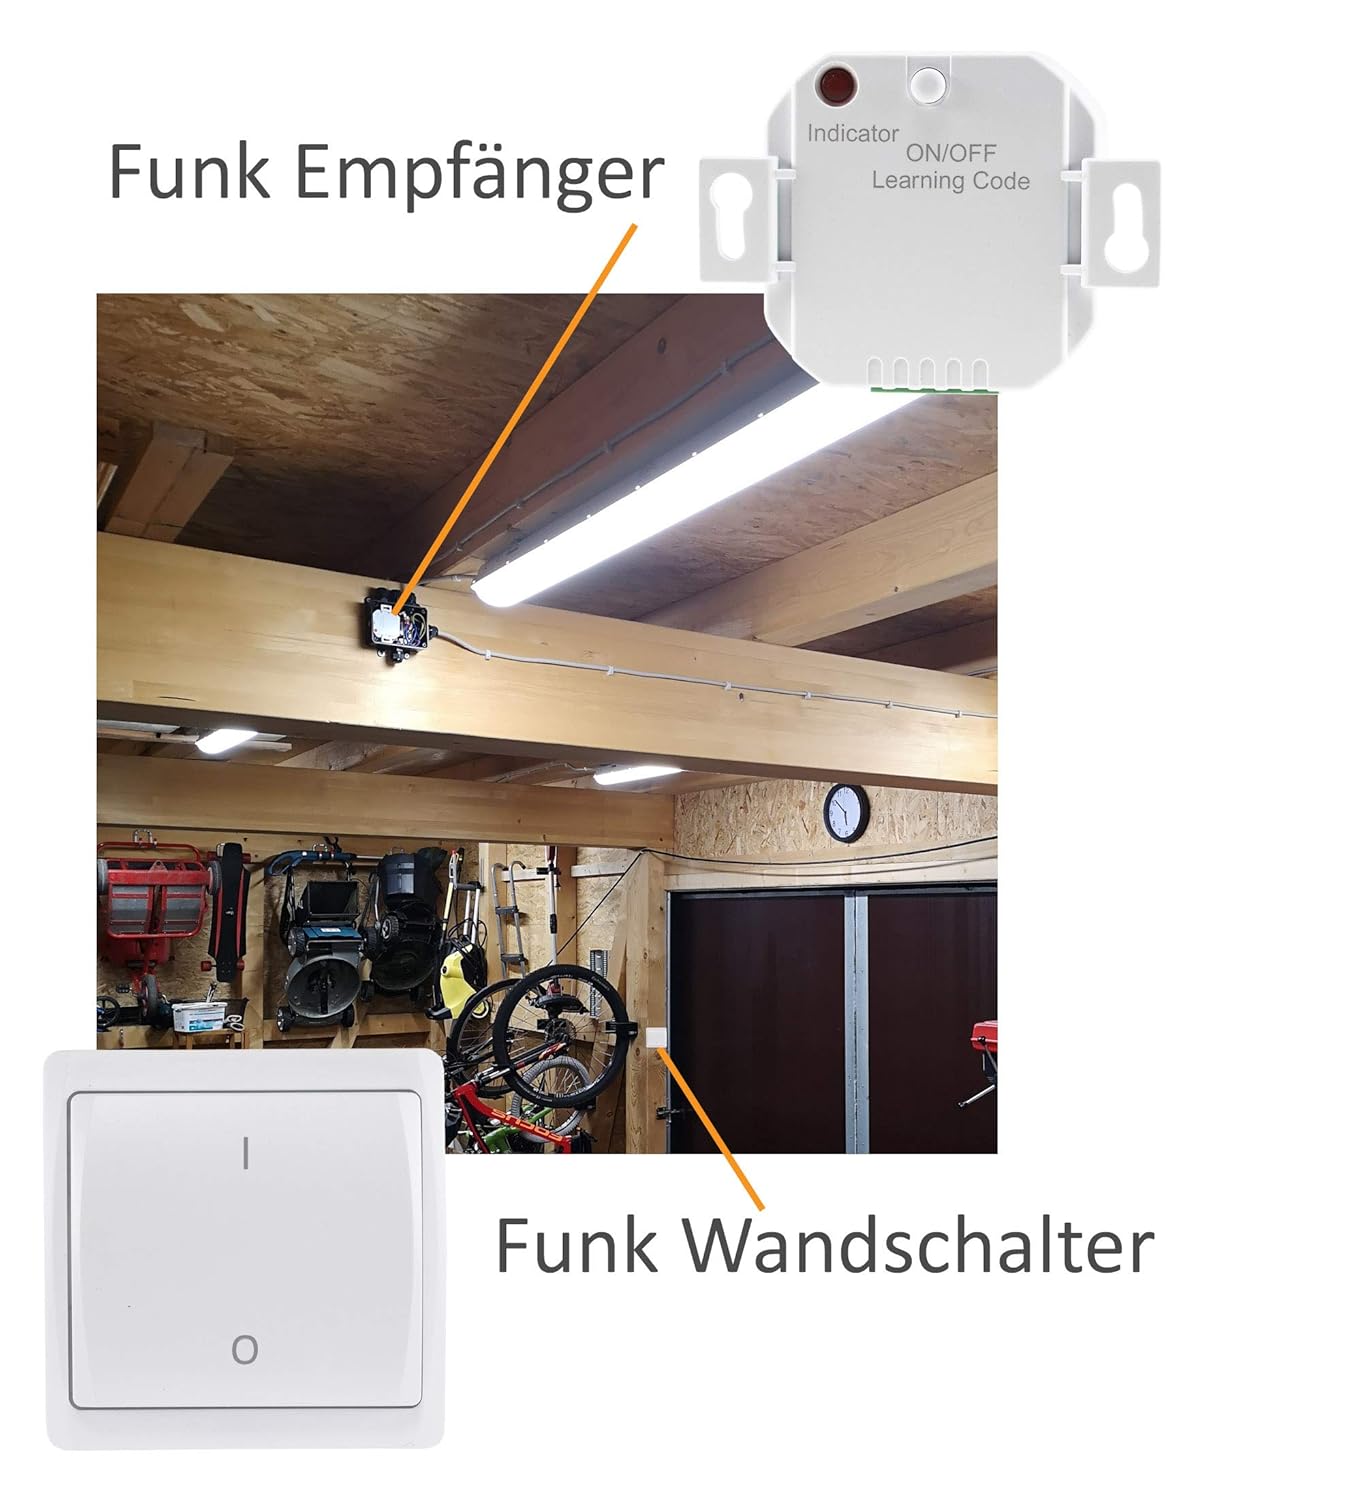
Figure 4: Example installation of the receiver in a ceiling fixture, demonstrating its compact size for discreet placement.
4.2 Wall Switch Installation
- Battery Insertion: Carefully open the wall switch housing to access the battery compartment. Insert the required battery type (typically a 12V A23 battery, as seen in product images), ensuring correct polarity.
- Mounting: The wireless wall switch can be mounted on any flat surface using screws or adhesive tape (not included). Its slim design (20mm build height) allows for flexible placement.

Figure 5: The wireless wall switch showing its battery compartment, typically housing a 12V A23 battery.

Figure 6: Side profile of the wireless wall switch, illustrating its slim 20mm build height for easy surface mounting.
4.3 Pairing (Learning Code)
The receiver and wall switch must be paired for wireless communication.
- Activate Learning Mode on Receiver: Briefly press the 'ON/OFF Learning Code' button on the receiver (refer to Figure 1 for location). The indicator LED on the receiver will start flashing, indicating it is in learning mode.
- Transmit Signal from Switch: Within a few seconds of activating learning mode, press the 'ON' button on your wireless wall switch. The receiver's LED will stop flashing and illuminate steadily, confirming successful pairing.
- Test Functionality: Press the 'ON' and 'OFF' buttons on the wall switch to verify that the connected device responds correctly.
- Multiple Switches/Receivers: A single receiver can be paired with up to 20 wireless transmitters (switches, remote controls, motion detectors). Multiple receivers can also be controlled by a single switch. The system automatically filters surrounding frequencies to prevent interference.

Figure 7: Examples of system configurations: multiple switches controlling one receiver, multiple switches controlling multiple receivers, and one switch controlling multiple receivers.
5. Operating Instructions
Once paired, operating the ChiliTec Pilota Casa system is straightforward:
- Wireless Wall Switch: Press the 'I' (ON) button to turn on the connected device. Press the 'O' (OFF) button to turn off the connected device.
- Manual Control on Receiver: The receiver itself has an 'ON/OFF Learning Code' button. A brief press of this button will manually toggle the connected device ON or OFF.
6. Maintenance
- Cleaning: Clean the wall switch and receiver with a soft, dry cloth. Do not use abrasive cleaners or solvents.
- Battery Replacement: When the wireless wall switch's range decreases or it becomes unresponsive, replace the battery (typically a 12V A23 battery). Ensure proper disposal of old batteries according to local regulations.
- Environmental Conditions: Ensure the receiver is not exposed to extreme temperatures, direct sunlight, or high humidity.
7. Troubleshooting
- Device not responding:
- Check if the receiver has power.
- Ensure the wall switch battery is not depleted.
- Verify that the wall switch and receiver are correctly paired (refer to Section 4.3).
- Check if the connected load (e.g., light bulb) is functional.
- Limited range:
- Replace the wall switch battery.
- Ensure there are no significant obstructions (e.g., thick concrete walls, large metal objects) between the switch and receiver.
- Avoid placing the receiver near other devices that emit strong radio frequencies.
- Interference with other devices:
- The Pilota Casa system features automatic frequency matching to minimize interference. If issues persist, ensure no other 433.92 MHz devices are operating in very close proximity.
- Note that this system is only compatible with other Pilota Casa series components and not with devices from other manufacturers.
8. Specifications
| Brand | ChiliTec |
| Model Number | 23250_22277_22278 |
| Operating Voltage | 230 Volts AC |
| Max. Load (Incandescent) | 2300 W |
| Max. Load (LED) | 300 W |
| Current Rating | 10 A |
| Radio Frequency | 433.92 MHz |
| Range | Up to 70 meters (open field) |
| Receiver Dimensions (L x W x H) | 50 x 50 x 25 mm |
| Wall Switch Dimensions (L x W x H) | 50 x 50 x 24 mm |
| Material | Plastic |
| Operating Mode | ON-OFF |
| Contact Type | Normally Open |
| Connector Type | Screw Terminals |
9. Warranty and Support
For warranty information and technical support, please refer to the documentation provided with your purchase or contact ChiliTec customer service directly. Keep your proof of purchase for warranty claims.
Manufacturer: ChiliTec GmbH


