Product Overview
The Walfront Handheld Endoscope is a versatile inspection tool designed for various applications, including automotive, pipeline, and air conditioning inspections. It features a 4.3-inch LCD color screen, a waterproof camera probe, and built-in LED lights for clear visibility in dark environments. The device is powered by a rechargeable lithium battery, offering convenience and portability.

Image: The Walfront Handheld Endoscope system, showing the main display unit, the flexible camera probe, a USB charging cable, and the included user manual.
Package Contents
Please verify that all items listed below are included in your package:
- 1 x Handheld Endoscope Unit
- 1 x Flexible Camera Probe (5-meter hard line)
- 1 x Small Memory Card (8GB)
- 1 x USB Charging Cable
- 1 x User Manual
Setup Guide
1. Charging the Device
Before first use, fully charge the endoscope unit. Connect the provided USB cable to the charging port on the device and to a standard USB power adapter (not included).
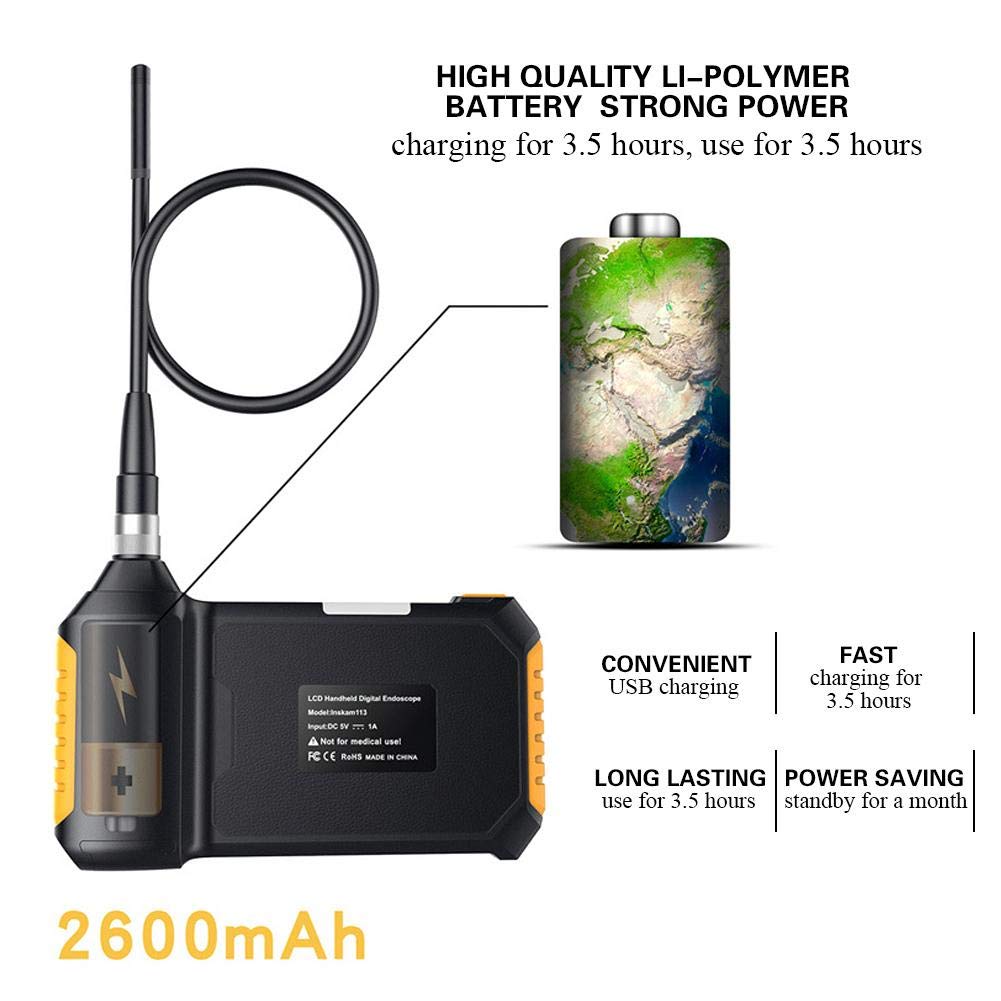
Image: Illustration of the endoscope's charging process, emphasizing its 2600mAh lithium battery which charges in 3.5 hours and provides 3.5 hours of use.
A full charge typically takes approximately 3.5 hours. The device can operate for about 3.5 hours on a full charge.
2. Attaching the Camera Probe
Carefully insert the camera probe's connector into the designated port on the main endoscope unit. Secure it by tightening the metal ring around the connection.

Image: Step-by-step visual guide on how to connect the flexible camera probe to the handheld endoscope unit, showing the alignment and securing mechanism.
3. Inserting the Memory Card
Locate the TF card slot on the side of the endoscope unit. Insert the provided 8GB memory card until it clicks into place. This card is essential for saving images and videos.
Operating Instructions
1. Powering On/Off
Press and hold the power button (usually marked with a power symbol) for a few seconds to turn the device on or off. The LCD screen will illuminate upon startup.

Image: A clear front view of the endoscope's display and control panel, indicating the power button and other operational controls.
2. Adjusting LED Lights
The endoscope is equipped with 6 adjustable LED lights to illuminate dark inspection areas. Use the dedicated light adjustment button (often marked with a light bulb icon) to cycle through brightness levels or turn the lights on/off.

Image: An internal view diagram highlighting the endoscope's 6 LED lights and the highly photosensitive chip designed for clear imaging in various lighting conditions.
3. Capturing Images and Videos
While viewing the live feed, press the "OK" or capture button to take a still image. To record video, press the video recording button (if available) to start and stop recording. All captured media will be saved to the inserted memory card.
4. Navigating Menus
Use the directional buttons (up, down, left, right) and the "OK" button to navigate through the device's menu options. This allows you to adjust settings such as language, resolution, and review captured media.
Supported languages include English, German, Simplified Chinese, Spanish, French, Russian, and Japanese.
Maintenance
- Cleaning: Wipe the main unit with a soft, dry cloth. The camera probe can be cleaned with a damp cloth. Ensure the probe is dry before storage.
- Storage: Store the endoscope in a cool, dry place, away from direct sunlight and extreme temperatures.
- Battery Care: To prolong battery life, avoid fully discharging the battery frequently. Charge the device regularly, even if not in use for extended periods.
- Waterproof Rating: The camera lens and lamp are IP67 waterproof, meaning they can withstand immersion in water up to 1 meter for 30 minutes. The main unit is NOT waterproof. Do not submerge the main unit.
Troubleshooting
| Problem | Possible Cause | Solution |
|---|---|---|
| Device does not power on. | Low battery; Device malfunction. | Charge the device fully. If problem persists, contact customer support. |
| No image on screen. | Camera probe not connected properly; Damaged probe. | Ensure the camera probe is securely connected. Check for visible damage to the probe. |
| Images/videos not saving. | Memory card full or not inserted correctly; Corrupted memory card. | Check if the memory card is inserted correctly. Delete old files or try a different memory card. Format the card if necessary (this will erase all data). |
| LED lights not working. | Lights turned off; Malfunction. | Press the light adjustment button to turn on/adjust brightness. If problem persists, contact customer support. |
Specifications
| Feature | Detail |
|---|---|
| Model | Walfrontwhogptq3fm |
| Monitor | 4.3-inch Color LCD |
| Camera Resolution | 1920x1080, 1280x720, 640x480 |
| Horizontal Viewing Angle | 70° |
| Focal Length | 40-5000mm |
| Waterproof Level | IP67 (for lens/lamp only) |
| Lens Diameter | 8mm |
| Battery | 1 x Lithium Battery, 18650, 3.7V, 2600mAh |
| Battery Working Time | Approx. 3.5 hours |
| Battery Charging Time | Approx. 3.5 hours |
| LED Lights | 6 pcs |
| Line Length | 5-meter hard line |
| Material | ABS+Metal |
| Weight | Approx. 676g |
| Dimensions (Unit) | 170mm (6.7in) x 100mm (3.9in) (approx.) |

Image: Diagram illustrating the approximate dimensions of the main endoscope unit, measuring 170mm in length and 100mm in height.
Warranty and Support
For warranty information and technical support, please refer to the contact details provided in the original product packaging or visit the official Walfront website. Keep your purchase receipt as proof of purchase for warranty claims.
The product is manufactured by Walfront.
Applications
The Walfront Handheld Endoscope is suitable for a wide range of inspection tasks, including but not limited to:
- Automobile inspection (engine, exhaust, chassis)
- Pipeline inspection (drains, plumbing, HVAC ducts)
- Air conditioning inspection
- Object retrieval in hard-to-reach areas
- Industrial machinery inspection

Image: Visual examples of the endoscope's diverse applications, including automotive, plumbing, and general inspection scenarios, demonstrating its versatility.
