1. Product Overview
The Tosuny Mini WiFi Range Extender is a compact USB-powered device designed to extend the coverage of your existing wireless network. It supports IEEE 802.11 B/G/N standards and offers a transmission rate of up to 300Mbps. This device can operate in multiple modes, including WiFi Repeater, Access Point (AP), and TV adapter mode, making it versatile for various networking needs.

Image 1.1: The Tosuny Mini WiFi Range Extender, showing the USB connector, WPS button, and indicator lights for WiFi and LAN.
Package Contents:
- 1 x Tosuny Mini WiFi Range Extender
- 1 x Instruction Manual (this document)
- 1 x Ethernet Cable (may be included depending on package)
2. Setup Instructions
Before beginning, ensure you have access to your existing WiFi network name (SSID) and password.
2.1. Repeater Mode Setup (Extending Existing WiFi)
- Power On: Plug the WiFi Extender into a USB port for power. This can be a USB wall adapter, a computer USB port, or a USB port on a Smart TV. The indicator lights will illuminate.
- Connect to Extender: On your computer or mobile device, search for available WiFi networks. Connect to the network named 'Wireless-N' or similar (this is the extender's default network).
- Access Setup Page: Open a web browser and enter the default IP address (usually 192.168.10.1 or 192.168.1.254) or the setup URL provided in the quick start guide. If the page does not load, try clearing your browser cache or using a different browser.
- Login: Enter the default username and password (commonly 'admin' for both).
- Select Repeater Mode: On the setup page, choose 'Repeater Mode'. The extender will scan for available WiFi networks.
- Select Your Network: Choose your home WiFi network (SSID) from the list.
- Enter Password: Input the password for your home WiFi network.
- Configure Extender SSID (Optional): You can choose to keep the same SSID as your main network or create a new one (e.g., 'YourNetwork_EXT').
- Apply Settings: Save the settings. The extender will restart.
- Reconnect: After the extender restarts, connect your devices to the new extended WiFi network.
2.2. WPS Setup (Quick Setup)
If your main router supports WPS (Wi-Fi Protected Setup), you can use this method for a quicker setup.
- Power On: Plug the WiFi Extender into a USB port for power.
- Activate WPS on Router: Press the WPS button on your main WiFi router. Refer to your router's manual for the exact location and timing.
- Activate WPS on Extender: Within two minutes, press the WPS button on the Tosuny Mini WiFi Range Extender. The WPS indicator light on the extender will flash.
- Wait for Connection: The extender will automatically connect to your router. Once connected, the WiFi indicator light will become solid.

Image 2.1: The extender powered via a laptop's USB port, ready for configuration.
2.3. AP Mode Setup (Creating a New WiFi Network)
In AP mode, the extender connects to a wired network and broadcasts a new wireless network.
- Power On: Plug the WiFi Extender into a USB port for power.
- Connect Ethernet Cable: Connect an Ethernet cable from your router or modem to the LAN port on the WiFi Extender.
- Access Setup Page: Follow steps 2.1.2 to 2.1.4 to access the setup page.
- Select AP Mode: On the setup page, choose 'AP Mode'.
- Configure New WiFi: Set a new SSID (network name) and password for the wireless network the extender will create.
- Apply Settings: Save the settings. The extender will restart.
- Connect Devices: Connect your wireless devices to the newly created WiFi network.

Image 2.2: Illustration of the extender converting a wired internet connection into a wireless one (AP Mode).
2.4. TV Adapter Mode Setup (Wired Connection for Smart TVs)
This mode allows your Smart TV or other Ethernet-only devices to connect to your WiFi network wirelessly.
- Power On: Plug the WiFi Extender into a USB port on your Smart TV for power.
- Connect Ethernet Cable: Connect an Ethernet cable from the extender's LAN port to your Smart TV's Ethernet port.
- Access Setup Page: Follow steps 2.1.2 to 2.1.4 to access the setup page from a separate device (e.g., phone or laptop).
- Select TV Adapter Mode: On the setup page, choose 'TV Adapter Mode' (or similar, it might be integrated into Repeater mode where the LAN port becomes active for the TV).
- Select Your Network: Choose your home WiFi network (SSID) from the list.
- Enter Password: Input the password for your home WiFi network.
- Apply Settings: Save the settings. The extender will restart.
- Configure TV Network: On your Smart TV, ensure its network settings are set to obtain an IP address automatically (DHCP). The TV should now have internet access via the extender.

Image 2.3: The extender providing wireless internet to a Smart TV via an Ethernet cable.
3. Operating the Device
3.1. Indicator Lights
- WiFi LED: Indicates the status of the wireless connection. Blinking usually means data transfer, solid means connected.
- LAN LED: Indicates the status of the wired Ethernet connection. Blinking means data transfer, solid means connected.
- WPS LED: Flashes during WPS setup, solid when WPS connection is established.
3.2. Reset Button
The 'Reset' button is a small pinhole button located on the side of the device. To perform a factory reset, press and hold this button for approximately 5-10 seconds using a paperclip or similar pointed object until the indicator lights flash. This will revert all settings to their factory defaults.

Image 3.1: Detail of the LAN port and the recessed Reset button on the extender.
4. Maintenance
To ensure optimal performance and longevity of your Tosuny Mini WiFi Range Extender, follow these maintenance guidelines:
- Cleaning: Use a soft, dry cloth to clean the exterior of the device. Do not use liquid cleaners or aerosols.
- Placement: Place the extender in a well-ventilated area, away from direct sunlight, heat sources, and moisture. Avoid placing it near large metal objects or other electronic devices that may cause interference.
- Power: Always use a stable power source. Unplug the device during electrical storms or when not in use for extended periods.
5. Troubleshooting
If you encounter issues with your WiFi Range Extender, refer to the following common solutions:
- No Internet Connection:
- Ensure the extender is properly powered and indicator lights are active.
- Verify that your main router has an active internet connection.
- Re-run the setup process, ensuring you enter the correct WiFi password for your main network.
- Try moving the extender closer to your main router to improve signal strength.
- Perform a factory reset (see Section 3.2) and reconfigure.
- Cannot Access Setup Page:
- Ensure your device is connected to the extender's default WiFi network (e.g., 'Wireless-N').
- Try a different web browser or clear your browser's cache.
- Verify the IP address (e.g., 192.168.10.1) is entered correctly.
- Temporarily disable any VPN or firewall software on your computer.
- Slow Speed or Frequent Disconnections:
- Relocate the extender to a position halfway between your router and the desired coverage area.
- Avoid physical obstructions like thick walls or metal objects.
- Check for interference from other electronic devices (e.g., microwaves, cordless phones).
- Ensure your main router's firmware is up to date.
- WPS Setup Fails:
- Ensure your router supports WPS and it is enabled.
- Press the WPS buttons on both devices within the specified time frame (usually 2 minutes).
- If WPS continues to fail, use the web browser setup method (Section 2.1).
6. Specifications
| Feature | Specification |
|---|---|
| Model Number | Tosunyxas8cfowdr |
| Wireless Communication Standard | 802.11bgn |
| Data Transfer Rate | Up to 300Mbps (2.4 GHz) |
| Frequency Band Class | Single-Band (2.4 GHz) |
| Work Modes | Repeater, AP, TV Adapter |
| Security Protocols | WEP, WPA/WPS2, WPA-PSK/WPA2-PSK |
| Power Supply | USB Powered |
| Color | Black |
| Item Weight | 2.46 ounces |
| Dimensions (Approx.) | 3.27" x 1.02" x 0.55" |
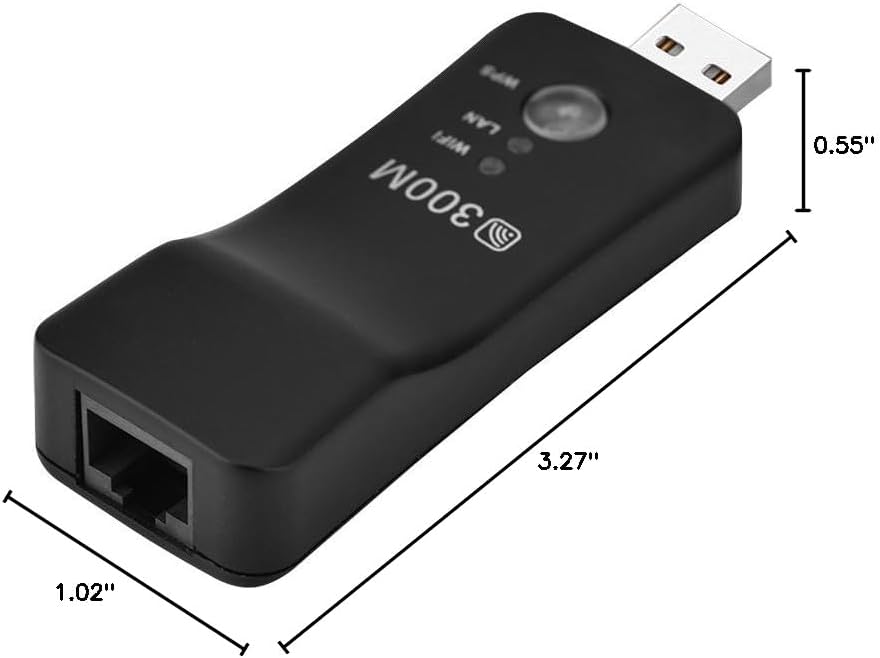
Image 6.1: Approximate dimensions of the extender.
7. Warranty and Support
7.1. Warranty Information
This product comes with a standard manufacturer's warranty. Please refer to the packaging or your point of purchase for specific warranty terms and conditions. Keep your purchase receipt as proof of purchase for any warranty claims.
7.2. Technical Support
For technical assistance or further inquiries, please contact your retailer or the manufacturer's customer support. Contact information can typically be found on the product packaging or the official Tosuny website.