
BAITHNA DC12V Motorcycle Anti-Theft Alarm Security System
BAITHNA DC12V Motorcycle Anti-Theft Alarm Security System Instruction Manual
Model: DC12V Motorcycle Anti-Theft Alarm Security System
Introduction
This manual provides comprehensive instructions for the installation, operation, and maintenance of your BAITHNA DC12V Motorcycle Anti-Theft Alarm Security System. This electronic anti-theft alarm system is designed to protect your motorcycle from theft with its remote control capabilities, including engine start, anti-hijacking, and adjustable sensitivity.

Image: The complete BAITHNA DC12V Motorcycle Anti-Theft Alarm System, including the main unit, siren, two remote controls, and wiring harness, shown alongside a motorcycle to illustrate its application.
Package Contents
Please verify that all components are present in your package:
- Main Alarm Unit
- Siren/Horn
- Two Remote Controls
- Wiring Harness with Fuse
- Instruction Manual (this document)

Image: A clear view of all individual components included in the BAITHNA DC12V Motorcycle Anti-Theft Alarm System package, including the main control unit, siren, two remote fobs, and the wiring loom.
Installation Instructions
Proper installation is crucial for the optimal performance of the alarm system. It is recommended that installation be performed by a qualified technician.
Important Notes Before Installation:
- This product defaults to AC ignition mode.
- Before installation, confirm whether your motorcycle uses AC or DC ignition mode.
- If your DC ignition mode motorcycle is being installed with an "AC ignition mode alarm," you will need to purchase an additional relay. Refer to the "DC ignition motorcycle—B wiring diagram" for details.
- Install according to the provided wiring diagrams to prevent circuit damage.
- The main host device is made of waterproof silicone, offering improved waterproofing.
Wiring Diagrams:
Refer to the following diagrams for correct wiring connections based on your motorcycle's ignition type.
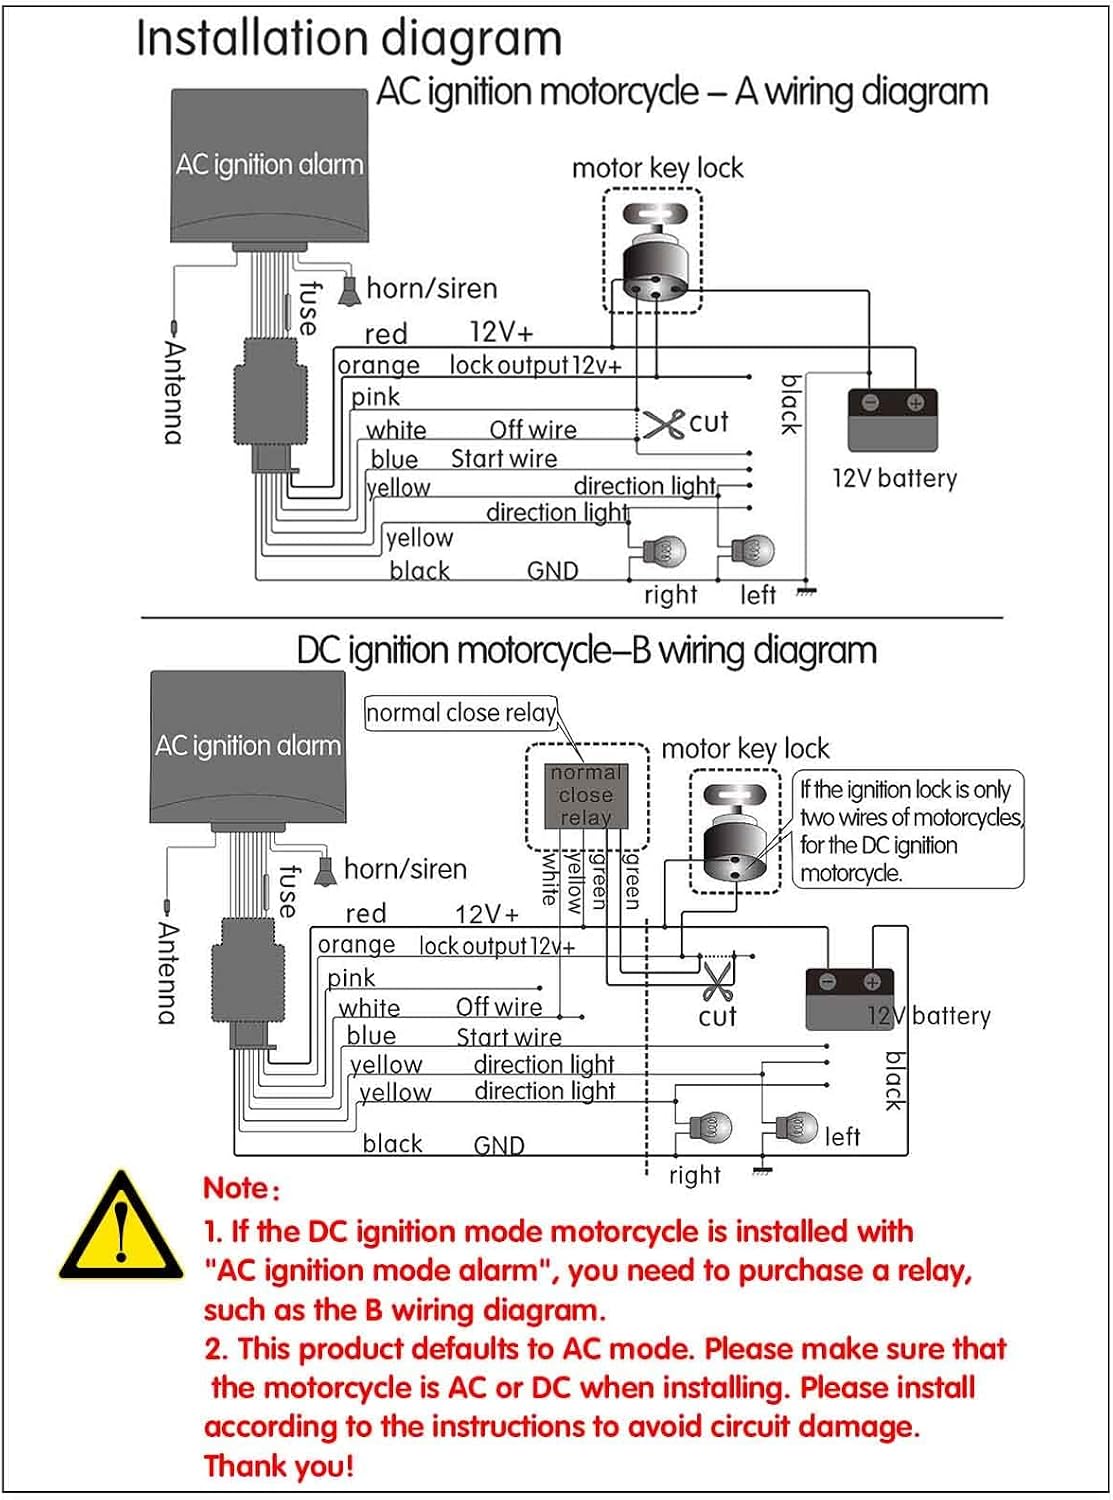
Image: Detailed wiring diagrams illustrating connections for both AC ignition (Diagram A) and DC ignition (Diagram B) motorcycles. Diagram B highlights the need for a normal close relay for DC ignition systems when using an AC ignition alarm.

Image: An additional wiring diagram (Diagram C) for sound and flash alarm, accompanied by a reminder section and technical parameters for the system.
Component Details:

Image: A close-up view of the inline fuse integrated into the wiring harness, essential for circuit protection.

Image: A close-up of the various wiring connectors, showing their design for secure and proper electrical connections.
Operating Instructions
The system is operated using the provided remote controls. Familiarize yourself with the remote's buttons and their functions.

Image: Two remote controls, each featuring buttons for arming, disarming, remote engine start, and alarm activation/deactivation.
Remote Control Functions:
- Arming: Press the lock button once to arm the alarm. The motorcycle will emit a sound, and the turn signals may flash.
- Disarming: Press the unlock button once to disarm the alarm. The motorcycle will emit a sound, and the turn signals may flash.
- Remote Engine Start: Press the lightning bolt button twice quickly to start the engine remotely.
- Remote Engine Cut-Off / Anti-Hijacking: While the engine is running (either normally or via remote start), press the unlock button to cut off the engine and activate the alarm. This function is for emergency anti-hijacking.
- Alarm Activation (Panic Button): Press the bell button to activate the alarm siren and flashing lights immediately. Press again to stop.
- Adjustable Sensitivity: The alarm features 3 sensitivity levels. Consult the full product manual for specific instructions on adjusting sensitivity, as this may involve a sequence of button presses on the remote.
Demonstration Video:
The following video demonstrates the alarm system's functionality, including arming and disarming.
No official seller demonstration videos are available for embedding at this time.
Maintenance
- Remote Control Battery Replacement: If the remote control distance shortens or the LED indicator dims, replace the battery. The remote controls typically use 2* CR2025, 2* CR2016, or 27A batteries. Refer to the remote's internal markings for the exact battery type.
- Waterproofing: The main alarm unit is designed with waterproof silicone. However, avoid submerging the unit in water or exposing it to extreme moisture for prolonged periods.
- Cleaning: Clean the main unit and remote controls with a soft, dry cloth. Do not use harsh chemicals or abrasive cleaners.
- Wiring Inspection: Periodically check all wiring connections for corrosion or loose contacts to ensure reliable operation.
- Ultra-low Power Consumption: The system is designed for ultra-low power consumption to prevent battery drain. However, if the motorcycle is stored for extended periods, consider disconnecting the motorcycle battery or using a trickle charger.
Troubleshooting
| Problem | Possible Cause | Solution |
|---|---|---|
| Alarm does not arm/disarm. |
|
|
| Alarm triggers too easily (high sensitivity). |
|
|
| Remote engine start not working. |
|
|
| No sound from siren. |
|
|
Specifications
| Working Voltage | DC 12V (9V-14V) |
| Static Current | <6mA |
| Working Temperature | -20°C to +80°C |
| Alarm Loudness | 125dB |
| Remote Control Battery Type | 2x CR2025 / 2x CR2016 / 27A (included) |
| Remote Control Voltage | DC 6V / 9V / 12V |
| Remote Control Frequency | 315MHz / 433MHz |
| Remote Control Distance | >60M (in open areas) |
| Main Unit Material | Waterproof Silicone |
| Item Weight | 6.4 ounces |
| Package Dimensions | 6.26 x 3.62 x 2.64 inches |
| Compatible Devices | Motorcycles |
Warranty and Support
For warranty information or technical support, please refer to the product packaging or contact BAITHNA customer service directly. Contact details are typically available on the manufacturer's official website or through your point of purchase.
For additional information or to explore other products, visit the BAITHNA Store on Amazon.
Ask a question about this manual
Ask about setup, troubleshooting, compatibility, parts, safety, or missing instructions. Manuals+ will review the question and use this page’s manual context to help answer it.