1. Introduction
This manual provides essential information for the safe and efficient operation of your Giandel 1200W Power Inverter with an integrated 20A Solar Charge Controller. This device converts 12V DC battery power to 120V AC household power, making it suitable for various applications including RVs, trucks, and off-grid solar systems. Please read this manual thoroughly before installation and use.
2. Safety Information
WARNING: Failure to follow these safety instructions may result in injury, damage to the inverter, or damage to connected devices.
- Ensure the battery voltage is 12V and fully charged before connecting the inverter.
- Do not expose the inverter to direct sunlight or extreme temperatures. Keep it in a cool, dry, and well-ventilated environment.
- Disconnect the positive battery terminal before performing any wiring to the inverter.
- Do not use the inverter with appliances that draw more wattage than the inverter can provide (1200W continuous, 2400W peak). Overloading can damage the inverter and the appliance.
- The inverter features multiple safety protections: over voltage, low voltage, overload, short circuit, over heat, and reverse polarity (fuse protected). These functions will trigger a warning and shutdown to protect the inverter.
- Ensure proper grounding of the inverter.
- Do not leave the power inverter in the ON position when your vehicle engine is off to prevent battery drain.

Figure 2.1: Inverter Safety Protections. This diagram visually represents the various safety mechanisms built into the inverter to protect both the device and connected electronics from electrical hazards.
3. Product Overview and Package Contents
3.1 Key Features
- 1200W Continuous Power: Provides 100% full continuous output power with 2400W peak power.
- Integrated 20A Solar Charge Controller (PWM): Suitable for connecting a 300W (15-18VDC) solar panel directly to charge SLA or GEL batteries. Includes a selectable switch for battery type.
- Multiple Outputs: Features two 120V AC outlets and one 2.4A USB charging port.
- Remote Control: Includes a remote controller with a 15ft cable for convenient ON/OFF operation.
- Advanced Protections: Isolated Input/Output design with comprehensive safety features including over voltage, low voltage, overload, short circuit, over heat, and reverse polarity protection.
- Durable Construction: Robust aluminum alloy housing for enhanced protection and integrated cooling fan for heat dissipation.
3.2 Package Contents
- 1x Giandel 1200W Power Inverter with 20A Solar Charge Controller
- 2x Battery Cables (one red, one black, 5AWG, 2 feet long)
- 1x Remote Controller with 15ft Cable (RJ10 connector)
- 1x User Manual (this document)

Figure 3.1: Giandel 1200W Power Inverter and Accessories. This image displays the main inverter unit, the remote control, and the battery connection cables included in the package.

Figure 3.2: Inverter Dimensions and Cable Details. This diagram provides physical measurements of the inverter and details about the remote control and battery cables.
3.3 Product Components

Figure 3.3: Inverter Front and Rear Panel Layout. This illustration identifies all ports, switches, and indicators on the inverter for easy reference during setup and operation.
4. Setup Instructions
4.1 Connecting to a 12V Battery
- Ensure the inverter's power switch is in the OFF position.
- Connect the red battery cable to the positive (+) terminal of your 12V battery.
- Connect the other end of the red battery cable to the positive (+) DC input terminal on the inverter.
- Connect the black battery cable to the negative (-) terminal of your 12V battery.
- Connect the other end of the black battery cable to the negative (-) DC input terminal on the inverter.
- Ensure all connections are tight and secure.

Figure 4.1: 12V DC Battery Connections. This image illustrates the correct way to connect the inverter to a 12V DC battery using the provided cables.
4.2 Connecting a Solar Panel (Optional)
The integrated 20A PWM solar charge controller allows direct connection of a solar panel to charge your battery. It is suitable for a 300W (15-18VDC) solar panel.
- Ensure the inverter's power switch is in the OFF position.
- Connect the positive (+) output of your solar panel to the 'Solar Energy Input +' terminal on the inverter.
- Connect the negative (-) output of your solar panel to the 'Solar Energy Input -' terminal on the inverter.
- Ensure all connections are tight and secure.
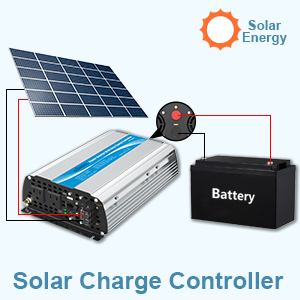
Figure 4.2: Solar Charge Controller Connection. This diagram shows the typical setup for connecting a solar panel to the inverter for battery charging.
4.3 Remote Control Connection
The remote control allows for convenient power management from a distance.
- Locate the RJ10 port on the inverter's front panel, labeled 'Remote On/Off'.
- Plug the RJ10 connector of the remote control cable into this port.
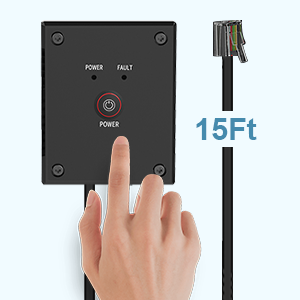
Figure 4.3: Remote Control Unit. This image displays the remote control and its connection cable.
4.4 Battery Type Selection
The inverter has a switch to select the battery type for optimal charging via the solar charge controller.
- Locate the 'Battery Select Switch' on the inverter's front panel.
- Set the switch to 'GEL' for Gel batteries or 'LEAD ACID' (SLA) for Sealed Lead Acid batteries, according to your battery type.
5. Operating Instructions
5.1 Powering On/Off
- After all connections are secure, press the 'POWER' button on the inverter's front panel or the remote control to turn the unit ON. The 'POWER' indicator light will illuminate.
- To turn OFF the inverter, press the 'POWER' button again.
5.2 Using AC Outlets and USB Port
- Once the inverter is ON, plug your 120V AC appliances into the two AC outlets.
- Connect USB-powered devices to the 2.4A USB port for charging.
- Ensure the total wattage of connected AC devices does not exceed 1200W.
5.3 Monitoring Battery Status
The inverter features a battery status indicator to display the battery level while using its built-in controller.
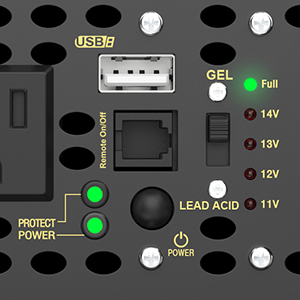
Figure 5.1: Battery Status Indicators. This image highlights the LED indicators that show the current battery voltage level.
5.4 Cooling Fan Operation
The built-in cooling fan operates automatically to prevent overheating. It will only start working when the internal temperature exceeds 104℉ (40℃).
6. Maintenance
- Keep the inverter clean and free from dust and debris. Use a dry cloth for cleaning.
- Ensure the cooling fan vents are not obstructed to allow for proper airflow.
- Periodically check all electrical connections to ensure they remain tight and secure. Loose connections can cause overheating and poor performance.
- Store the inverter in a cool, dry place when not in use for extended periods.
7. Troubleshooting
This section addresses common issues you might encounter with your Giandel 1200W Power Inverter.
| Problem | Possible Cause | Solution |
|---|---|---|
| Inverter does not turn on. | Loose battery connections, low battery voltage, blown fuse. | Check battery cable connections. Ensure battery is charged. Check inverter's internal fuses (if accessible and safe to do so, consult professional). |
| No AC output, but power light is on. | Overload, short circuit, over-temperature. | Reduce load on AC outlets. Disconnect all appliances, turn inverter off and on again. Allow inverter to cool down if it was running hot. |
| Solar charge controller not charging. | Incorrect solar panel connection, low sunlight, incorrect battery type setting, faulty solar panel. | Verify solar panel connections (positive to positive, negative to negative). Ensure sufficient sunlight. Check the GEL/LEAD ACID switch setting matches your battery. Test solar panel output. |
| Inverter shuts down frequently. | Overload, low battery voltage, over-temperature. | Reduce connected load. Recharge or replace battery. Ensure adequate ventilation around the inverter. |
| Remote control unresponsive. | Loose cable connection, faulty remote. | Check the RJ10 cable connection to the inverter. Try operating the inverter directly using its power button. |
8. Specifications
| Feature | Specification |
|---|---|
| Rated Power (AC Outlets) | 1200W Continuous |
| Peak Power | 2400W |
| USB Output | 1x DC 5V/2.4A (max) |
| Output Waveform | Modified Sine Wave |
| Nominal Input Voltage | 9.8-16VDC |
| Nominal Output Voltage | 110-125VAC |
| Internal Fuses | 4x 35A |
| Battery Cables | One pair, 5AWG, 2 feet length |
| Remote Controller Cable Length | 15ft |
| Solar Charge Controller | 20A PWM, suitable for 300W (15-18VDC) solar panel |
| Cooling Fan Activation | Activates when temperature exceeds 104℉ (40℃) |
| Product Dimensions | 44.41 x 7 x 2.68 inches |
| Item Weight | 4.85 pounds |
| Model Number | PM-1200HSC |
9. Warranty and Support
9.1 Warranty Information
The Giandel 1200W Power Inverter is covered by an 18-Month Warranty provided by Giandel. Please retain your proof of purchase for warranty claims.
9.2 Customer Support
For technical assistance, troubleshooting beyond this manual, or warranty inquiries, please contact Giandel customer support. Refer to the official Giandel website or your purchase documentation for the most current contact information.


