1. Introduction
This manual provides detailed instructions for the installation, operation, and maintenance of your Keshangda 7-inch Double Din Car Stereo (Model KSD-7018b). This unit features a digital capacitive touch screen, Bluetooth for wireless music streaming and hands-free calling, Mirror Link functionality, AM/FM radio, USB and TF card support, AUX input, video playback, and steering wheel control compatibility. A rear view camera is included with the unit.
The stereo supports various audio formats including DIS, MP3, WMA, ACC, OGG, WAV, RA, AC3, MP2, AMR, and video formats such as AVI, MP4, FLV, PMP, RM, RMVB, MPG. It also offers a 5V 2.1A charging function for smart devices.
2. Safety Information and Precautions
- Always read the entire installation manual before attempting installation. Professional guidance is recommended for installation. Incorrect installation can lead to short circuits or damage to the unit or vehicle.
- This car stereo operates on a 12V DC power supply. Verify your vehicle's voltage before installation to prevent short circuits.
- Exercise caution when handling electrical components during self-installation.
- Correctly identify and connect your car's positive and negative terminals according to the provided wiring diagram.
- This car stereo is not a CD/DVD player or a GPS unit. The faceplate is not removable.
3. Setup and Installation
3.1. Installation Guidelines
Due to the complexity of car audio systems, professional installation is highly recommended. If you choose to install the unit yourself, ensure you follow all safety precautions and wiring instructions carefully.
3.2. Wiring Diagram
Refer to the following diagram for proper wiring connections. Incorrect wiring can cause damage to the unit or vehicle's electrical system.

Image: Wiring diagram for the Keshangda KSD-7018b car stereo. It illustrates connections for power (A1-A8), speakers (B1-B8), and auxiliary inputs/outputs, including the rear view camera input (CAMIN) and antenna (Antenna in).
- A1: Parking Line: Connect if you want to watch video while driving. Not recommended for safety.
- A2: Reverse/Back Detection Line: Connect to the positive terminal of the car's reverse light. This enables automatic display of the rear view camera when reversing.
- A3: B+ 12V: Connect to the car's positive battery terminal (+12V).
- A4: Key 1: Connect to the original car's multi-function steering wheel control wire (if applicable).
- A5: ILL: Connect to the car's headlight control line for illumination synchronization.
- A6: ANT: Connect to the radio antenna power supply or subwoofer control line.
- A7: ACC +12V: Connect to the car's ignition switch (ACC) for power control.
- A8: GND: Connect to the car's negative battery terminal or a suitable ground point.
- Speaker Wires (B1-B8): Connect to the corresponding car speakers (Front Right, Front Left, Rear Right, Rear Left). Ensure correct polarity.
3.3. Rear View Camera Connection
The included rear view camera connects to the CAMIN input on the stereo. Ensure the camera's power wire is connected to the reverse light's positive terminal and its ground wire to a chassis ground. The A2 (Reverse/Back Detection Line) wire from the stereo must also be connected to the reverse light's positive terminal for automatic activation.
4. Operating Instructions
4.1. Power On/Off
The unit powers on automatically when the car's ignition is turned to the ACC or ON position. Press and hold the power button on the front panel to manually turn the unit off or on.
4.2. Touch Screen Operation
The 7-inch digital capacitive touch screen allows for intuitive control. Use your fingertip to tap, swipe, and drag icons and menus. The screen is designed for sensitive and easy operation.
4.3. Bluetooth Connection
The unit features built-in Bluetooth for wireless music streaming and hands-free calling.

Image: The car stereo's display showing the Bluetooth interface with a phone connected, indicating hands-free calling functionality.
- Turn on Bluetooth on your mobile device.
- On the car stereo, navigate to the Bluetooth menu.
- Search for available devices on your mobile phone. The stereo's device name will typically appear as "Keshangda" or a similar identifier.
- Select the stereo from your phone's Bluetooth list to pair. Confirm any pairing requests on both devices.
- Once paired, you can stream audio or make/receive hands-free calls through the stereo.
4.4. Mirror Link Function
Mirror Link allows you to display and control your smartphone's screen content on the car stereo's display. This function supports most Android and iOS devices (note: iPhone X and higher versions may not be supported for Mirror Link).

Image: The car stereo screen showing a navigation map, mirrored from a smartphone connected via Mirror Link.

Image: A visual guide demonstrating the Mirror Link connection process. Step 1 shows enabling USB debugging on the phone, Step 2 shows the stereo displaying phone content, and Step 3 shows a navigation app mirrored on the stereo.
- Connect your smartphone to the stereo using an original USB cable. This also allows for phone charging.
- For Android devices, you may need to enable "USB Debugging" in your phone's developer options.
- On the stereo, select the Mirror Link function.
- Your phone's screen content will be displayed on the stereo. You can control your phone through the stereo's touch screen.
4.5. USB and TF Card Playback
The unit supports media playback from USB drives and TF (MicroSD) cards up to 32GB.

Image: The car stereo's USB port being used to charge a smartphone, highlighting its multifunctionality.

Image: The car stereo's display showing a music playback screen, with icons indicating support for TF card, AUX, USB, and Bluetooth input sources.
- Insert your USB drive into the USB port or your TF card into the TF card slot.
- The unit will automatically detect the media and display the content. If not, select the USB or TF card source from the main menu.
- Browse and select your desired audio or video files for playback.
4.6. AM/FM Radio Operation
The stereo includes an AM/FM radio tuner with memory stations.
- Select the Radio function from the main menu.
- Use the touch screen controls to scan for stations, manually tune, or select from preset stations.
- The FM frequency range is 87.5-107.9Mhz, and the AM frequency range is 530-1710KHz.
4.7. AUX Input
Connect external audio devices using the AUX-in port on the front panel.
- Connect your external audio device (e.g., MP3 player) to the AUX-in port using a 3.5mm audio cable.
- Select the AUX source from the stereo's main menu.
- Audio from your external device will play through the car stereo speakers.
4.8. Video Playback
The unit supports 1080P video playback from USB drives or TF cards.
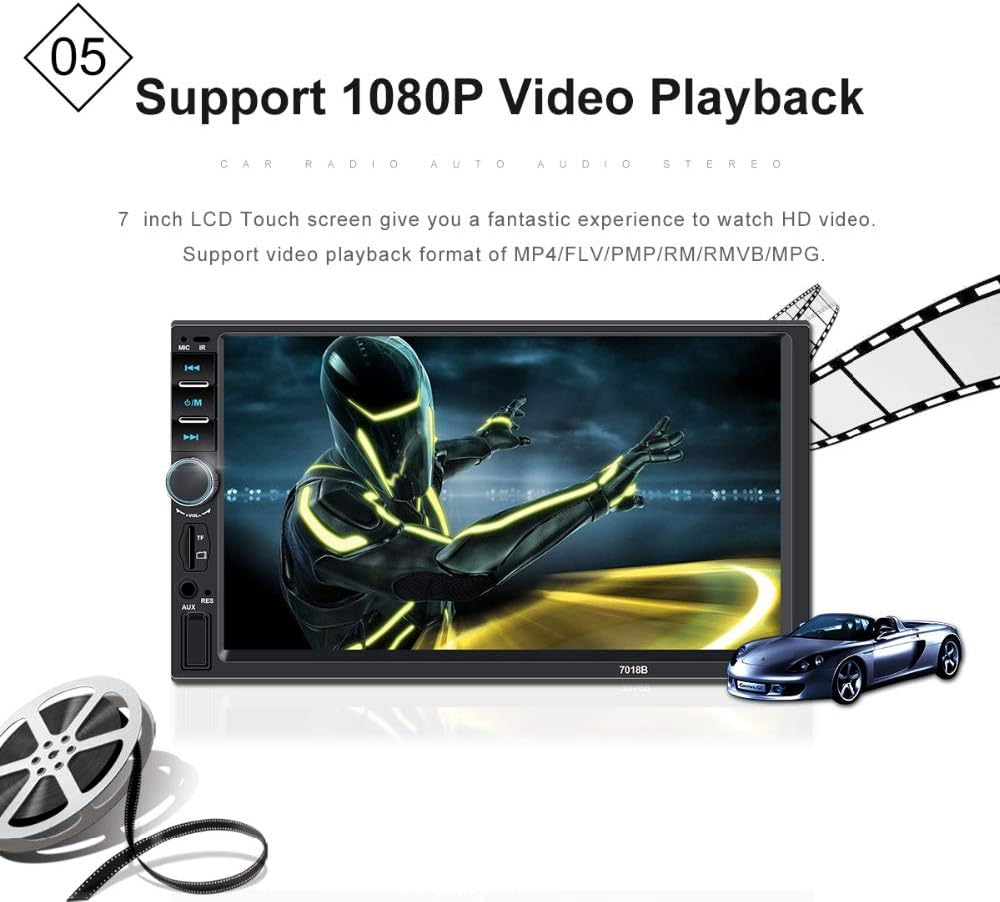
Image: The 7-inch LCD touch screen of the car stereo displaying a high-definition video, illustrating its video playback capability.
- Ensure your video files are in a supported format (AVI, MP4, FLV, PMP, RM, RMVB, MPG).
- Access video files from your USB drive or TF card through the media player interface.
- Select the desired video file for playback.
4.9. Steering Wheel Control
The unit supports connection to your vehicle's existing steering wheel controls for convenient operation. Refer to the wiring diagram for connecting the 'Key 1' wire to your car's steering wheel control line. Configuration may be required in the stereo's settings menu.
5. Maintenance
To ensure the longevity and optimal performance of your car stereo, follow these general maintenance guidelines:
- Cleaning the Screen: Use a soft, lint-free cloth to gently wipe the touch screen. For stubborn smudges, slightly dampen the cloth with water or a screen-safe cleaner. Avoid harsh chemicals or abrasive materials.
- General Cleaning: Keep the unit's front panel and buttons free from dust and debris. Use a soft, dry cloth.
- Avoid Extreme Temperatures: Do not expose the unit to extreme heat or cold, as this can affect its electronic components.
- Prevent Liquid Contact: Keep liquids away from the unit to prevent short circuits or damage.
6. Troubleshooting
If you encounter issues with your Keshangda car stereo, refer to the following common troubleshooting steps:
- No Power: Check all power connections (B+, ACC, GND) according to the wiring diagram. Ensure the car's fuse for the stereo is not blown.
- No Sound: Verify speaker connections are correct and secure. Check the volume level and ensure the mute function is not active.
- Bluetooth Connection Issues: Ensure Bluetooth is enabled on both the stereo and your phone. Delete previous pairings and try re-pairing. Move your phone closer to the stereo.
- Mirror Link Not Working: Ensure you are using an original USB cable. For Android, verify USB debugging is enabled. Note that some phone models (e.g., iPhone X and higher) may not be fully compatible.
- USB/TF Card Not Recognized: Ensure the media is formatted correctly (FAT32 is generally recommended). Check that the files are in supported formats. Try a different USB drive or TF card.
- Rear View Camera Not Displaying: Check the CAMIN connection and ensure the A2 (Reverse/Back Detection Line) is correctly connected to the reverse light's positive terminal.
- Unit Freezes/Unresponsive: Try resetting the unit. A small reset button (often recessed) may be present on the front panel, requiring a thin object (like a paperclip) to press.
If problems persist after attempting these steps, contact customer support for further assistance.
7. Specifications
| Feature | Specification |
|---|---|
| Brand | Keshangda |
| Model Number | KSD-7018b |
| Screen Size | 7 Inch HD Screen |
| Screen Resolution | 800 x 480 |
| Output Power (Max) | 4 x 60W (240 Watts total) |
| Audio Output Mode | Stereo |
| Connectivity Technology | Bluetooth, USB |
| Supported Audio Formats | DIS, MP3, WMA, ACC, OGG, WAV, RA, AC3, MP2, AMR, etc. |
| Supported Video Formats | AVI, MP4, FLV, PMP, RM, RMVB, MPG, H263, H264, 3GP, SWF, ASF, MJPEG, etc. |
| USB Charging Output | 5V 2.1A |
| TF Card Support | Up to 32GB |
| FM Frequency Range | 87.5-107.9Mhz |
| AM Frequency Range | 530-1710KHz |
| Product Dimensions | 6.22 x 17.81 x 10.01 cm |
| Item Weight | 500 Grams |
8. Warranty and Support
Keshangda offers a 1-Month Money Back Guarantee and a 1-Year Warranty for this product. A professional technical support team is available to assist with product issues. For detailed installation tutorials, FAQs, or technical support before and after sales, please refer to the contact information provided with your purchase or on the official Keshangda website.


