1. Introduction
The Renogy 500A Battery Monitor is a high-precision instrument designed to provide real-time monitoring of your battery system. It accurately measures voltage, current, consumed power, battery capacity, and battery degradation rate, offering essential insights for managing your power usage and maintaining battery health. This manual provides detailed instructions for the installation, operation, and maintenance of your battery monitor.

Figure 1: Front view of the Renogy 500A Battery Monitor display unit.
2. What's in the Box
Upon unpacking your Renogy 500A Battery Monitor, please ensure all the following components are present:
- 1 x LCD Interface (Battery Monitor Display)
- 1 x 500A Shunt/Sampler
- 1 x Shielded Wire (20ft/6m)
- 1 x B+ Wire (3ft/1m)
- 1 x Shunt Holder

Figure 2: All components included in the Renogy 500A Battery Monitor package, including the LCD interface, shunt/sampler, shunt holder, shielded wire, and B+ wire.
3. Product Features
The Renogy 500A Battery Monitor offers several key features to enhance your battery management experience:
- 1% Accuracy Measurement: Utilizes a shunt-type design for highly accurate real-time voltage and current draw measurements.
- Battery Protection: Features programmable high and low capacity alarm functions. The monitor will alarm, and the backlight and voltage value will flash simultaneously to prevent over-discharge.
- Universal Compatibility: Compatible with various battery types, including Lead Acid (AGM, GEL), Lithium Iron Phosphate, Lithium-ion, and Nickel-metal hybrid. Supports 12V, 24V, and 48V battery systems.
- Easy-to-Read Display: The high-definition backlit LCD displays multiple electronic parameters: Voltage, Current, Consumed Power, Battery Capacity, and battery degradation rate, with customized brightness.
- Simple Installation: A transparent shunt holder simplifies mounting, and the 20ft shielded cable allows for remote monitoring of battery status.

Figure 3: The monitor's large backlit LCD display showing present capacity, charge-discharge indicator, capacity percentage, remaining time, present voltage, present power, and present current.
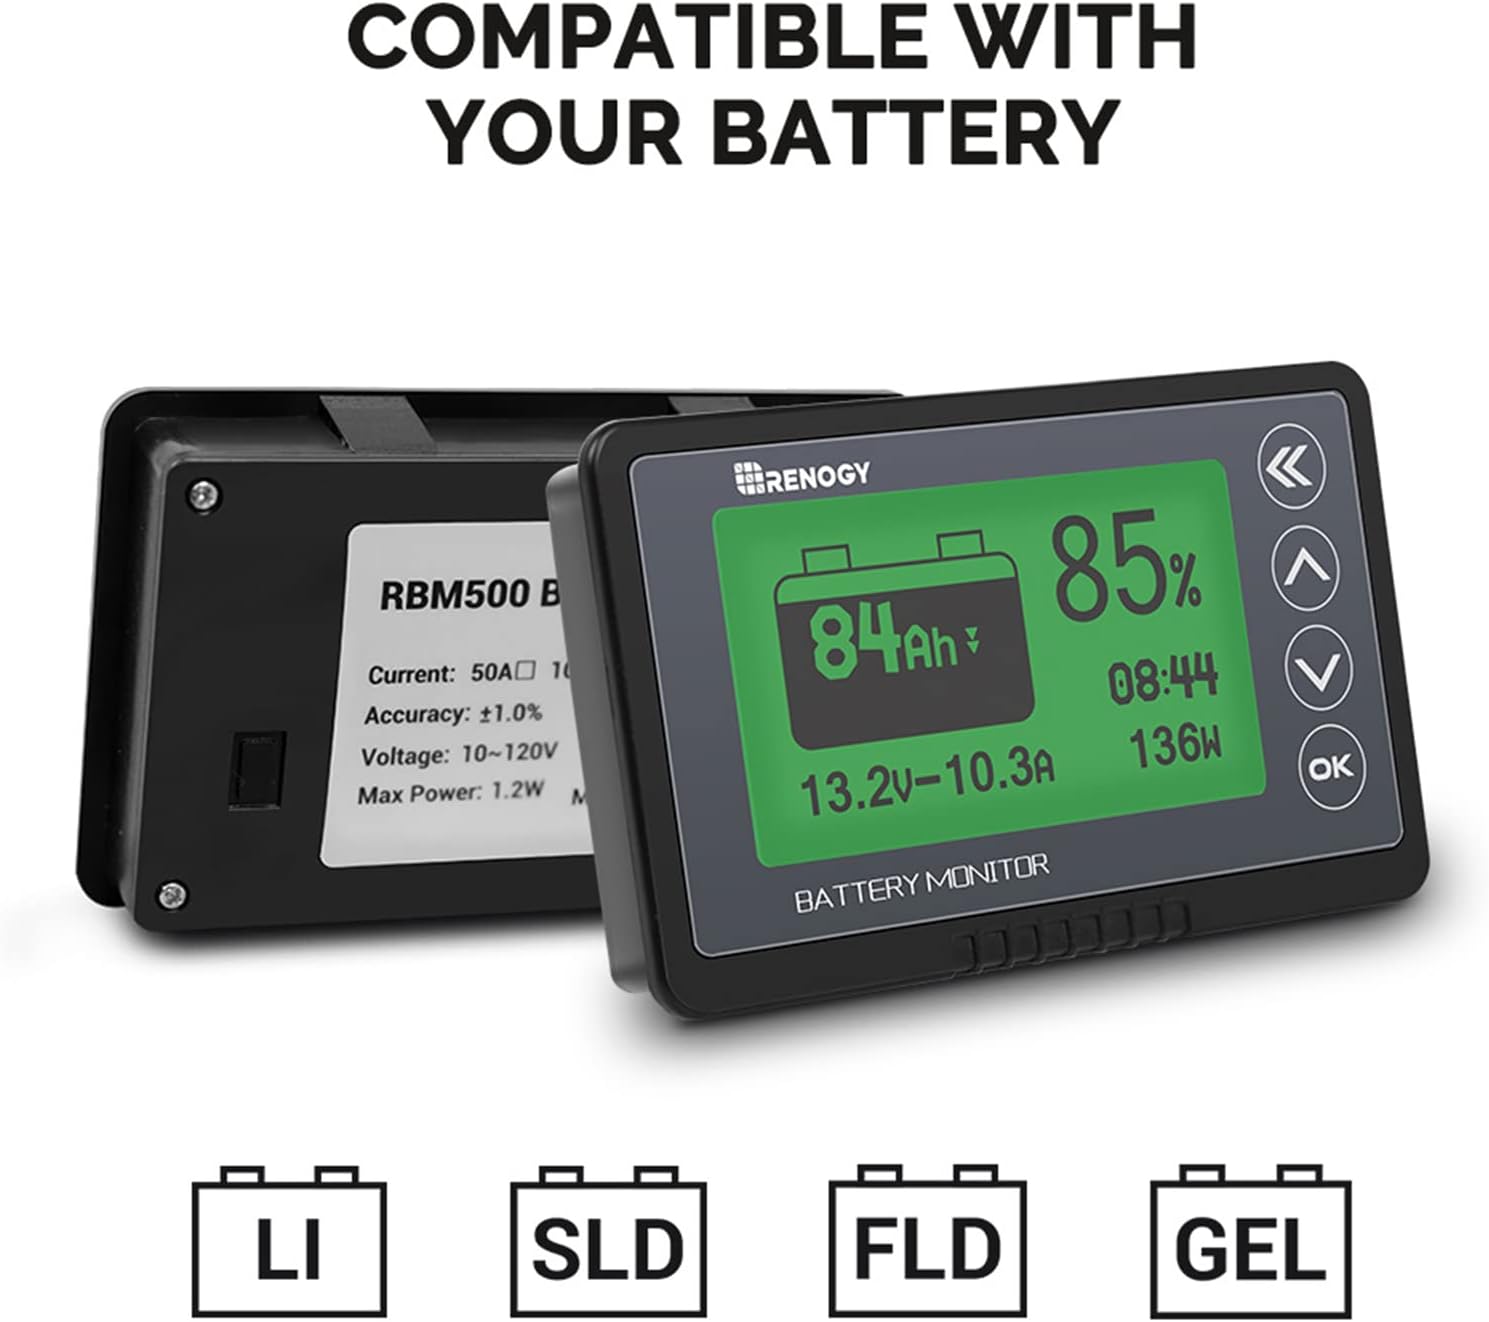
Figure 4: The battery monitor is compatible with Lithium (LI), Sealed Lead Acid (SLD), Flooded Lead Acid (FLD), and Gel batteries (GEL).

Figure 5: Dimensions of the battery monitor (3.9 x 2.4 x 0.7 inches) and the shunt holder (3.3 x 1.7 x 1.3 inches), with a total weight of 2.6 oz (75g).
4. Setup and Installation
Proper installation is crucial for accurate readings and safe operation. Follow these steps carefully:
- Connect the Shunt to the Battery: Begin by connecting the B- (Battery Negative) terminal of the 500A shunt to the negative port of your battery bank.
- Connect Loads to the Shunt: Next, connect the negative terminals of all your loads (e.g., inverter, charger) to the P- (Output Negative) terminal on the shunt. Ensure all negative loads pass through this side of the shunt.
- Connect B+ Wire: Take the provided B+ wire (red wire with a lug on one end) and connect the lug end to the positive terminal of your battery.
- Connect B+ Wire to Shunt: Connect the bare wire end of the B+ wire to either of the two B+ terminals on the shunt. These terminals are typically labeled B+ and are part of a small green connector block on the shunt.
- Connect Shielded Wire: Once you've ensured all wires are connected with the correct polarity, connect the shielded wire to the port on the shunt and the corresponding port located behind the battery monitor LCD. The battery monitor should turn on.

Figure 6: Detailed wiring diagram showing connections for the battery monitor, shunt, battery bank, inverter, and charger. Note the B- of the shunt connects to B- of the battery bank, and P- of the shunt connects to N- of the inverter and B- of the charger.

Figure 7: Simplified connection diagram of the shunt/sampler. The shunt must be series connected to the negative circuit; DO NOT connect to the positive circuit.
5. Operation
After successful installation, you will need to calibrate and configure your battery monitor.
5.1. Calibration
To ensure accurate readings, calibrate the percentage shown on the monitor. This requires your battery to be either completely full or completely discharged.
- Calibrate to 100% (Full Battery): With a completely full battery, hold down the UP arrow button for approximately 3 seconds. The display should show 100% when done correctly.
- Calibrate to 0% (Discharged Battery): Alternatively, with a completely discharged battery, hold down the DOWN arrow button for approximately 3 seconds. The display should show 0% when done correctly.
Note: You will need to recalibrate the monitor when replacing your batteries to maintain accuracy.
5.2. Parameter Settings
You can customize various parameters of the battery monitor to match your system's specifications and preferences.
- Use the UP and DOWN arrows to navigate through the display screens.
- Use the double back arrow button to return to the previous screen.
- To enter the parameter settings, press and hold the OK button for 3 seconds.
Within the parameter settings, you can program the following:
- CAP (Capacity): Set the battery's amp-hour capacity.
- HIGH V (High Voltage Disconnect): Set the high voltage threshold.
- LOW V (Low Voltage Disconnect): Set the low voltage threshold.
- Alarm: Set an alarm feature for when the battery reaches a certain amp-hour rating.
To Set Battery Capacity (CAP):
- Highlight 'CAP' in the parameter settings and press OK. The first digit of the capacity number will begin to flash.
- Use the UP or DOWN arrows to set the digit to your battery's capacity.
- Press OK again to move to the next decimal place. Repeat until all digits are set.
- Once you have gone through all digits, the first digit will highlight again. Press the double back arrow to exit the program setting.
Using the same controls, you can set the rest of the parameters (HIGH V, LOW V, Alarm) by highlighting them and following a similar process. After setting all desired parameters, press the double back arrow to return to the home screen.

Figure 8: The parameter settings screen, allowing adjustment of capacity (CAP), high voltage (HIGH V), low voltage (LOW V), and alarm settings.
6. Maintenance
To ensure the longevity and continued accuracy of your Renogy 500A Battery Monitor, consider the following maintenance tips:
- Keep Clean: Regularly wipe the display screen and unit with a soft, dry cloth to remove dust and debris. Avoid abrasive cleaners or solvents.
- Check Connections: Periodically inspect all wiring connections to the shunt and monitor to ensure they are secure and free from corrosion. Loose connections can lead to inaccurate readings or system malfunctions.
- Recalibration: As noted in the operation section, recalibrate the monitor whenever you replace your battery bank to ensure the capacity readings remain accurate.
- Environmental Conditions: Ensure the monitor is installed in an environment within its specified operating temperature and humidity ranges to prevent damage.
7. Troubleshooting
If you encounter issues with your Renogy 500A Battery Monitor, consider the following common troubleshooting steps:
- Display Not Turning On: Verify that the B+ wire is correctly connected to the positive terminal of the battery and to the shunt's B+ terminal. Check the shielded wire connection between the shunt and the monitor. Ensure the battery has sufficient voltage to power the monitor (Min. Operating Voltage: 10 Volts).
- Inaccurate Readings: Ensure the monitor has been properly calibrated to 100% or 0% as described in the Operation section. Check all wiring connections for tightness and proper polarity. Confirm that the battery capacity set in the parameters matches your actual battery bank capacity.
- No Current Reading: Ensure all loads are connected to the P- terminal of the shunt and that the shunt is correctly installed in series with the negative circuit.
- Alarm Not Functioning: Verify that the alarm parameters are correctly set in the monitor's settings menu.
For more detailed troubleshooting or complex issues, please refer to the official user manual PDF available for download or contact Renogy customer support.
Official User Manual (PDF): Download PDF
8. Specifications
Key technical specifications for the Renogy 500A Battery Monitor (Model: RBM500-G1):
| Specification | Value |
|---|---|
| Brand | Renogy |
| Model | 500A Battery Monitor (RBM500-G1) |
| Power Source | Battery Powered |
| Color | Black |
| Item Weight | 75 Grams (2.65 ounces) |
| Dimensions (L x W x H) | 3.9 x 2.4 x 0.7 inches |
| Min. Operating Voltage | 10 Volts |
| Maximum Operating Voltage | 120 Volts |
| Measurement Type | Ammeter, Voltmeter |
| Lower Temperature Rating | 14 Degrees Fahrenheit (-10°C) |
| Upper Temperature Rating | 140 Degrees Fahrenheit (60°C) |
| Specification Met | RoHS |
| UPC | 810009712206 |
9. Warranty and Support
Renogy products are designed for reliability and performance. For information regarding product warranty, technical support, or to explore other Renogy products, please visit the official Renogy store or contact their customer service directly.
Renogy Official Store: Visit Store


