Introduction
This manual provides essential information for the safe and efficient operation, installation, and maintenance of your EdgeStar BIDW1802SS 18-inch wide 8 place setting built-in dishwasher. Please read all instructions carefully before using the appliance and retain this manual for future reference.
Important Safety Information
Always follow basic safety precautions when using electrical appliances to reduce the risk of fire, electric shock, or injury. This appliance is intended for household use only.
- Read all instructions before using the dishwasher.
- Do not touch the heating element during or immediately after use.
- Use only detergents and rinse agents recommended for dishwashers.
- Keep children away from detergent and rinse aid.
- Do not operate the dishwasher unless all enclosure panels are properly in place.
- Do not tamper with controls.
- The dishwasher must be properly grounded.
- Do not store or use flammable materials near this or any other appliance.
Product Overview
The EdgeStar BIDW1802SS is an 18-inch wide built-in dishwasher designed for compact spaces, accommodating up to 8 place settings. It features a stainless steel finish and a user-friendly control panel.

Figure 1: Front view of the EdgeStar BIDW1802SS dishwasher installed in a kitchen.
Control Panel Features

Figure 2: Digital push-button control panel with cycle and option selections.
The digital push-button control panel allows for easy selection of wash cycles and options. It includes a digital display for cycle time and status indicators for pre-wash, main-wash, rinse, and drying phases.
Interior Components

Figure 3: Interior view showing the upper and lower racks, silverware basket, and detergent dispenser.
The dishwasher features two racks, a silverware basket, and a cup tray to maximize loading capacity. The detergent and rinse aid compartments are located on the inner door panel.

Figure 4: Detachable silverware basket for organized utensil washing.
Installation and Setup
Proper installation is crucial for the performance and longevity of your dishwasher. It is recommended that installation be performed by a qualified technician.
Location Requirements
- Ensure the installation area meets the cutout dimensions: 32.5" H x 17.75" W x 23" D.
- The dishwasher requires a 120V electrical connection and appropriate water supply and drainage.
- Position the dishwasher to allow for easy access to water and electrical connections.
Connecting Utilities
- Connect the water inlet hose to a hot water supply line.
- Securely connect the drain hose to the household drain system, ensuring proper air gap if required by local codes.
- Connect the electrical supply, ensuring the appliance is properly grounded.
- Verify all connections are tight and free of leaks.
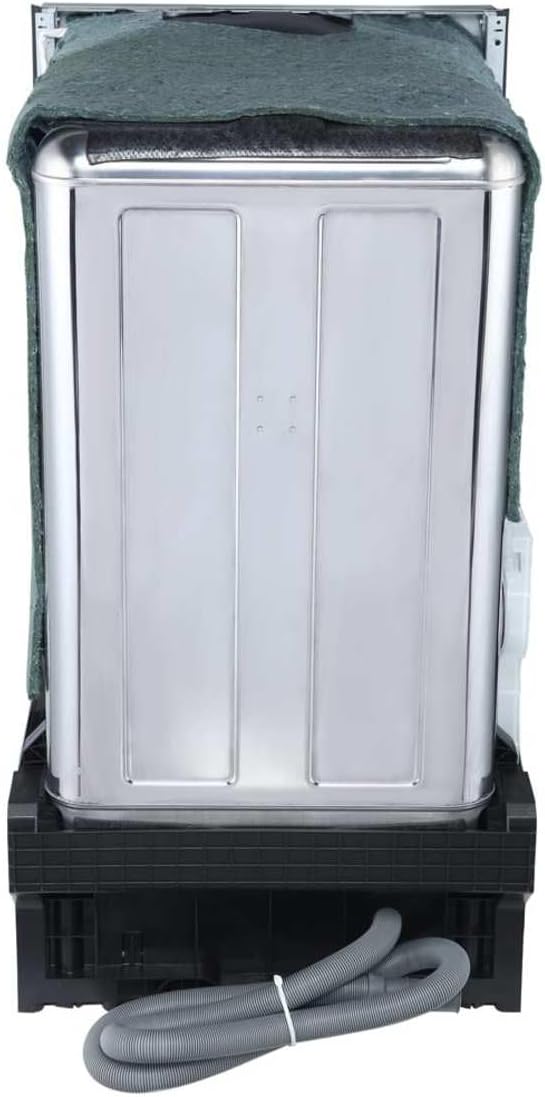
Figure 5: Rear connections for water supply and drainage.
Operating Instructions
Loading the Dishwasher
- Scrape off large food particles from dishes before loading.
- Place larger items in the lower rack and smaller items, glasses, and cups in the upper rack.
- Ensure dishes do not block the spray arms or detergent dispenser.
- Place silverware in the designated basket with handles up for forks and spoons, and handles down for knives.
Adding Detergent and Rinse Aid
- Open the detergent dispenser cover and add the recommended amount of dishwasher detergent. Close the cover securely.
- Fill the rinse aid dispenser with liquid rinse aid. The dispenser will automatically release rinse aid during the rinse cycle to prevent spots and improve drying.
Selecting a Wash Cycle and Options
Press the desired cycle button on the control panel. Available cycles include:
- Heavy: For heavily soiled dishes and pots.
- Normal: For regularly soiled dishes.
- ECO: Energy-efficient cycle for normal loads.
- Glass: Gentle cycle for delicate glassware.
- Rapid: Quick wash for lightly soiled items.
- Rinse: For rinsing dishes that will be washed later.
Select additional options as needed:
- Sanitize: Increases water temperature for sanitization.
- Hi Temp: Boosts wash temperature for improved cleaning.
- Heated Dry: Activates a heating element for enhanced drying.
- Delay: Delays the start of the wash cycle for up to 24 hours.
Press the "Start/Cancel" button to begin the cycle. The digital display will show the remaining time, and indicator lights will illuminate to show the current stage of the wash cycle.
Care and Maintenance
Cleaning the Interior
- Regularly clean the filter assembly at the bottom of the dishwasher to prevent food particle buildup.
- Wipe down the interior with a damp cloth and mild detergent as needed.
- Periodically run a dishwasher cleaning cycle with a specialized cleaner to remove mineral deposits and odors.
Exterior Care
- Clean the stainless steel exterior with a soft cloth and a stainless steel cleaner to maintain its finish.
- Wipe the control panel gently with a damp cloth. Avoid abrasive cleaners.
Leakage Sensor
The dishwasher is equipped with a leakage sensor that automatically shuts off water flow if a leak is detected, protecting your home from water damage. If this feature activates, consult the troubleshooting section.
Troubleshooting Guide
Before contacting customer service, review the following common issues and solutions:
| Problem | Possible Cause | Solution |
|---|---|---|
| Dishwasher does not start | Door not fully closed; Power supply issue; Cycle not selected. | Ensure door is latched; Check circuit breaker; Select a wash cycle and press Start. |
| Dishes are not clean | Improper loading; Clogged spray arms/filter; Insufficient detergent; Water temperature too low. | Reload dishes correctly; Clean spray arms and filter; Use recommended detergent; Ensure hot water supply. |
| Dishes are not drying | No rinse aid; Heated Dry option not selected; Improper loading. | Refill rinse aid dispenser; Select Heated Dry option; Ensure proper spacing for air circulation. |
| Error Code E4 (or similar) | Water overflow detected (leakage sensor activated). | Turn off power to the dishwasher. Inspect for visible leaks. If no obvious leak, contact customer support. |
| Unusual noises | Items interfering with spray arms; Foreign object in pump; Loose components. | Rearrange dishes; Inspect for and remove foreign objects; Contact service if noise persists. |
Specifications
| Feature | Detail |
|---|---|
| Model Number | BIDW1802SS |
| Installation Type | Built-In |
| Capacity | 8 Place Settings |
| Dimensions (H x W x D) | 32.5" x 17.63" x 22.44" |
| Cutout Dimensions (H x W x D) | 32.5" x 17.75" x 23" |
| Weight | 62.8 lbs |
| Finish Type | Stainless Steel |
| Inner Material | Stainless Steel |
| Voltage | 120V |
| Amperage | 6.67A |
| Noise Level | 52 Decibels |
| Number of Cycles | 6 (Heavy, Normal, ECO, Glass, Rapid, Rinse) |
| Number of Options | 3 (Sanitize, Hi Temp, Heated Dry) |
| Special Feature | Leakage Sensor |
| Controls Type | Push Button |
| Display Type | LED |
Warranty and Customer Support
For warranty information or technical assistance, please refer to the warranty card included with your product or contact EdgeStar customer support directly. Keep your purchase receipt and model number readily available when contacting support.
EdgeStar Customer Support: Visit the official EdgeStar website for contact details and service information.