Introduction
This manual provides essential instructions for the installation, operation, maintenance, and troubleshooting of your SonicWall TZ400 Network Security Appliance. Please read this document thoroughly before setting up your device to ensure proper functionality and security.
1. Setup and Installation
1.1 Package Contents
Verify that all items are present in the package:
- SonicWall TZ400 Appliance
- Power Adapter
- Power Cord
- Ethernet Cable
- Quick Start Guide (refer to this manual for detailed instructions)
1.2 Physical Installation
- Placement: Position the appliance in a cool, dry, and well-ventilated area. Ensure adequate space around the device for airflow. Avoid placing it near heat sources or in direct sunlight.
- Power Connection: Connect the power adapter to the appliance's power input and then plug the power cord into a suitable electrical outlet. The device will power on automatically.
- Network Connections:
- Connect your Internet Service Provider's (ISP) modem or router to the WAN port (typically labeled X1) on the SonicWall TZ400 using an Ethernet cable.
- Connect your internal network devices (e.g., switch, computer) to the LAN ports (typically labeled X0, X2-X6) using Ethernet cables.
- For initial configuration, connect a computer directly to the X0 (LAN) port.

Image 1.1: Front view of the SonicWall TZ400 appliance, showing LED indicators, a USB port, and network port labels.
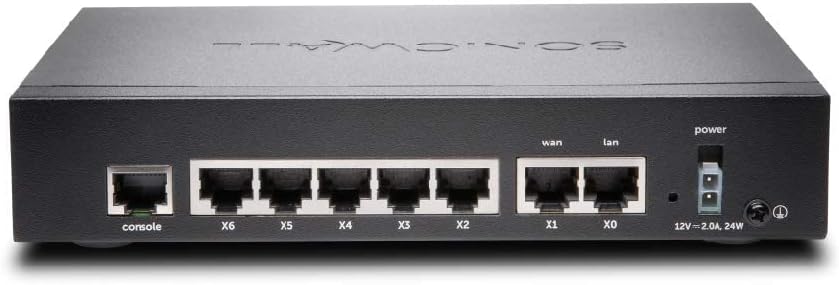
Image 1.2: Rear view of the SonicWall TZ400 appliance, displaying the console port, multiple LAN/WAN Ethernet ports (X0-X6), and the power input.
1.3 Initial Configuration Access
- Ensure your computer is connected to the X0 (LAN) port of the TZ400.
- Configure your computer's network adapter to obtain an IP address automatically (DHCP). The TZ400's X0 interface typically acts as a DHCP server.
- Open a web browser and navigate to the default management IP address, usually http://192.168.168.168.
- Log in using the default credentials (refer to the Quick Start Guide or device label for initial username and password). You will be prompted to change the password upon first login.
- Follow the on-screen setup wizard to configure basic network settings, including WAN connectivity and time zone.
2. Operation
2.1 Network Configuration
The SonicWall TZ400 provides extensive options for network configuration. Access these settings via the web management interface.
- WAN Settings: Configure your Internet connection type (e.g., Static IP, DHCP, PPPoE).
- LAN Settings: Manage IP addressing, DHCP server settings, and VLANs for your internal network.
- Wireless (if applicable): If your model includes wireless capabilities, configure SSIDs, security protocols, and wireless channels. The TZ400 supports 802.11ac wireless type.
2.2 Security Features
The TZ400 is designed to provide robust network security. Key features include:
- Firewall Rules: Create and manage access rules to control traffic flow between network zones.
- Intrusion Prevention System (IPS): Protect against network-based attacks and vulnerabilities.
- Gateway Anti-Virus/Anti-Spyware: Scan incoming and outgoing traffic for malicious content.
- VPN (Virtual Private Network): Establish secure connections for remote access or site-to-site communication.
- Content Filtering: Control access to inappropriate or unproductive web content.
2.3 Monitoring and Reporting
The appliance offers tools to monitor network activity and generate reports:
- System Logs: View detailed logs of network events, security alerts, and system status.
- Real-time Monitoring: Observe current network traffic, connections, and resource utilization.
- Reports: Generate customizable reports on security threats, user activity, and bandwidth usage.
3. Maintenance
3.1 Firmware Updates
Regularly update the appliance firmware to ensure optimal performance, security, and access to new features. Firmware updates can be performed via the web management interface.
- Download the latest firmware from the official SonicWall support portal.
- Navigate to the firmware update section in the web interface.
- Upload the downloaded firmware file and follow the on-screen prompts. The device will reboot after the update.
3.2 Backup and Restore Configuration
It is recommended to regularly back up your configuration settings. This allows for quick recovery in case of misconfiguration or system issues.
- Backup: From the management interface, locate the backup option to save your current configuration to your computer.
- Restore: Use the restore option to upload a previously saved configuration file to the appliance.
3.3 Regular Checks
Perform periodic checks to ensure the appliance is functioning correctly:
- Monitor system logs for unusual activity or errors.
- Verify that all security services (e.g., IPS, Anti-Virus) are active and up-to-date.
- Check the physical connections and LED indicators for normal operation.
4. Troubleshooting
4.1 Common Issues
- No Internet Access:
- Verify the WAN cable connection to your ISP modem.
- Check WAN status in the management interface.
- Ensure your ISP connection is active.
- Cannot Access Management Interface:
- Confirm your computer is connected to a LAN port (e.g., X0) and has an IP address from the TZ400.
- Try pinging the default gateway (192.168.168.168).
- Clear your browser cache or try a different browser.
- Slow Network Performance:
- Check for high CPU or memory usage in the system monitoring section.
- Review firewall logs for excessive blocked traffic or attacks.
- Ensure firmware is up-to-date.
4.2 LED Indicators
The front panel LEDs provide status information:
- Power LED: Indicates power status. Solid green for normal operation.
- Activity LEDs (10/100/act, 1000/act): Indicate network activity and link speed for each port.
- Refer to the device's specific documentation for a complete list of LED behaviors and their meanings.
4.3 Factory Reset
A factory reset will revert all configuration settings to their default values. This should be used as a last resort for troubleshooting.
- Locate the reset button on the device (often recessed).
- With the device powered on, use a paperclip or similar pointed object to press and hold the reset button for approximately 10-15 seconds until the device reboots.
- After the reset, the device will return to its default IP address and credentials.
5. Specifications
| Feature | Detail |
|---|---|
| Brand | Sonicwall |
| Model Name | TZ400 |
| Item Model Number | TZ400 |
| Operating System | SonicOS 6.x |
| Wireless Type | 802.11ac |
| Frequency Band Class | Dual-Band |
| Connectivity Technology | Ethernet |
| Antenna Type | Internal |
| Item Weight | 0.16 ounces (approx. 4.54 g) |
| Product Dimensions (LxWxH) | 5.28 x 7.48 x 3.26 inches |
| Date First Available | June 4, 2015 |
6. Warranty and Support
6.1 Product Warranty
The SonicWall TZ400 Network Security Appliance typically comes with a manufacturer's limited warranty. For specific warranty terms and conditions, including duration and coverage, please refer to the documentation provided with your purchase or visit the official SonicWall website. Warranty details may vary based on region and reseller.
6.2 Technical Support
For technical assistance, firmware downloads, and additional resources, visit the official SonicWall support portal. Please note that access to certain technical support services, including direct assistance from SonicWall, may require an active support license or subscription. Ensure your device is registered on MySonicWALL to manage licenses and access available support options.
For more information, visit: SonicWall Support


