1. Important Safety Instructions
Always observe basic safety precautions when using electric tools to reduce the risk of fire, electric shock, and personal injury. Read all instructions before operating this product.
- Work Area Safety: Keep your work area clean and well-lit. Cluttered or dark areas invite accidents. Do not operate power tools in explosive atmospheres, such as in the presence of flammable liquids, gases, or dust.
- Electrical Safety: Avoid body contact with earthed or grounded surfaces such as pipes, radiators, ranges, and refrigerators. There is an increased risk of electric shock if your body is earthed or grounded.
- Personal Safety: Always wear eye protection. Use personal protective equipment such as dust masks, non-skid safety shoes, hard hats, or hearing protection when appropriate. Stay alert, watch what you are doing, and use common sense when operating a power tool.
- Tool Use and Care: Do not force the power tool. Use the correct power tool for your application. Disconnect the plug from the power source and/or the battery pack from the power tool before making any adjustments, changing accessories, or storing power tools.
- Battery Tool Use and Care: Recharge only with the charger specified by the manufacturer. Use power tools only with specifically designated battery packs.
2. Product Overview
The Bosch GSB 12V-15 is a compact and powerful 12V cordless impact driver drill designed for various drilling and driving applications. It features a robust motor, variable speed control, and an ergonomic design for comfortable use.
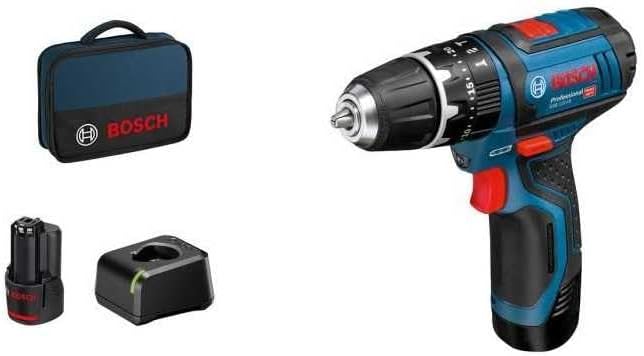
Figure 2.1: Bosch GSB 12V-15 Impact Driver Drill complete kit, including the drill, two 12V Li-ion batteries, a charger, and a soft carrying case.

Figure 2.2: Detailed view of the Bosch GSB 12V-15 Impact Driver Drill, highlighting its compact design and key controls.
Key Components:
- Chuck: For securing drill bits and screwdriver bits.
- Torque Setting Ring: Adjusts the torque for driving screws.
- Mode Selector: Switches between drilling and impact driving modes.
- Speed Selector: Controls the gear speed (1st gear for high torque, 2nd gear for high speed).
- Trigger Switch: Activates the tool and controls variable speed.
- Forward/Reverse Switch: Changes the rotation direction.
- Battery Pack: Removable 12V Lithium-ion battery.
- Battery Charger: For recharging the battery packs.
3. Setup
3.1 Charging the Battery
- Connect the charger to a suitable power outlet.
- Insert the battery pack into the charger. Ensure it clicks into place.
- The charging indicator light on the charger will show the charging status. Refer to the charger's specific instructions for light indications.
- Once fully charged, remove the battery pack from the charger.
3.2 Installing/Removing the Battery Pack
- Installation: Slide the charged battery pack into the base of the tool until it clicks securely into place.
- Removal: Press the battery release button (usually located on the side of the battery) and slide the battery pack out of the tool.
3.3 Installing/Removing Drill Bits or Screwdriver Bits
- Ensure the tool is switched off and the battery is removed for safety.
- Rotate the chuck counter-clockwise to open the jaws.
- Insert the desired drill bit or screwdriver bit fully into the chuck.
- Rotate the chuck clockwise to tighten the jaws firmly around the bit. Ensure the bit is centered and secure.
- To remove, rotate the chuck counter-clockwise and pull the bit out.
4. Operating Instructions
4.1 Powering On/Off and Speed Control
- To turn the tool on, press the trigger switch. The tool speed increases as you press the trigger further.
- To turn the tool off, release the trigger switch.
4.2 Forward/Reverse Rotation
The forward/reverse switch is located above the trigger. Push it to the left for forward rotation (for drilling and driving screws) and to the right for reverse rotation (for removing screws or freeing jammed bits).
4.3 Torque Settings (for Driving Screws)
The torque setting ring allows you to adjust the amount of torque applied before the clutch disengages. This prevents overtightening screws or damaging the workpiece. Rotate the ring to select the desired torque level. Start with a lower setting and increase as needed.
4.4 Mode Selection (Drilling vs. Impact Driving)
Use the mode selector to switch between drilling (drill bit icon) and impact driving (hammer icon) modes. Select the appropriate mode for your task.
4.5 Gear Speed Selection
The gear speed selector allows you to choose between two speed ranges:
- Gear 1 (Low Speed): Provides higher torque for driving large screws or drilling large holes.
- Gear 2 (High Speed): Provides higher speed for smaller drilling tasks or faster driving.
4.6 General Operation Tips
- Always hold the tool firmly with both hands if possible, especially during high-torque applications.
- Apply steady, even pressure. Do not force the tool.
- For drilling, start with a pilot hole if necessary, especially in hard materials or near edges.

Figure 4.1: The compact design of the GSB 12V-15 allows for operation in confined spaces, such as inside cabinets.

Figure 4.2: Demonstrating the GSB 12V-15 being used for driving screws into a wooden surface, highlighting its utility for assembly tasks.

Figure 4.3: The GSB 12V-15 in action, drilling into a wall, showcasing its capability for various drilling applications.
5. Maintenance
5.1 Cleaning
- Regularly clean the ventilation slots of the tool to prevent overheating.
- Use a soft, damp cloth to wipe down the tool's exterior. Do not use harsh chemicals or abrasive cleaners.
- Keep the chuck jaws free of dust and debris for optimal bit gripping.
5.2 Battery Care
- Store batteries in a cool, dry place away from direct sunlight and extreme temperatures.
- Do not store fully discharged batteries for extended periods. Recharge them periodically.
- Avoid exposing batteries to water or moisture.
5.3 Storage
When not in use, store the tool, batteries, and charger in their original carrying case or a secure, dry location out of reach of children.
6. Troubleshooting
| Problem | Possible Cause | Solution |
|---|---|---|
| Tool does not start | Battery discharged or not properly inserted. | Charge the battery. Ensure battery is fully inserted until it clicks. |
| Reduced power or performance | Battery low, incorrect torque setting, or dull bit. | Recharge battery. Adjust torque setting. Replace or sharpen bit. |
| Battery not charging | Charger not plugged in, faulty battery/charger, or battery too hot/cold. | Check power connection. Allow battery to reach room temperature. Contact service if problem persists. |
| Bit slips in chuck | Chuck not tightened sufficiently or chuck jaws are dirty. | Tighten chuck firmly. Clean chuck jaws. |
7. Specifications

Figure 7.1: Dimensions of the Bosch GSB 12V-15 Impact Driver Drill: 187 mm (length) x 178 mm (height).
| Feature | Specification |
|---|---|
| Brand | Bosch Professional |
| Model | GSB 12V-15 |
| Part Number | 06019B690H |
| Power Source | Battery Powered |
| Voltage | 12V |
| Battery Type | Lithium-ion |
| Battery Capacity | 2 Amp Hours |
| Maximum Rotational Speed | 1300 RPM |
| Maximum Torque | 30 Newton Meters |
| Number of Speeds | 2 |
| Maximum Chuck Size | 10 Millimeters |
| Drilling Capacity (Wood) | 10 Millimeters |
| Drilling Capacity (Metal) | 10 Millimeters |
| Tool Dimensions (L x H) | 187 mm x 178 mm (approx. 7.36" x 7.01") |
| Item Weight | 9 Grams (Note: This weight appears to be for a component or is an error in source data. Actual tool weight is typically higher.) |
8. Warranty and Support
Bosch Professional products are manufactured to high-quality standards and undergo rigorous quality control. This product is covered by a manufacturer's warranty against defects in materials and workmanship. Please refer to the warranty card included with your product for specific terms, conditions, and registration information.
For technical support, service, or warranty claims, please contact your local Bosch Professional service center or authorized dealer. Contact information can typically be found on the Bosch Professional website for your region.


