1. Important Safety Information
Please read all instructions carefully before operating the appliance. Retain this manual for future reference.
- This ice machine is designed for indoor use only. Do not install or operate outdoors.
- Ensure the installation area is well-ventilated, with ambient temperatures between 10°C (50°F) and 32°C (90°F).
- Avoid locations exposed to wind, rain, water spray, or drips.
- Before initial use, keep the ice machine upright for at least 24 hours to allow the refrigerant to settle.
- Connect the appliance to a properly grounded electrical outlet. Do not use extension cords or adapters.
- Ensure all water connections are secure to prevent leaks.
- Do not block ventilation openings on the appliance.
- Always unplug the unit before cleaning or performing maintenance.
2. Product Overview
The VEVOR Commercial Ice Maker Machine is designed for high-efficiency ice production, suitable for various commercial and home settings. It features a robust construction and intelligent controls.
Key Features:
- Efficient Ice Making: Produces up to 320 lbs of ice per 24 hours, with a cycle time of 8-15 minutes.
- Large Storage Capacity: Integrated bin holds up to 77 lbs of ice.
- Premium Quality Construction: Built with heavy-duty brushed stainless steel exterior and food-grade PP injection liner interior.
- Advanced LCD Control Panel: Intuitive interface for easy operation, including self-cleaning and ice thickness adjustment.
- Cyclopentane Foam Insulation: Six-sided insulation layer helps prevent ice from melting quickly.
- Built-in Drainage Pump: Eliminates the need for a separate drainage pump.
- NANO Blue Light: Maintains ice hygiene and allows for easy observation.
Components:
- Ice Maker Unit
- SECOP Compressor
- LCD Control Panel
- Ice Storage Bin
- Water Filter
- Water Inlet Hose
- Drainage Hose
- Drainage Pump
- Ice Scoops (x2)

Figure 1: The VEVOR Commercial Ice Maker Machine, showcasing its main unit, control panel, and included accessories such as water filter, hoses, drainage pump, and ice scoops.

Figure 2: All necessary accessories are provided, including the water hose, drainage pump, water filter, and two ice scoops.
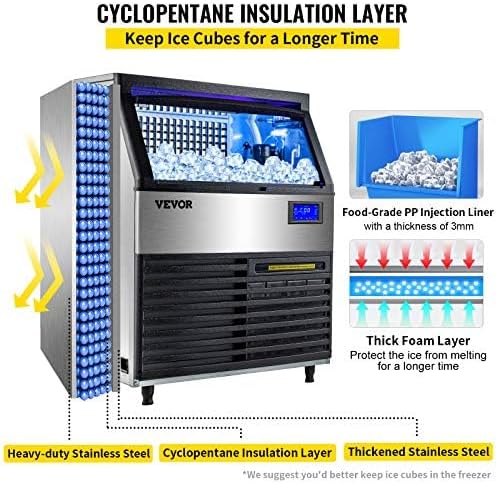
Figure 3: Diagram illustrating the cyclopentane insulation layer and thickened stainless steel construction designed to keep ice cubes frozen for longer periods.
3. Setup and Installation
Proper installation is crucial for the optimal performance and longevity of your ice maker.
3.1 Unpacking and Placement
- Carefully remove the ice maker from its packaging.
- Place the unit on a flat, stable surface capable of supporting its weight when full of ice and water.
- Ensure adequate clearance around the unit for proper ventilation (at least 5 inches from walls).
- As noted in safety information, allow the unit to stand upright for at least 24 hours before plugging it in.
3.2 Water Connection
The ice maker requires a continuous water supply.
- Connect the provided water inlet hose to a potable water supply line.
- Install the water filter in-line with the water supply, as shown in the diagram, to ensure clarified water for ice production.
- Connect the other end of the water inlet hose to the designated water inlet port on the back of the ice maker.
- Ensure all connections are tight to prevent leaks.
3.3 Drainage Connection
The unit includes a built-in electric drainage pump.
- Connect the drainage hose to the drainage outlet on the ice maker.
- Route the drainage hose to a suitable drain (e.g., floor drain, sink) ensuring it has a continuous downward slope for proper water flow. The maximum lift for the drainage pump is approximately 6.5 feet.
- Secure the drainage hose to prevent accidental disconnections.

Figure 4: Installation diagram showing the connection of water supply (with filter), drainage pump, and power cord to the ice maker.
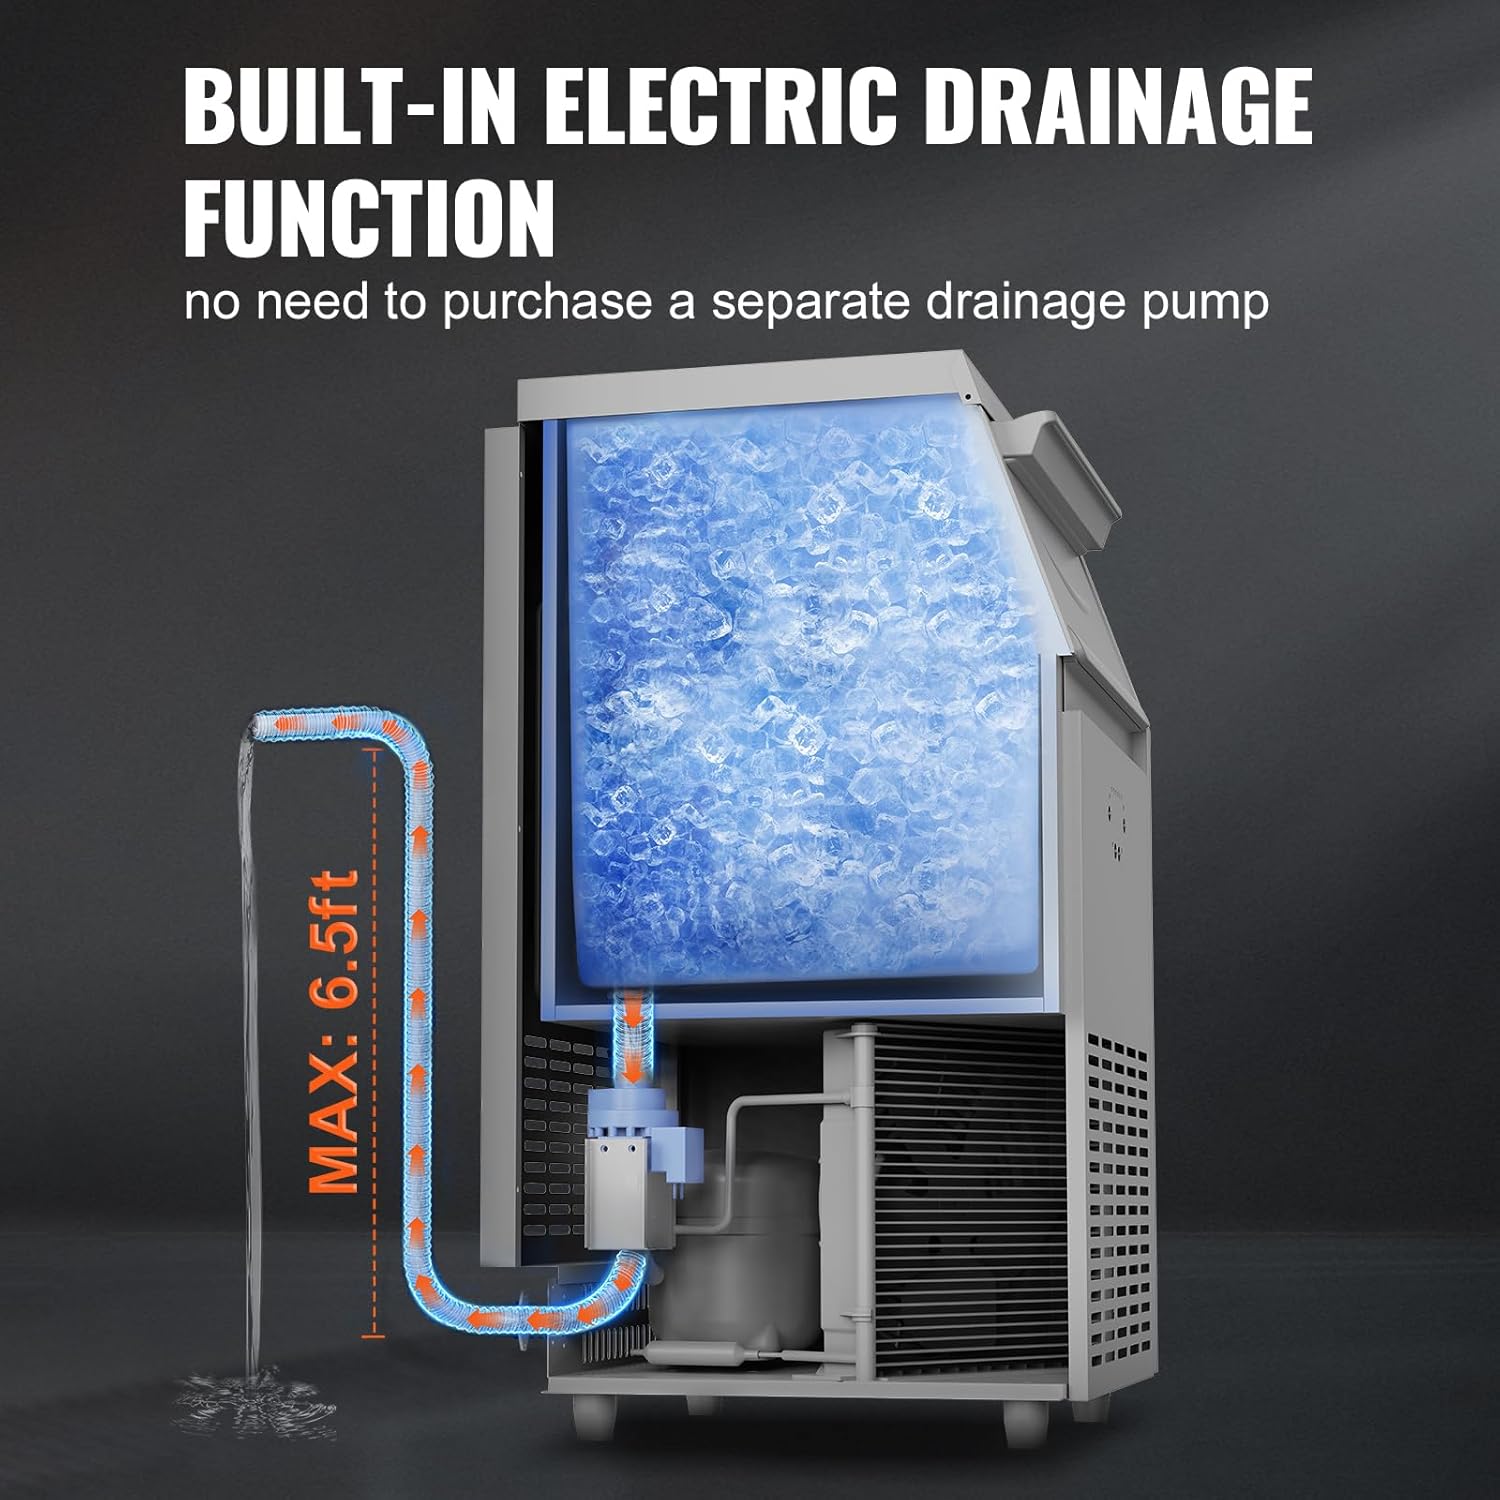
Figure 5: Illustration of the built-in electric drainage function, highlighting the maximum drainage height of 6.5 feet.
3.4 Electrical Connection
- Plug the power cord into a dedicated, grounded 110V electrical outlet.
- Do not share the outlet with other high-power appliances.
4. Operating Instructions
Operating your VEVOR ice maker is straightforward with its intuitive LCD control panel.
4.1 Control Panel Overview

Figure 6: Detailed view of the advanced multi-function automatic control panel, showing various indicators and control buttons.
- On/Off Button: Powers the unit on or off.
- Running Mode Indicator: Shows current operational status.
- Auto Clean Button: Initiates the automatic cleaning cycle.
- Thickness Adjustable Buttons (+/-): Adjusts the thickness of ice cubes.
- Reservation Function: Allows scheduling of ice making cycles.
- Light Control: Toggles the internal blue light.
- Ice Full Indicator: Lights up when the ice storage bin is full, pausing ice production.
4.2 Initial Operation
- Ensure the unit is properly installed and connected to water and power.
- Press the 'On/Off' button to power on the machine.
- The machine will automatically begin the ice-making process. The first few cycles may produce smaller or irregular ice cubes.
4.3 Adjusting Ice Thickness
You can customize the ice cube thickness to suit your needs:

Figure 7: Visual representation of thin, medium, and thick ice cubes, and their typical production times.
- Use the '+' and '-' buttons on the control panel to increase or decrease the ice-making time, which directly affects the ice cube thickness.
- Thin Ice: Approximately 5-8 minutes per cycle. Ideal for quick chilling.
- Medium Ice: Approximately 8-11 minutes per cycle. Standard size for beverages.
- Thick Ice: Approximately 11-15 minutes per cycle. Suitable for longer cooling or storage.
4.4 Ice Production and Storage
- The machine will automatically stop when the ice storage bin is full. The 'Ice Full' indicator will illuminate.
- Once ice is removed, the machine will resume production.
- The built-in insulation helps keep ice frozen for 5-7 hours, depending on ambient temperature. For longer storage, transfer ice cubes to a freezer.
- Use the provided ice scoops to retrieve ice from the bin.

Figure 8: Illustration highlighting the SECOP compressor for rapid ice making, capable of meeting demand for 900-1000 drinks per day.
5. Maintenance and Cleaning
Regular maintenance ensures the longevity and hygienic operation of your ice maker.
5.1 Automatic Cleaning
- The ice maker features a one-button automatic cleaning function.
- Press the 'Auto Clean' icon on the LCD panel to initiate the cleaning cycle.
- It is recommended to run the automatic cleaning cycle regularly, especially if the machine is used frequently.

Figure 9: The ice maker's one-button automatic cleaning feature, showing water circulation for internal cleaning.
5.2 Water Filter Maintenance
- The external water filter should be checked and replaced periodically, ideally every one to three months, depending on water quality and usage.
- Refer to the water filter's specific instructions for replacement procedures.
5.3 Dust Filter and Water Tray
- The pull-out dust filter located on the front of the unit should be cleaned regularly to ensure proper airflow and cooling.
- The water tray should also be cleaned periodically to prevent mineral buildup and maintain hygiene.
5.4 General Cleaning
- Wipe the exterior of the unit with a soft, damp cloth. Do not use abrasive cleaners or solvents.
- Ensure the ice storage bin is kept clean.
- The NANO blue light helps maintain hygiene within the ice bin.
6. Troubleshooting
This section provides solutions to common issues you might encounter.
| Problem | Possible Cause | Solution |
|---|---|---|
| No ice production | No power; Water supply off; Ice bin full; Ambient temperature too high; Compressor issue. | Check power connection; Ensure water supply is on; Empty ice bin; Relocate to cooler area; Contact support if compressor issue suspected. |
| Ice melts quickly | High ambient temperature; Door not sealed properly; Insulation compromised. | Ensure proper ventilation and cooler environment; Check door seal; Contact support if insulation is suspected. |
| Water leakage | Loose water connections; Clogged drain hose; Damaged water tray. | Tighten all water inlet/drainage connections; Clear any blockages in the drain hose; Inspect water tray for damage. |
| Ice cubes are too thin/thick | Ice thickness setting incorrect. | Adjust ice thickness using the '+' and '-' buttons on the control panel. |
| Unusual noise | Unit not level; Loose components; Compressor noise. | Ensure unit is level; Check for loose parts; Some compressor noise is normal, but excessive noise may require professional inspection. |
If the problem persists after attempting these solutions, please contact VEVOR customer support for assistance.
7. Specifications
Detailed technical specifications for the VEVOR Commercial Ice Maker Machine.

Figure 10: Detailed product dimensions of the VEVOR Commercial Ice Maker Machine.
- Brand: VEVOR
- Model Name: VEVOR 110V Commercial Ice Maker 320LBS/24H, 77LBS Storage Bin
- Product Dimensions (D x W x H): 24" x 26" x 36.4"
- Ice Production Capacity: 320 lbs per 24 hours
- Ice Storage Capacity: 77 lbs
- Wattage: 750 watts
- Voltage: 110 Volts
- Refrigerant: R290a
- Material: Stainless Steel
- Item Weight: 129 pounds
- UPC: 739210172275
8. Warranty and Support
For warranty information, please refer to the documentation provided with your purchase or contact VEVOR customer service directly. Keep your purchase receipt as proof of purchase.
For technical support or service inquiries, please visit the official VEVOR website or contact their customer support channels.
9. Official Product Videos
No official product videos were available in the provided data for embedding in this manual.