1. Introduction
This manual provides essential information for the safe and efficient operation, installation, and maintenance of your HPDMC PACK15-TA 20HP Rotary Screw Compressor. Please read this manual thoroughly before operating the equipment to ensure proper usage and to prevent injury or damage.
2. Safety Information
Operating industrial machinery requires strict adherence to safety protocols. Failure to follow these guidelines can result in serious injury or equipment damage.
- Electrical Safety: Ensure the compressor is connected to a 208-230V, 3-phase power supply. Do not attempt to convert single-phase power to three-phase power using a converter, as this unit is designed for direct 3-phase input.
- Pressure Safety: Never exceed the maximum working pressure of 150 psi. Regularly inspect all air lines and connections for leaks or damage.
- Moving Parts: Keep hands, clothing, and tools clear of all moving parts, including belts and fans, during operation.
- Ventilation: Operate the compressor in a well-ventilated area to prevent overheating and ensure proper air intake.
- Weight: The unit weighs approximately 1200 pounds. Use appropriate lifting equipment and procedures for moving the compressor. The machine chassis is low and cannot be moved directly by a forklift; it must be placed on a pallet for transport.

Image: Illustration showing that a 3-phase compressor cannot be operated with a single-phase power source via a phase converter.
3. Product Description and Features
The HPDMC PACK15-TA is a 20HP rotary screw air compressor system designed for industrial applications. It features an integrated design with an 80-gallon air tank and a refrigerated air dryer, providing a complete compressed air solution.

Image: The HPDMC PACK15-TA 20HP Rotary Screw Compressor, showcasing its integrated design with the air tank and dryer.
Key Features:
- Rotary Screw Air Compressor: Designed for stable operation, low noise, and easy maintenance, with auto load and unload functions for high efficiency.
- Refrigerated Air Dryer: Efficiently removes moisture from compressed air via cooling and condensation, ensuring dry, clean air for high-quality industrial applications.
- Line Filter: High-efficiency, multi-stage filtration system to remove oil, water, and particulates, providing high-purity air.
- ASME Air Tank: An 80-gallon air tank, compliant with ASME standards.
- Intelligent Electronic Controls: Displays essential parameters and ensures uniform operation and uninterrupted production.
- Horizontal Oil Tank: Designed to prevent oil backflow when the unit is stopped.
- Electric Motor: Stable and efficient, with an auto-shutdown feature after 600 seconds of no load.
- Air Intake System: Ensures internal ventilation, prevents overheating, and protects the machine.
- Spin-on Oil Separator and Filter: Protects production tools and the quality of final products by ensuring clean air.
- Air End with SKF Bearing: Features a high-performance air end with SKF bearings for durability and efficiency.
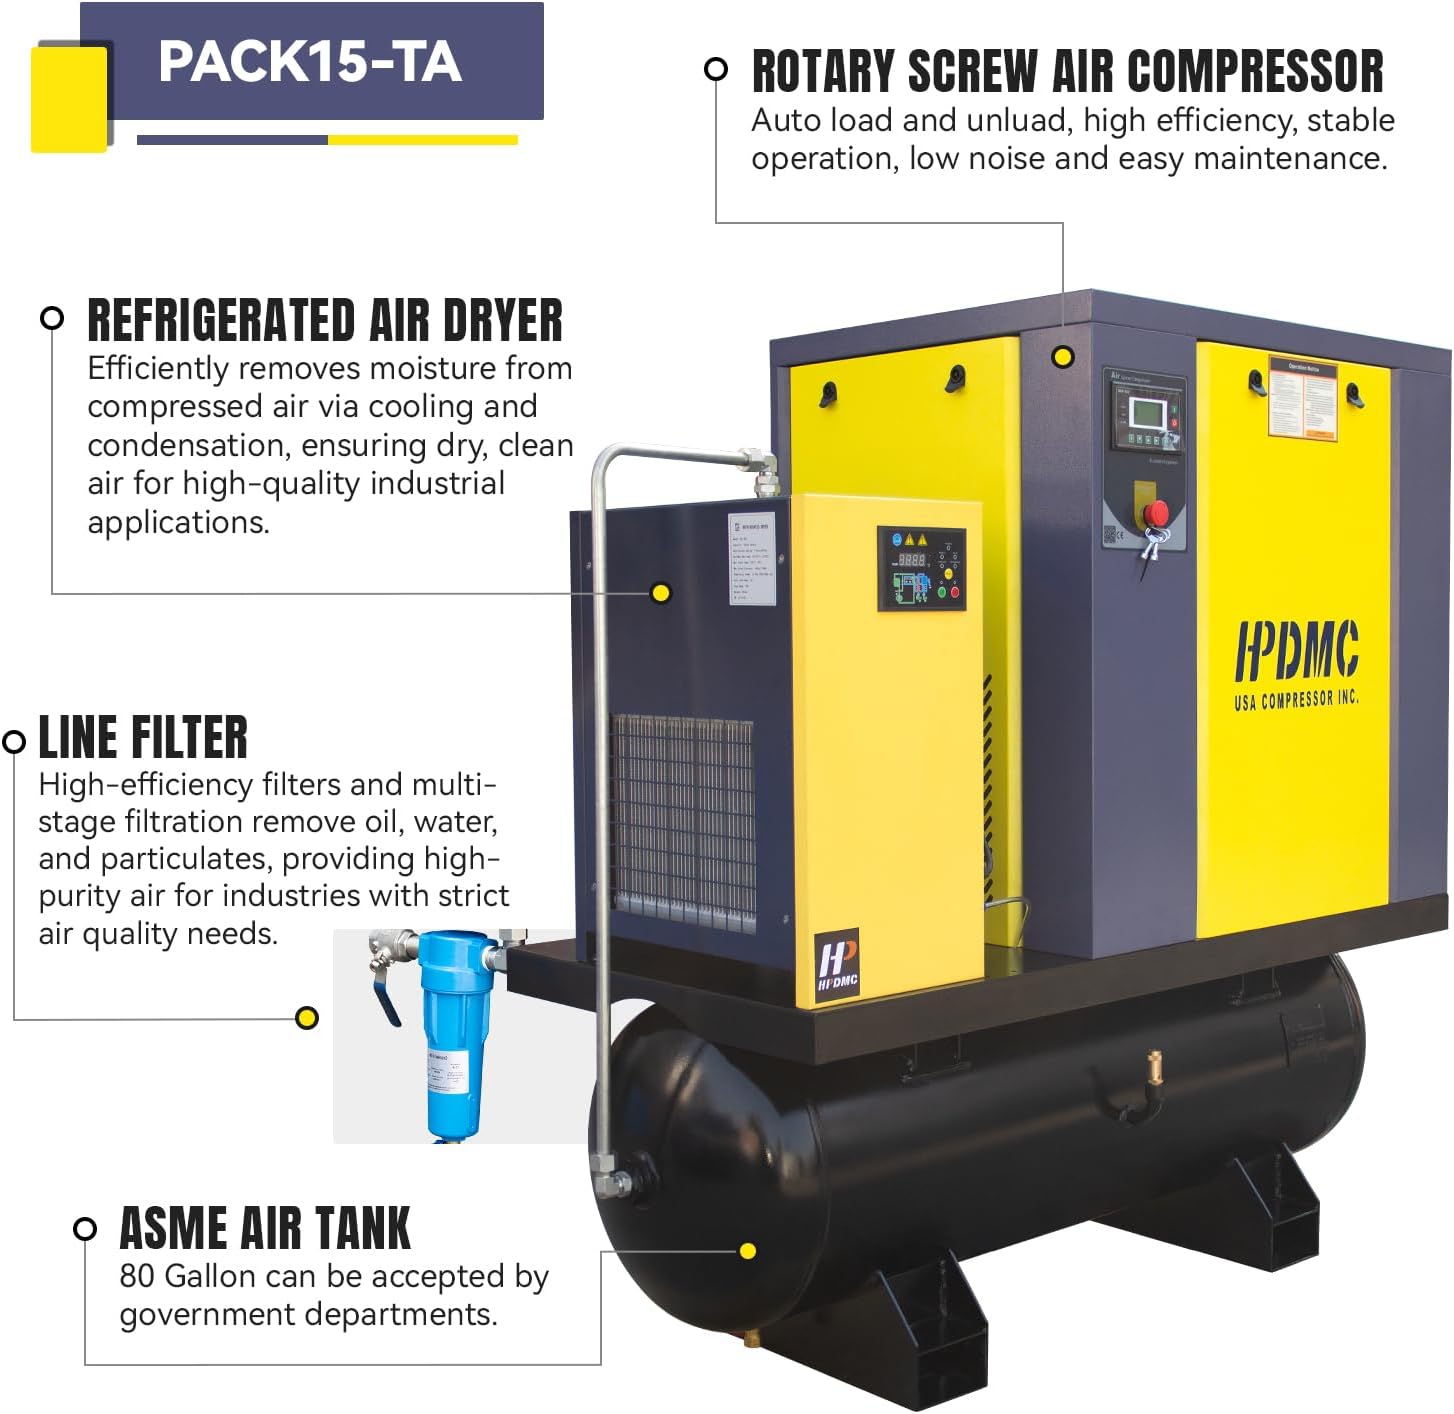
Image: Detailed view of the PACK15-TA highlighting the rotary screw air compressor, refrigerated air dryer, line filter, and ASME air tank.

Image: Close-up of the intelligent electronic control panel and the horizontal oil tank with visual indicators for oil level during startup and when stopped.

Image: Details of the electric motor and the air intake system, emphasizing internal ventilation and protection against overheating.

Image: Components including the spin-on oil separator, oil filter, and the air end with SKF bearings, crucial for performance and efficiency.

Image: Diagram illustrating the internal components of the compressor, including the air end, motor, intake valve, oil separator, oil filter, safety valve, horizontal oil tank, oil sight window, cooler, and air filter element.

Image: Explanation of the internal circulation ventilation system for preventing overheating and the use of sound-absorbing cotton for noise reduction.
4. Specifications
Detailed technical specifications for the HPDMC PACK15-TA Rotary Screw Compressor.

Image: Visual representation of key specifications for the PACK15-TA model.
| Parameter | Value |
|---|---|
| Model | PACK15-TA |
| Power | 20 HP |
| Input Voltage | 208-230V / 3 Phase / 60Hz |
| Air Flow Capacity | 81 CFM |
| Maximum Working Pressure | 150 psi |
| Output Pipe Diameter | NPT 1” |
| Motor Speed | 3600 rpm |
| Tank Capacity | 80 Gallons |
| Noise Level | Less than 78 dB |
| Item Weight | 1200 Pounds |
| Product Dimensions (L x W x H) | 77 x 34 x 77 inches |
| Material | Cast Iron |

Image: Comprehensive specifications and physical dimensions of the compressor, with a note regarding the need for a pallet for forklift transport.
5. Setup and Installation
Proper installation is crucial for the performance and longevity of your compressor. Ensure all safety precautions are followed.
5.1 Unpacking and Placement
- Carefully unpack the compressor, inspecting for any shipping damage.
- Due to its weight (1200 lbs) and low chassis, the unit must be placed on a pallet for safe movement with a forklift.
- Place the compressor on a level, stable surface in a well-ventilated area, ensuring adequate clearance for maintenance and airflow.
5.2 Electrical Connection
- The compressor requires a 208-230V, 3-phase electrical supply. Consult a qualified electrician for proper wiring.
- Ensure the electrical circuit is protected by an appropriate circuit breaker.
- Important: Do not attempt to operate this 3-phase compressor on a single-phase power supply using a phase converter.
5.3 Air Line Connection
- Connect your air system to the NPT 1” output pipe.
- Use appropriate fittings and sealants to ensure airtight connections.
6. Operation
Familiarize yourself with the control panel and operational procedures before starting the compressor.
6.1 Pre-Operation Check
- Verify all electrical and air connections are secure.
- Check the oil level in the horizontal oil tank. Ensure it is within the recommended range (between MIN and MAX indicators).
- Ensure the area around the compressor is clear of obstructions.
6.2 Starting the Compressor
- Turn on the main power switch.
- Use the intelligent electronic control panel to initiate operation. Follow the on-screen prompts or refer to the specific control panel manual for detailed instructions.
- The compressor will automatically load and unload as needed to maintain the desired pressure.
6.3 Stopping the Compressor
- To stop the compressor, use the control panel shutdown procedure.
- The unit features an auto-shutdown function after 600 seconds (10 minutes) of no load.
- For complete power disconnection, turn off the main power switch at the electrical source.
7. Maintenance
Regular maintenance ensures optimal performance and extends the lifespan of your compressor. All components are easily accessible for maintenance.
7.1 Daily Checks
- Monitor the oil level and replenish if necessary.
- Check for any unusual noises or vibrations.
- Inspect for air or oil leaks.
7.2 Scheduled Maintenance
- Spin-on Air Oil Separator: This integrated separator is designed for easy and quick replacement. Refer to the maintenance schedule for replacement intervals.
- Oil Filter: Replace the oil filter according to the maintenance schedule to ensure clean oil circulation.
- Air Filter Element: Regularly inspect and replace the air filter element to maintain optimal air intake quality and prevent contamination.
- Belt Inspection: Check the drive belts for wear, tension, and alignment. Adjust or replace as needed.
- Refrigerated Air Dryer: Perform routine checks and maintenance as specified for the dryer component to ensure efficient moisture removal.
8. Troubleshooting
This section provides guidance for common issues. For complex problems, contact technical support.
8.1 Phase Sequence Error Alarm
If a phase sequence error alarm occurs, it indicates incorrect wiring of the three main power lines.
- Step 1: Check the belt rotation direction. The belt should rotate in the direction indicated by the red arrow on the compressor. If it's rotating in the wrong direction, proceed to Step 2.
- Step 2: Adjust the three main power lines on top by swapping two of the wires (e.g., blue and black wires) to correct the phase sequence.

Image: Visual guide for troubleshooting a phase sequence error, demonstrating how to check belt rotation and correct wiring by swapping two power lines.
9. Warranty and Support
For warranty information, please refer to the documentation provided at the time of purchase. HPDMC offers comprehensive support for its products.
- Service Centers: Access to authorized service centers for repairs and maintenance.
- Technical Support: Dedicated technical assistance for operational questions and troubleshooting guidance.
- Local Pickup Service: Availability of local pickup services for parts or repairs in select regions.

Image: Icons and descriptions for available support services: Service Centers, Technical Support, and Local Pickup Service.


