
1. Introduction
This manual provides detailed instructions for the safe installation, operation, and maintenance of your Fantech PB270L10V-2 Dual Grille Bath Fan. This system is designed to provide efficient ventilation for bathrooms, featuring a powerful 270 CFM fan, one ceiling grille with an integrated 10W LED light, and one vent-only ceiling grille. It supports both 4-inch and 6-inch duct connections, offering flexible installation options for optimal air movement and moisture control.
Please read this manual thoroughly before beginning installation or operation to ensure proper function and to prevent potential hazards.
2. Safety Information
WARNING: To reduce the risk of fire, electric shock, or injury to persons, observe the following:
- Installation work and electrical wiring must be done by qualified person(s) in accordance with all applicable codes and standards, including fire-rated construction codes and standards.
- Use this unit only in the manner intended by the manufacturer. If you have questions, contact the manufacturer.
- Before servicing or cleaning the unit, switch power off at the service panel and lock the service disconnecting means to prevent power from being switched on accidentally. When the service disconnecting means cannot be locked, securely fasten a prominent warning device, such as a tag, to the service panel.
- Do not use this fan with any solid-state speed control device unless specifically approved by the manufacturer.
- This product is UL Listed for wet locations, but proper installation to prevent water ingress into electrical components is crucial.
- Always wear safety glasses and gloves during installation.
3. Package Contents
Verify that all components listed below are present and undamaged before proceeding with installation:
- 1x Fantech PB270L10V-2 Inline Fan Unit
- 1x Ceiling Grille with 10W LED Light
- 1x Vent-Only Ceiling Grille
- 2x Grille Housings with Dampers
- 1x Y-Adapter (4x4x6 inches)
- 1x 14-watt Instant-On LED Bulb (for the lit grille)
- Mounting Hardware (screws, brackets)
- Installation Manual
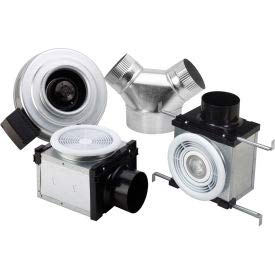
This image displays the various components included with the Fantech PB270L10V-2 bath fan system. It shows the inline fan motor, two separate grille housings (one with an integrated LED light, one without), and a Y-adapter for connecting ductwork. These parts are essential for setting up the dual-grille ventilation system.
4. Installation
The Fantech PB270L10V-2 is designed for remote mounting, allowing for quiet operation by positioning the fan motor away from the living area. This system utilizes a Y-adapter to connect two ceiling grilles to a single fan unit.
4.1 Pre-Installation Checks
- Ensure the installation location complies with local building codes and electrical regulations.
- Verify that the power supply is 120V, 1PH.
- Confirm adequate space in the attic or joist space for the fan unit, ductwork, and grille housings.
- Plan the ducting runs to be as straight and short as possible to maximize airflow efficiency.
4.2 Fan Unit Mounting
- Select a suitable remote location for the fan unit, typically in an attic or utility space, away from the bathroom.
- Securely mount the fan unit to a sturdy structural member using appropriate fasteners. Ensure the unit is level.
4.3 Ducting Connections
- Install the two grille housings in the desired ceiling locations. These should be positioned directly over areas requiring ventilation, such as showers, whirlpool tubs, or toilets.
- Connect 4-inch or 6-inch ductwork from each grille housing to the Y-adapter. Use duct clamps or tape to ensure airtight connections.
- Connect the single output of the Y-adapter to the inlet of the Fantech fan unit.
- Connect the exhaust outlet of the fan unit to exterior venting using appropriate ductwork. Ensure the exhaust duct terminates outside the building, away from windows or air intakes.
- Minimize bends and kinks in the ductwork to maintain optimal airflow.
4.4 Electrical Wiring
- Ensure power is OFF at the circuit breaker before beginning any wiring.
- Route 120V electrical wiring to the fan unit and to the grille housing with the LED light, if separate wiring is required for the light.
- Connect the fan unit wiring according to the wiring diagram provided with the unit and local electrical codes.
- Connect the LED light wiring within the grille housing. Install the 14-watt LED bulb into the designated socket.
- All electrical connections must be secure and properly insulated.
4.5 Grille Installation
- Once ducting and wiring are complete, attach the decorative grilles to their respective housings in the ceiling.
- Ensure the grilles are flush with the ceiling surface for a clean finish.
5. Operation
The Fantech PB270L10V-2 bath fan system is designed for straightforward operation.
5.1 Fan Operation
The fan unit is typically controlled by a wall switch (not included). Flip the switch to the 'ON' position to activate the fan. The fan will begin to draw air from both grille locations, exhausting it to the outside. The remote-mounted design ensures quiet operation within the living space.
5.2 LED Light Operation
The 10W LED light integrated into one of the grilles is also controlled by a separate or combined wall switch. Turn the switch to 'ON' to illuminate the area. The LED bulb provides instant-on illumination.
5.3 Continuous Operation
This fan is designed for continuous operation to meet ASHRAE Standard 62.2, which specifies minimum ventilation rates for indoor air quality. Consult local building codes for specific requirements regarding continuous ventilation.
6. Maintenance
Regular maintenance ensures optimal performance and longevity of your Fantech bath fan system.
6.1 Grille Cleaning
- Turn off power to the fan at the circuit breaker.
- Carefully remove the grilles from the ceiling housings.
- Wash the grilles with a mild soap and water solution. Rinse thoroughly and allow them to dry completely before reinstallation.
- Wipe down the interior of the grille housings to remove any dust or debris.
6.2 Fan Unit Inspection
Periodically (e.g., annually), inspect the fan unit in the attic or utility space:
- Turn off power to the fan at the circuit breaker.
- Check for any accumulation of dust or debris on the fan blades or motor housing. If necessary, gently clean with a soft brush or vacuum.
- Inspect duct connections for any leaks or disconnections. Re-secure with duct clamps or tape if needed.
- Ensure the fan unit is still securely mounted.
6.3 LED Bulb Replacement
If the LED light stops working:
- Turn off power to the light at the circuit breaker.
- Carefully remove the grille with the LED light.
- Unscrew the old LED bulb and replace it with a new 14-watt instant-on LED bulb of the same type.
- Reinstall the grille and restore power.
7. Troubleshooting
This section addresses common issues you might encounter with your Fantech PB270L10V-2 bath fan.
| Problem | Possible Cause | Solution |
|---|---|---|
| Fan does not operate | No power to the unit Faulty wall switch Loose wiring connection Motor malfunction | Check circuit breaker and wall switch. Ensure power is ON. Test or replace wall switch. Inspect wiring connections (with power OFF). Contact qualified service personnel. |
| LED light does not turn on | No power to the light Faulty LED bulb Loose wiring connection | Check circuit breaker and wall switch. Ensure power is ON. Replace LED bulb (with power OFF). Inspect wiring connections (with power OFF). |
| Excessive noise from fan | Loose mounting Debris in fan blades Ductwork obstruction or kink Motor bearing wear | Ensure fan unit is securely mounted. Clean fan blades (with power OFF). Inspect ductwork for obstructions or kinks. Contact qualified service personnel. |
| Poor ventilation performance | Ductwork leaks or obstructions Grilles are dirty Improper duct sizing | Inspect ductwork for leaks or obstructions. Seal any leaks. Clean grilles and fan blades. Ensure ductwork is correctly sized (4" or 6") and installed. |
If you are unable to resolve an issue after consulting this troubleshooting guide, please contact Fantech customer support or a qualified electrician/HVAC technician.
8. Specifications
Key technical specifications for the Fantech PB270L10V-2 Dual Grille Bath Fan:
| Feature | Specification |
|---|---|
| Model | PB270L10V-2 |
| Air Flow Capacity (CFM) | 270 |
| Voltage | 120V |
| Phase | 1PH |
| Amperage | 0.7 Amps |
| LED Light Wattage | 14 Watts (Instant-On) |
| Duct Size Compatibility | 4 inch & 6 inch |
| Certifications | HVI Certified, UL Listed for wet locations |
| Sound Level | Quiet Operation (Remote Mount) |
| Manufacturer | Fantech |
9. Warranty and Support
Fantech products are manufactured to high-quality standards. For specific warranty details regarding your PB270L10V-2 Dual Grille Bath Fan, please refer to the warranty card included with your product or visit the official Fantech website.
If you require technical assistance, have questions about installation, or need to report a defect, please contact Fantech customer support. Ensure you have your model number (PB270L10V-2) and purchase date available when contacting support.

