
1. Introduction
This manual provides detailed instructions for the installation, operation, and maintenance of your ANNKE 3K/5MP Lite 5-in-1 8-Channel DVR with 2TB HDD. Please read this manual thoroughly before using the product to ensure proper setup and functionality. This DVR is designed for comprehensive security surveillance, offering advanced features such as intelligent detection and remote access.

Image: ANNKE 5-in-1 Hybrid DVR device, highlighting its AI capabilities.
2. What's in the Box
Verify that all items listed below are included in your package. If any items are missing or damaged, please contact ANNKE customer support.
- 1x ANNKE 3K Lite DVR with 2TB Hard Drive
- 1x 12V Power Adapter
- 1x USB Mouse
- 1x HDMI Cable
- 1x Network Cable
- 1x Wall Sticker
- 1x User Manual
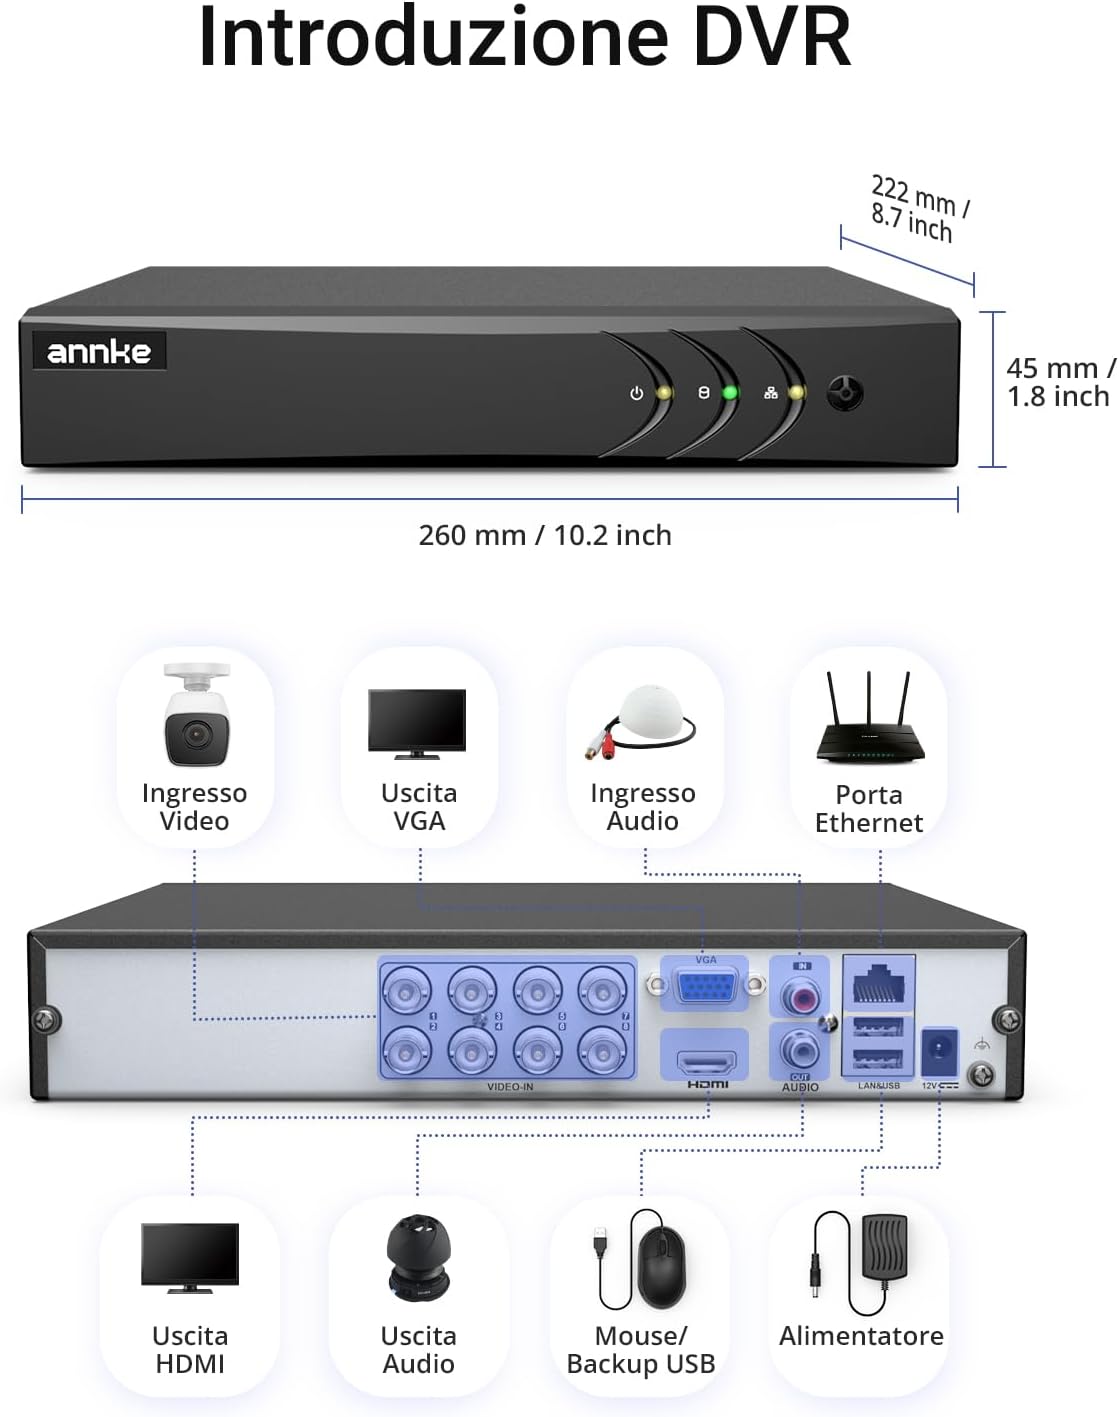
Image: All components included in the ANNKE DVR package.
3. Product Overview
The ANNKE 3K/5MP Lite 5-in-1 DVR is a versatile digital video recorder supporting multiple camera technologies. It features an 8-channel input for analog cameras and can integrate additional IP cameras, making it suitable for various surveillance needs.
3.1 DVR Features
- 5-in-1 Compatibility: Supports 5MP TVI, 4MP AHD, CVI, CVBS analog cameras, and 6MP IP cameras.
- 8-Channel Input: Connect up to 8 analog cameras.
- Expandable IP Channels: Supports 2 additional 6MP IP cameras, or up to 12 IP cameras when switched to IP signal mode (ANNKE IP cameras only).
- 2TB Security-Grade HDD: Pre-installed for continuous, reliable recording.
- H.265+ Video Encoding: Efficiently saves storage space by up to 80% compared to H.264.
- Intelligent Detection: Advanced person and vehicle detection to minimize false alarms.
- Remote Access: Monitor your property from anywhere using smartphones, tablets, or computers.

Image: The ANNKE 5-in-1 DVR demonstrating compatibility with multiple camera types.
3.2 DVR Ports and Connections
Familiarize yourself with the ports on the rear panel of the DVR for proper connection of cameras, display, network, and power.

Image: Detailed view of the DVR's rear panel with labeled ports.
- Video Input (BNC): Connect analog cameras.
- VGA Output: Connect to a monitor or display.
- HDMI Output: Connect to an HD monitor or TV.
- Audio Input/Output (RCA): For audio recording and playback.
- Ethernet Port (RJ45): Connect to your network for remote access.
- USB Ports: For mouse, USB backup, or external storage.
- 12V Power Input: Connect the included power adapter.
4. Setup
Follow these steps to set up your ANNKE DVR system.
4.1 Initial Hardware Connection
- Connect Cameras: Connect your analog cameras to the BNC video input ports on the DVR. If using IP cameras, ensure they are connected to your network.
- Connect Display: Connect a monitor or TV to the DVR using either the VGA or HDMI port.
- Connect Mouse: Plug the USB mouse into one of the USB ports on the DVR.
- Connect Network (Optional but Recommended): Connect the DVR to your router using the Ethernet cable for remote access and firmware updates.
- Connect Power: Plug the 12V power adapter into the DVR's power input and then into a power outlet. The DVR will power on automatically.
4.2 First-Time Setup Wizard
Upon first boot, the DVR will guide you through a setup wizard. Follow the on-screen prompts to configure basic settings:
- Language Selection: Choose your preferred language.
- Password Creation: Create a strong password for the administrator account. This is crucial for security.
- Network Settings: Configure network settings (DHCP is usually sufficient for most home networks).
- Time and Date: Set the correct time zone, date, and time.
- HDD Initialization: The pre-installed 2TB HDD may need to be initialized. Follow the instructions to format it.
5. Operating Instructions
5.1 Recording Modes
The DVR offers flexible recording options to suit your surveillance needs:
- 24/7 Continuous Recording: Records continuously, overwriting the oldest footage when the HDD is full.
- Motion-Triggered Recording: Records only when motion is detected, saving storage space.
- Scheduled Recording: Set specific times for recording.
- Event-Based Recording: Records when specific events (e.g., alarm input, intelligent detection) are triggered.

Image: Visual representation of 24/7 continuous recording.
5.2 Intelligent Person and Vehicle Detection
This feature significantly reduces false alarms by distinguishing between human and vehicle movement and other environmental factors.
- Configuration: Access the DVR's menu, navigate to 'Event' or 'Smart Detection' settings.
- Area Setup: Define specific detection zones within the camera's view.
- Alerts: Configure alerts such as app push notifications, email alerts, or buzzer sounds when a person or vehicle is detected.

Image: How AI person and vehicle detection works, showing detection zones and alert methods.
5.3 Remote Access
Monitor your surveillance system remotely using the ANNKE Vision app or web browser.
- Download App: Download the ANNKE Vision app from the App Store (iOS) or Google Play (Android).
- Create Account: Register for an ANNKE Vision account.
- Add Device: Scan the QR code on your DVR or manually enter its serial number to add it to your account.
- Access: View live footage, play back recordings, and receive alerts from your smartphone, tablet, or computer.

Image: Remote access to the DVR system via the ANNKE Vision mobile application.
5.4 Smart Playback
Quickly find specific events in your recorded footage.
- Smart Search: Use the smart search function to filter recordings by event type (e.g., motion, person, vehicle).
- Timeline Navigation: Easily navigate through the recording timeline to pinpoint specific moments.

Image: Smart playback interface on a computer, demonstrating search filters for human and vehicle events.
6. Maintenance
Regular maintenance ensures the longevity and optimal performance of your DVR system.
6.1 Hard Drive Management
- Check HDD Status: Periodically check the health status of the 2TB HDD through the DVR's menu.
- Automatic Overwrite: The DVR is configured to automatically overwrite the oldest footage when the HDD is full. Ensure this setting is enabled if continuous recording is desired.
- Backup Important Footage: Regularly back up any critical recordings to an external USB drive or network storage.

Image: Icon symbolizing automatic data overwrite on the hard drive.
6.2 Firmware Updates
Keep your DVR's firmware updated to benefit from the latest features and security enhancements. Check the ANNKE website or the DVR's system settings for available updates.
6.3 Cleaning
Gently clean the DVR unit and camera lenses with a soft, dry cloth. Avoid using harsh chemicals or abrasive materials.
7. Troubleshooting
This section addresses common issues you might encounter with your ANNKE DVR.
7.1 No Video Output
- Check Cables: Ensure HDMI/VGA cables are securely connected to both the DVR and the display.
- Power Cycle: Restart the DVR and the display device.
- Resolution: Verify that the display resolution is supported by your monitor. You might need to try a different display or reset the DVR's display settings.
7.2 No Camera Image
- Camera Power: Ensure cameras are powered on and receiving adequate power.
- Cable Connections: Check BNC cable connections between cameras and DVR.
- Compatibility: Confirm that your cameras are compatible with the DVR's supported video input types (TVI, AHD, CVI, CVBS, IP).
- IP Camera Setup: For IP cameras, ensure they are correctly added and configured on the network and within the DVR settings.
7.3 Remote Access Issues
- Network Connection: Verify the DVR is connected to the internet (check network cable and router status).
- App/Software: Ensure the ANNKE Vision app or client software is up-to-date.
- Account Login: Double-check your login credentials for the ANNKE Vision account.
- Firewall/Router Settings: Your router's firewall or port forwarding settings might need adjustment. Refer to your router's manual or contact your ISP for assistance.
7.4 False Motion Alerts
- Adjust Sensitivity: Reduce the motion detection sensitivity in the DVR settings.
- Refine Detection Zones: Adjust the detection zones to exclude areas with frequent irrelevant movement (e.g., trees swaying, busy roads).
- Enable Person/Vehicle Detection: Ensure the intelligent person and vehicle detection feature is enabled and configured correctly to filter out non-human/non-vehicle movements.
8. Specifications
| Feature | Specification |
|---|---|
| Brand | ANNKE |
| Model Number | DW81KN200 |
| Connectivity Technology | VGA, HDMI, BNC, USB |
| Compatible Devices | Smartphone, Tablet |
| Product Dimensions (L x W x H) | 36 x 28 x 8 cm |
| Storage Capacity | 2 TB HDD |
| Number of Channels | 8 (Analog) + 2 (IP) / 12 (IP Mode) |
| Digital Video Media Format | HDD |
| Audio Input | AHD |
| Supported Video Input Types | TVI, AHD, CVI, CVBS, IP |
| Manufacturer | ANNKE |
| Country of Origin | China |
9. Warranty and Support
ANNKE is committed to providing high-quality products and excellent customer service.
9.1 Warranty Information
- EU Spare Parts Availability: 2 Years.
- For specific warranty terms and conditions, please refer to the warranty card included with your product or visit the official ANNKE website.
9.2 Customer Support
If you encounter any issues or have questions regarding your ANNKE DVR, please contact our support team. We offer:
- After-Sales Support
- Quick Response to inquiries
- Customer-Centric Approach
- Lifetime Technical Support

Image: ANNKE's commitment to customer support.
For further assistance, please visit the official ANNKE website or refer to the contact information provided in your product packaging.


