
1. Introduction
Thank you for choosing the BSOD 60W Solar Flood Light. This manual provides essential information for the safe and efficient installation, operation, and maintenance of your solar flood light. Please read these instructions carefully before use and retain them for future reference.
2. Product Overview
2.1 Key Features
- High Brightness: Equipped with 118 SMD5730 LED chips, providing up to 7670 lumens and a 120-degree illumination angle, covering up to 250 square meters.
- Easy Installation: Designed for simple setup without the need for complex electrical wiring.
- Dusk to Dawn Operation: Features a built-in light sensor for automatic activation at dusk and deactivation at dawn.
- Remote Control: Conveniently control the light's functions, including on/off and brightness, from a distance.
- Durable and Weatherproof: IP66 rated for rainproof performance, suitable for various outdoor conditions.
- Efficient Power: Integrated 13000mAh 3.2V lithium iron battery powered by a 15W 6V solar panel.
2.2 Package Contents
Upon unpacking, please ensure all the following components are present:
- 1x Solar Flood Light (60W)
- 1x Solar Panel
- 1x 8-Key Remote Controller
- 2x Remote Controller Batteries (AA type)
- 1x U-Type Holder
- 4x Screws
- 2x Nuts
- 1x User Manual (this document)

Image: The product packaging box, indicating "Solar Light" on the side.
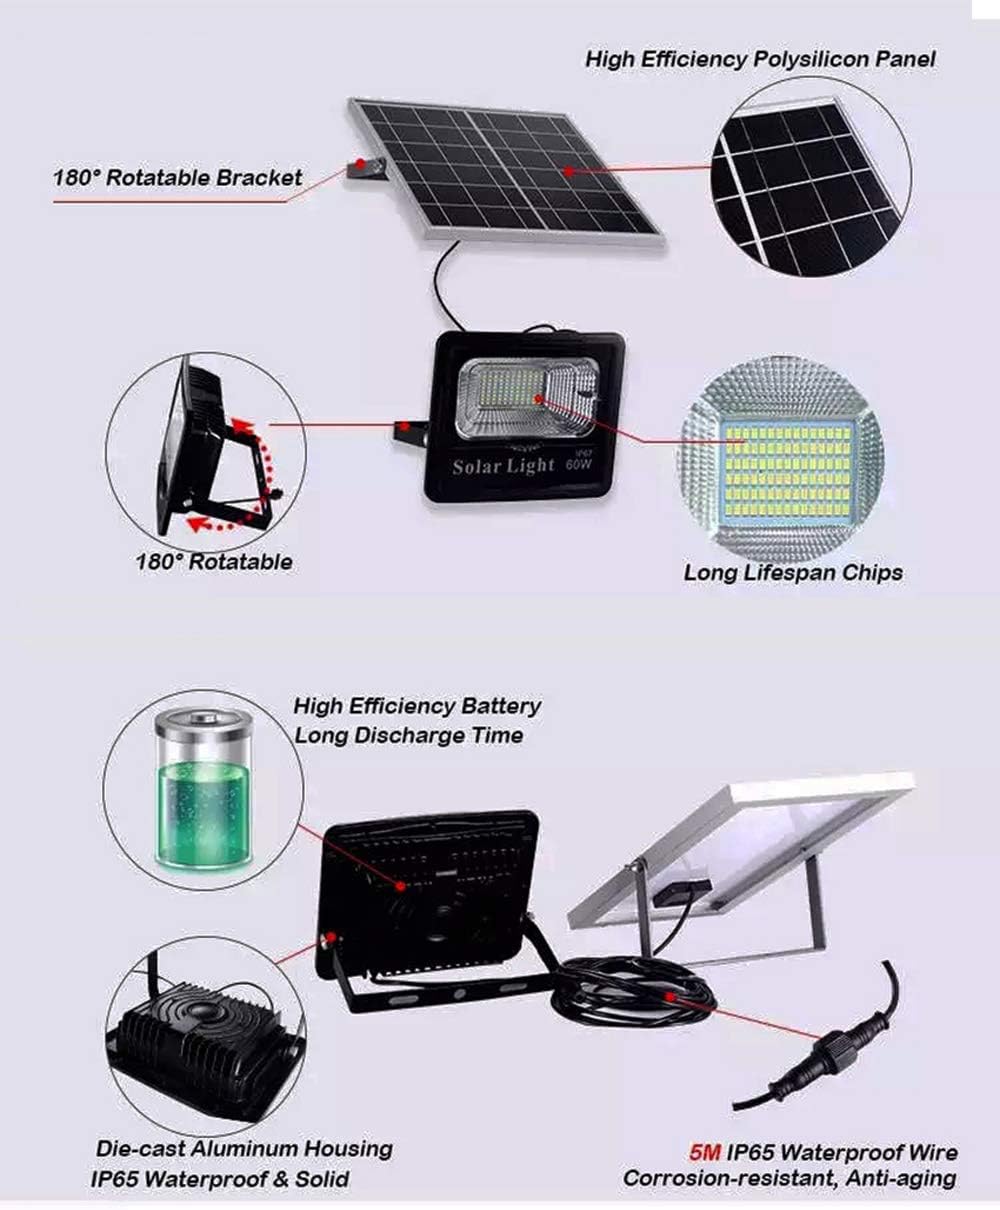
Image: A diagram illustrating the solar flood light, solar panel, 180-degree rotatable bracket, long lifespan chips, high-efficiency battery, die-cast aluminum housing, and 5-meter waterproof connecting wire.
3. Setup and Installation
Proper installation is crucial for optimal performance of your solar flood light.
3.1 Important Installation Notes
- The solar flood light requires direct sunlight to charge effectively. Install the solar panel in a location that receives maximum direct sunlight throughout the day, free from obstructions like trees or buildings.
- Ensure the connecting wire between the light and the panel is securely fastened and protected from damage. The wire length is 5 meters (16.5 feet).
3.2 Mounting the Solar Panel and Flood Light
- Choose Location: Select a mounting location for the solar panel that receives direct sunlight for at least 6-8 hours daily. The flood light can be mounted on a wall, pole, or other suitable surface.
- Attach U-Type Holder: Secure the U-type holder to the desired mounting surface using the provided screws and nuts.
- Mount Solar Panel: Attach the solar panel to the U-type holder. Adjust the angle of the solar panel to face the sun directly for optimal charging.
- Mount Flood Light: Secure the flood light to its chosen location. The light features a 180-degree rotatable bracket for flexible positioning.
- Connect Components: Connect the solar panel to the flood light using the 5-meter connecting wire. Ensure the connection is firm and waterproof.

Image: This image displays the dimensions of the 60W solar flood light (250mm x 205mm x 65mm) and the solar panel (305mm x 370mm), along with key specifications like 118 LEDs, 12-24 hours working time, 12000mAh battery, and cool white light color.

Image: A close-up view of the back of the solar panel, showing the attached connecting cable and waterproof connector.

Image: A collage showing the solar flood light installed in different outdoor environments, including a house entrance, a patio, and a garage area, demonstrating its versatility.
4. Operating Instructions
The BSOD 60W Solar Flood Light is designed for automatic operation but also offers manual control via the included remote.
4.1 Automatic Operation (Dusk to Dawn)
The flood light features a built-in light sensor. Once the solar panel is connected and the light is charged, it will automatically turn on when ambient light levels drop (dusk) and turn off when light levels increase (dawn). Ensure the "AUTO" mode is activated on the remote control for this function.
4.2 Remote Control Functions
The 8-key remote controller allows for manual control and setting adjustments. The remote control distance is approximately 10 meters (33 feet).

Image: A detailed view of the 8-key remote controller, showing buttons for AUTO (Dusk to Dawn), ON/OFF, 3H/5H/8H timer settings, 100% brightness, and 50% brightness.
- AUTO: Activates the dusk-to-dawn sensor mode. The light will automatically turn on at night and off during the day.
- ON/OFF: Manually turns the light on or off.
- 3H / 5H / 8H: Sets the light to stay on for 3, 5, or 8 hours after dark, overriding the AUTO mode.
- 100% Brightness: Sets the light to full brightness (Auto mode off).
- 50% Brightness: Sets the light to half brightness (Auto mode off).
Note: The remote control requires 2 AA batteries, which are included in the package.
5. Maintenance
Regular maintenance ensures the longevity and optimal performance of your solar flood light.
- Solar Panel Cleaning: Periodically clean the surface of the solar panel with a soft, damp cloth to remove dust, dirt, leaves, or snow. A clean panel ensures maximum sunlight absorption and charging efficiency.
- Light Fixture Cleaning: Wipe the flood light fixture with a soft, damp cloth as needed to keep it clean.
- Battery: The built-in lithium iron battery is designed for long-term use. Avoid extreme temperatures outside the working range of -23°C to 60°C (-9.4°F to 140°F) to prolong battery life.
- Connections: Occasionally check all connections to ensure they remain secure and free from corrosion.
6. Troubleshooting
If you encounter issues with your solar flood light, refer to the following common problems and solutions:
| Problem | Possible Cause | Solution |
|---|---|---|
| Light does not turn on at night. |
|
|
| Light is dim or only stays on for a short period. |
|
|
| Remote control not working. |
|
|
7. Specifications
| Parameter | Detail |
|---|---|
| Flood Light Power | 60W |
| LED Quantity | 118 LEDs (SMD5730) |
| Max Lumen Output | 7670 LM |
| Solar Panel | 15W 6V |
| Battery Capacity | 13000mAh 3.2V |
| Battery Material | Lithium Iron |
| Working Time (Full Charge) | 12-24 hours |
| Working Time in Rain | 2-3 days |
| Color Temperature | 6000K-6500K (Cool White) |
| Waterproof Level | IP66 |
| Control Mode | Remote Controller + Light Sensor |
| Remote Distance | 10m (33ft) |
| Connecting Wire Length | 5M (16.5ft) |
| Material (Flood Light) | Aluminum and ABS |
| Working Temperature | -23°C to 60°C (-9.4°F to 140°F) |
| Solar Panel Size | 30.5 x 37 cm (12 x 14.6 inch) |
| Flood Light Size | 250 x 205 x 65 mm (9.8 x 8 x 2.6 inch) |
8. Warranty and Support
This product is covered by a seller warranty. For specific warranty terms and conditions, please refer to the purchase agreement or contact your retailer.
If you experience any issues or have questions regarding your BSOD 60W Solar Flood Light, please contact the seller or manufacturer for assistance. Provide your product model number (60W) and details of the issue for efficient support.