Introduction
This manual provides detailed instructions for the setup, operation, and maintenance of your Clarity D714 base unit and D704HS cordless amplified telephone system. This system utilizes DECT 6.0 technology for clear, interference-free communication and includes features designed for enhanced usability, such as amplified sound, caller ID, and an integrated answering machine. Please read this manual thoroughly to ensure proper use and to maximize the benefits of your new telephone system.
Package Contents
Please verify that all items listed below are included in your package:
- Clarity D714 Base Unit
- Clarity D704HS Cordless Handset(s) (Quantity may vary based on purchase)
- AC Power Adapter for Base Unit
- Telephone Line Cord
- Rechargeable Batteries for Handset(s)
- User Manual (this document)
Product Overview
Base Unit and Handset Overview

Image 1: The Clarity D714 base unit shown with three D704HS cordless handsets docked in their charging cradles. This image provides an overall view of the complete telephone system.
Base Unit Controls

Image 2: A detailed view of the Clarity D714 base unit's control panel. Key buttons include Volume Up/Down, Previous, Next, Delete, and the Answering Machine Play/Stop button, along with a digital message counter.
- VOL - / VOL +: Adjusts speaker volume during message playback or speakerphone calls.
- PREV / NEXT: Navigates through answering machine messages.
- DEL X: Deletes the current answering machine message.
- Play/Stop Button: Initiates or stops answering machine message playback.
- Power Button: Turns the answering machine on or off.
Handset Controls and Display
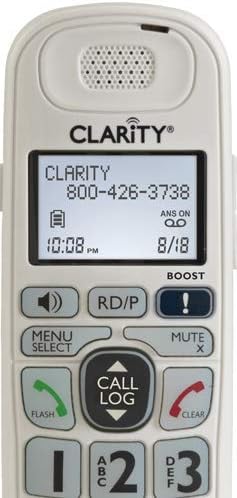
Image 3: A close-up of the Clarity D704HS cordless handset keypad. It features large, high-contrast numbers and contoured keys for comfortable dialing. Function buttons such as Menu/Select, Call Log, Flash, Clear, and Mute are also visible.

Image 4: A detailed view of the Clarity D704HS handset's backlit display. It shows the Clarity brand, a sample phone number, current time, battery indicator, and answering machine status (ANS ON).
- Display Screen: Shows caller ID, menu options, time, and battery status.
- Numeric Keypad: Large, backlit keys for dialing.
- MENU/SELECT: Accesses menu options and confirms selections.
- CALL LOG (Up/Down Arrows): Navigates through the call log.
- FLASH (Green Button): Answers an incoming call or initiates a call waiting flash.
- CLEAR (Red Button): Ends a call or cancels an operation.
- MUTE X: Mutes the microphone during a call.
- BOOST: Activates amplification for increased listening volume.
- RD/P (Redial/Pause): Redials the last number or inserts a pause during dialing.
- Speakerphone Button: Toggles speakerphone mode.
Handset Side Controls

Image 5: Side view of the Clarity D704HS handset, highlighting the headset jack and tone adjustment buttons. This allows for direct connection of assistive listening devices or a headset, and customization of audio tone.
- HEADSET Jack (2.5mm): For connecting a compatible headset or assistive listening device.
- TONE Buttons: Adjusts the audio tone for personalized listening.
Setup
Follow these steps to set up your Clarity telephone system:
- Unpack: Carefully remove all components from the packaging.
- Connect Base Unit:
- Plug one end of the telephone line cord into the base unit's TEL LINE jack and the other end into a wall telephone jack.
- Plug the AC power adapter into the base unit's POWER jack and then into a standard electrical outlet.
- Install Handset Batteries:
- Open the battery compartment cover on the back of each handset.
- Insert the rechargeable batteries, ensuring correct polarity (+ and -).
- Close the battery compartment cover securely.
- Charge Handsets: Place each handset in its respective charging cradle. The handset display will indicate that it is charging. Allow at least 12-16 hours for the initial charge to ensure optimal battery performance.
- Set Date and Time: After the initial charge, follow the on-screen prompts on the handset display or navigate through the handset menu to set the current date and time. This is essential for accurate caller ID records and answering machine timestamps.
Operating Instructions
Making and Receiving Calls
- To Make a Call: Press the green FLASH button, then dial the desired number. Alternatively, you can dial the number first and then press FLASH.
- To Answer a Call: Press the green FLASH button or any numeric key when the phone rings.
- To End a Call: Press the red CLEAR button or place the handset back in its charging cradle.
- Speakerphone: During an active call, press the speakerphone button on the handset to toggle speakerphone mode on or off.
- Amplification (BOOST): Press the BOOST button on the handset during a call to significantly increase the listening volume. Press it again to deactivate the amplification.
- Tone Adjustment: Use the TONE buttons located on the side of the handset to adjust the audio frequency for personalized and clearer listening.
Caller ID
- When an incoming call is received, the caller's information (name and number, if available) will be displayed on the handset screen.
- Press the CALL LOG (up/down arrows) on the handset to review a list of past incoming calls.
- To call back a number from the call log, select the desired entry and press the green FLASH button.
Answering Machine
- Turning On/Off: Use the Power Button on the base unit to activate or deactivate the answering machine function.
- Playing Messages: Press the Play/Stop button on the base unit to listen to recorded messages. Use the PREV and NEXT buttons to skip between messages.
- Deleting Messages: During message playback, press the DEL X button on the base unit to delete the current message.
- Recording Outgoing Message (OGM): Refer to the handset menu for options to record a personalized outgoing message or select a pre-recorded one.
- Remote Access: You can access your answering machine remotely by calling your home number and entering a pre-set PIN. Consult the full product manual for detailed instructions on setting up and using remote access.
Intercom (for multiple handsets)
- If you have multiple D704HS handsets, you can use the intercom feature to communicate between them. Press the INTERCOM button (if available) or follow the menu prompts on your handset to select the desired internal handset to call.
Maintenance
Proper care ensures the longevity and optimal performance of your telephone system:
- Cleaning: Wipe the phone and base unit with a soft, slightly damp cloth. Avoid using harsh chemicals, abrasive cleaners, or solvents, as these can damage the surfaces.
- Battery Care: Replace handset batteries when they no longer hold a charge effectively or when the handset indicates low battery frequently. Always use only approved rechargeable batteries specified for this model.
- Environmental Conditions: Avoid exposing the telephone system to extreme temperatures, direct sunlight, high humidity, or moisture. Keep it away from sources of heat and water.
Troubleshooting
If you encounter issues with your Clarity telephone system, refer to the table below for common problems and their solutions:
| Problem | Solution |
|---|---|
| No dial tone. | Ensure the telephone line cord is securely connected to both the base unit and the wall jack. Check if other phones on the same line are working. |
| Handset not charging. | Verify the handset is correctly seated in the charging cradle. Ensure the base unit's power adapter is plugged into a live electrical outlet. Clean the charging contacts on both the handset and cradle with a dry cloth. |
| Poor sound quality / Static. | Move the handset closer to the base unit. Avoid placing the base unit near other electronic devices that may cause interference (e.g., Wi-Fi routers, microwaves, computers). Check the telephone line cord for any damage. |
| Answering machine not recording. | Ensure the answering machine is turned on via the base unit's power button. Check if the memory is full; delete old messages if necessary. |
| Caller ID not displaying. | Confirm you have Caller ID service activated with your telephone service provider. Ensure the date and time are set correctly on the phone system. |
Specifications
- Technology: DECT 6.0
- Color: White
- Material: Plastic
- Power Source: Corded Electric (Base Unit)
- Handset Batteries: 4 AA rechargeable batteries required (per handset, type may vary)
- Answering System Type: Digital
- Headset Jack: 2.5mm
- Tone Settings: 4 customizable tone settings
- Display: Large font, high contrast, backlit LCD
- Keypad: Backlit, contoured keys with large numbers
Warranty and Support
For detailed warranty information and technical support, please refer to the official Clarity website or contact Clarity customer service directly. It is recommended to keep your purchase receipt as proof of purchase for any warranty claims.
Manufacturer: CLARITY
Date First Available: April 25, 2019
For further assistance and the most up-to-date support information, please visit the manufacturer's website: www.clarityproducts.com


