1. Introduction
The MeterTo PS-303D is a continuously adjustable linear DC voltage regulator power supply designed for high stability, reliability, and low noise. It offers continuously adjustable output voltage and current, functioning as both a constant voltage and constant current DC power supply with automatic conversion between modes. This versatile and cost-effective power supply is suitable for a wide range of applications, from educational laboratories to electronic production lines.
2. Product Features
- Single channel output with digital meters displaying voltage and current values.
- Voltage adjustment knob with both coarse and fine tuning capabilities.
- Lightweight and compact design, ideal for educational laboratories and safe for student use.
- Features low ripple and noise for stable output.
- Affordable and user-friendly, includes current limitation protection.
3. Setup Guide
3.1 Unpacking and Inspection
Carefully remove the power supply from its packaging. Inspect the unit for any signs of physical damage that may have occurred during transit. Ensure all accessories are present.
3.2 Input Voltage Selection
The PS-303D supports input voltages of 220V or 110V ±10% at 50Hz. Before connecting the power supply to the mains, locate the voltage selection switch on the rear panel of the unit. Set this switch to match your local mains voltage (110V or 220V) to prevent damage to the device.
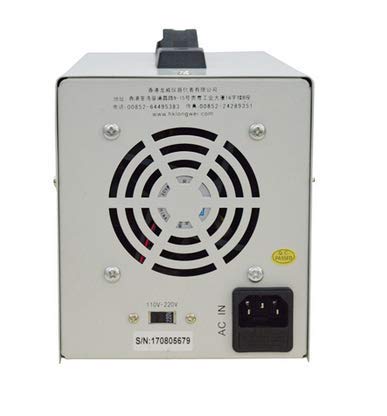
Figure 3.1: Rear panel of the PS-303D, highlighting the 110V/220V voltage selection switch and AC power input.
3.3 Power Connection
After selecting the correct input voltage, connect the provided AC power cord to the AC input socket on the rear panel of the power supply. Plug the other end of the power cord into a suitable mains outlet.
3.4 Initial Power On
Press the green 'Power' button located on the front panel to turn on the unit. The digital displays for current and voltage should illuminate.

Figure 3.2: Front panel of the PS-303D, showing the power button and digital readouts.
4. Operating Instructions
4.1 Front Panel Overview
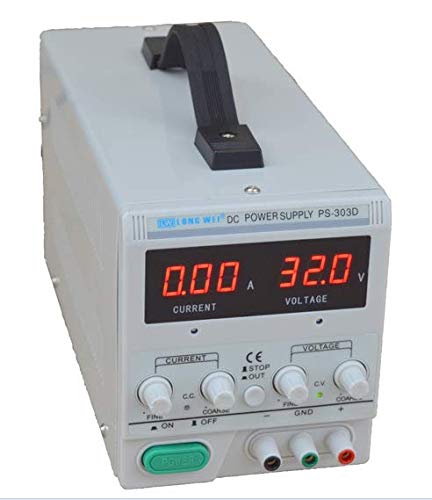
Figure 4.1: Detailed view of the PS-303D front panel controls.
The front panel features digital displays for current (A) and voltage (V), along with several control knobs and output terminals:
- Current Adjustment Knobs: 'COARSE' and 'FINE' knobs for setting the output current limit.
- Voltage Adjustment Knobs: 'COARSE' and 'FINE' knobs for setting the output voltage.
- Output Terminals: Red (+) for positive, Green (GND) for ground, and Black (-) for negative output.
- Power Button: Green button to turn the unit ON/OFF.
4.2 Setting Output Voltage and Current
- Ensure the power supply is turned on.
- Setting Voltage: Use the 'COARSE' voltage knob to set the approximate desired voltage. Then, use the 'FINE' voltage knob for precise adjustment. Observe the voltage display.
- Setting Current Limit: To set the current limit, first short the output terminals (connect the red and black terminals with a wire). Then, use the 'COARSE' current knob to set the approximate desired current limit, followed by the 'FINE' current knob for precise adjustment. The current display will show the set limit. Remove the short circuit after setting. Alternatively, you can set the current limit while connected to a load, observing the current draw.
- Connect your load to the output terminals. Ensure correct polarity.
4.3 Constant Voltage (CV) and Constant Current (CC) Modes
The PS-303D operates in two modes, automatically switching between them:
- Constant Voltage (CV) Mode: When the load resistance is high enough that the current drawn is less than the set current limit, the power supply will maintain the set output voltage. The 'CV' indicator light on the front panel will be illuminated.
- Constant Current (CC) Mode: When the load resistance is low enough that the current drawn attempts to exceed the set current limit, the power supply will automatically switch to constant current mode. It will then maintain the set current limit, and the output voltage will drop accordingly. The 'CC' indicator light on the front panel will be illuminated. This feature protects both the power supply and the connected load from overcurrent conditions.
5. Maintenance
To ensure the longevity and optimal performance of your MeterTo PS-303D power supply, follow these maintenance guidelines:
- Cleaning: Regularly clean the exterior of the unit with a soft, dry cloth. Do not use abrasive cleaners or solvents. Ensure no liquids enter the device.
- Ventilation: Keep the ventilation openings on the sides and rear of the unit clear of obstructions to ensure proper airflow and prevent overheating. Do not operate the power supply in an enclosed space without adequate ventilation.
- Storage: When not in use for extended periods, store the power supply in a cool, dry place, away from direct sunlight and excessive dust.
- Power Cord: Periodically inspect the power cord for any signs of damage. Replace if necessary.

Figure 5.1: Side view of the PS-303D, illustrating the ventilation grilles.
6. Troubleshooting
This section provides solutions to common issues you might encounter with your PS-303D power supply. If the problem persists, please contact MeterTo customer support.
| Problem | Possible Cause | Solution |
|---|---|---|
| Unit does not power on. | No power from outlet; Power cord loose; Incorrect voltage selection. | Check wall outlet with another device. Ensure power cord is securely connected. Verify the 110V/220V switch on the rear is set correctly. |
| No output voltage/current. | Output terminals not connected; Voltage/current knobs set to zero; Overcurrent protection activated. | Ensure load is properly connected to output terminals. Adjust voltage and current knobs to desired levels. Check if the CC indicator is on, indicating current limit. |
| Voltage drops significantly under load. | Current limit set too low; Load resistance too low for set voltage. | Increase the current limit setting. The unit may be operating in Constant Current (CC) mode. Ensure the load's current draw does not exceed the set limit for Constant Voltage (CV) operation. |
7. Specifications
| Parameter | Value |
|---|---|
| Model | PS-303D |
| Input Voltage | 220V or 110V±10% 50Hz (setting switch at the back) |
| Output Voltage | 0-30V |
| Output Current | 3A |
| Operating Temperature | 0℃ to 40℃ |
| Relative Humidity (Operating) | <80% |
| Storage Temperature | -10℃ to 70℃ |
| Relative Humidity (Storage) | <70% |
| Constant Voltage State | |
| Voltage Stability | <0.01%+3mV |
| Load Stability | <0.01%+5mV |
| Recovery Time | <100µS |
| Ripple & Noise | <1.0mVrms |
| Temperature Coefficient | <300PPM/0C |
| Constant Current State | |
| Current Stability | <0.2%+3mA |
| Load Stability | <0.2%+3mA |
| Ripple & Noise | <3mArms |
| Item Weight | 1.5 Kilograms (3.31 Pounds) |
| Manufacturer | MeterTo |
| Date First Available | April 16, 2019 |
8. Warranty and Support
This MeterTo PS-303D power supply is manufactured by MeterTo. For specific warranty information, including terms and duration, please refer to the documentation provided with your purchase or contact MeterTo customer support directly. MeterTo is committed to ensuring the quality and after-sale service of products purchased from their official channels.
For technical assistance, troubleshooting beyond this manual, or warranty claims, please contact MeterTo customer service. When contacting support, please have your product model (PS-303D) and purchase details ready.
Note: MeterTo mainly offers instruments and tools. Please confirm the product is offered by our store MeterTo when purchasing, otherwise we can't ensure the quality and after-sale service.


