
1. Introduction
This manual provides instructions for the installation, operation, and maintenance of your VIGORWORK G30 Full HD 1080P Car DVR Dashcam. Please read this manual thoroughly before using the device to ensure proper functionality and safety.
2. Safety Information
- Ensure the dashcam is securely mounted and does not obstruct the driver's view or interfere with vehicle controls.
- Do not operate the device while driving. Adjust settings only when the vehicle is safely parked.
- Use only the provided power adapter to prevent damage to the device and vehicle.
- Avoid exposing the device to extreme temperatures, direct sunlight for prolonged periods, or excessive moisture.
- Do not attempt to disassemble or repair the device yourself. Contact customer support for assistance.
3. Package Contents
Verify that all items are present in the package:
- VIGORWORK G30 Car DVR Dashcam
- Car Charger
- Suction Cup Mount
- USB Cable
- User Manual
4. Product Overview
Familiarize yourself with the components of your VIGORWORK G30 Dashcam.

Image 4.1: Front view of the VIGORWORK G30 Dashcam with its suction cup mount and screen.

Image 4.2: Side view of the VIGORWORK G30 Dashcam, highlighting its compact design and various ports.
- Lens: Captures video footage.
- Display Screen: Shows live view, menu, and playback.
- Power Button: Turns the device on/off.
- Menu Button: Accesses settings and options.
- Up/Down Buttons: Navigate menu options.
- OK Button: Confirms selections.
- Mode Button: Switches between video, photo, and playback modes.
- MicroSD Card Slot: For memory card insertion.
- USB Port: For power and data transfer.
- HDMI Port: For video output to an external display.
- AV OUT Port: For analog video output.
- Speaker/Microphone: For audio recording and playback.
5. Setup
5.1. Installing the MicroSD Card
- Ensure the dashcam is powered off.
- Locate the MicroSD card slot on the side of the device.
- Insert a Class 10 or higher MicroSD card (up to 32GB) into the slot until it clicks into place.
- To remove, gently push the card in until it clicks, then release.
5.2. Mounting the Dashcam
- Clean the desired area on your windshield.
- Attach the suction cup mount to the dashcam.
- Press the suction cup firmly against the windshield and flip the lever to secure it.
- Adjust the angle of the dashcam to ensure a clear view of the road.
5.3. Power Connection
- Connect the car charger to the dashcam's USB port.
- Plug the other end of the car charger into your vehicle's 12V power outlet (cigarette lighter socket).
- The dashcam will automatically power on and begin recording when the vehicle's ignition is turned on.
6. Operating Instructions
6.1. Power On/Off
- Automatic: The device powers on and off automatically with the vehicle's ignition.
- Manual: Press and hold the Power button for a few seconds to manually turn the device on or off.
6.2. Basic Recording
Once powered on, the dashcam will automatically start continuous loop recording. The recording indicator will flash on the screen.
6.3. Loop Recording
Loop recording continuously records video in segments (e.g., 1, 2, or 3 minutes). When the memory card is full, the oldest unlocked files are overwritten by new recordings.

Image 6.1: Menu display for adjusting loop recording duration.
- Press the MENU button to enter the settings menu.
- Navigate to 'Loop Recording' using the Up/Down buttons.
- Press OK to select and choose your desired segment length (e.g., 1 Minute, 2 Minutes, 3 Minutes, or Off).
6.4. G-Sensor (Emergency Recording)
The built-in G-Sensor detects sudden impacts or collisions. When triggered, it automatically locks the current video segment, preventing it from being overwritten by loop recording.

Image 6.2: G-Sensor file protection in action, locking critical footage.

Image 6.3: Visual representation of the G-Sensor activating to protect video files during an incident.
The G-Sensor sensitivity can be adjusted in the settings menu.
6.5. Motion Detection
When enabled, the dashcam will automatically start recording if it detects movement in front of the lens while the vehicle is parked. This feature requires continuous power supply.
6.6. Night Vision
The dashcam is equipped with night vision capabilities to enhance recording clarity in low-light conditions.
6.7. Menu Navigation and Language Settings
To access and adjust settings, use the MENU, Up/Down, and OK buttons.
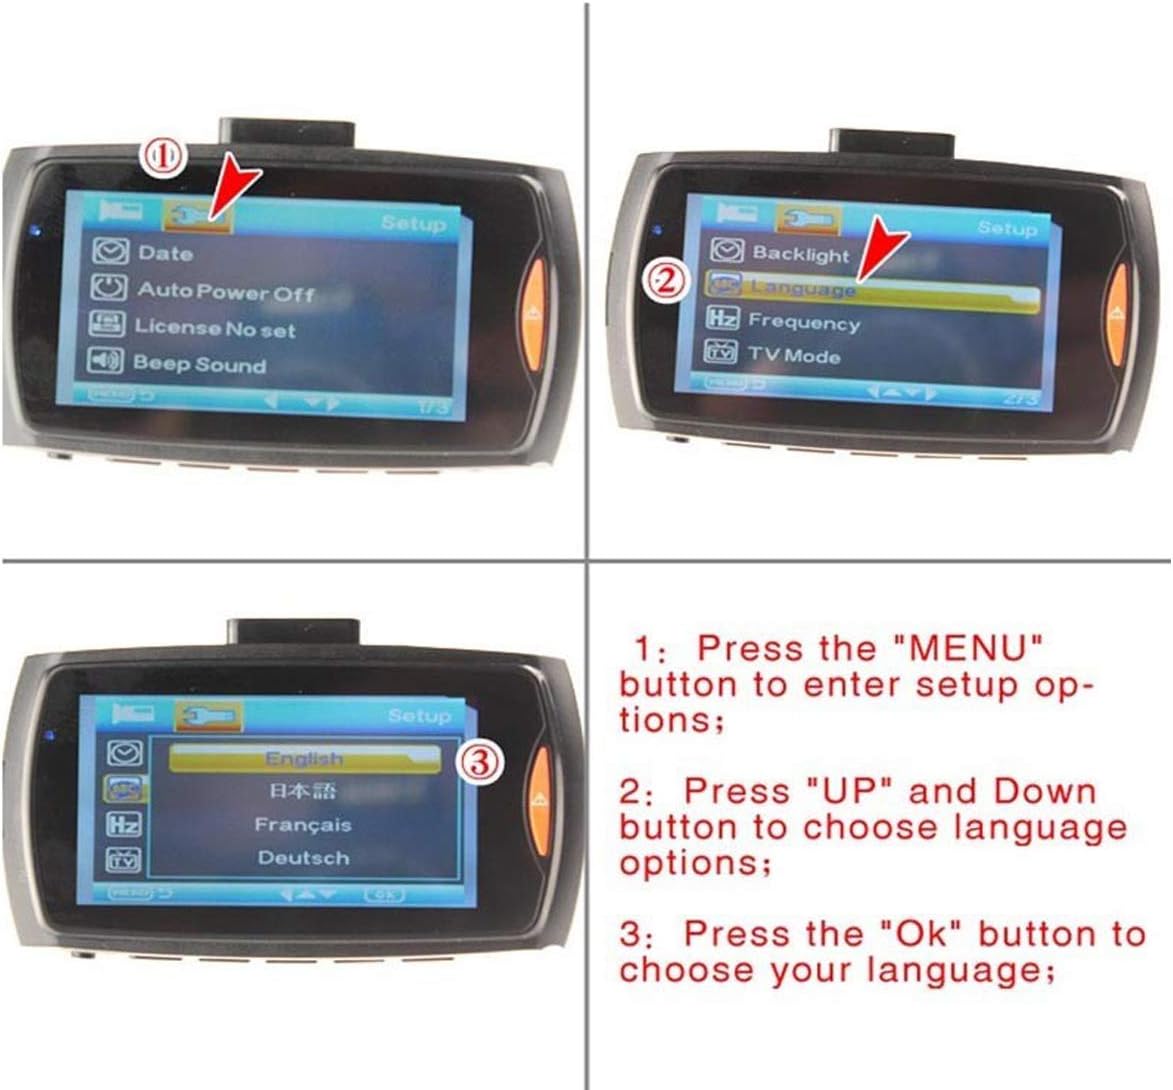
Image 6.4: Steps for navigating the menu and selecting a language.
- Press the MENU button to enter setup options.
- Press the Up and Down buttons to navigate to 'Language'.
- Press the OK button to select 'Language' and choose your preferred language.
6.8. Time Synchronization
Ensure the date and time are correctly set in the menu for accurate timestamps on your recordings.
7. Features Explained
- 1080P Full HD Video: Records high-definition video at 1920*1080 resolution.
- 170° Ultra-Wide Angle Lens: Provides a broad field of view, capturing more of the road ahead.
- G-Sensor: Automatically detects impacts and protects video files from being overwritten.
- Loop Recording: Overwrites the oldest unlocked files when the memory card is full, ensuring continuous recording.
- Motion Detection: Records automatically when movement is detected in front of the camera while parked.
- Night Vision: Enhances video clarity in low-light conditions.
- Delay Start Function: Prevents damage from instantaneous pulse current during car ignition.

Image 7.1: Illustration of the 170-degree super wide-angle lens coverage.
8. Maintenance
- Regularly format the MicroSD card (at least once a month) to maintain optimal performance and prevent data corruption.
- Clean the lens with a soft, lint-free cloth to ensure clear video quality.
- Wipe the device exterior with a dry or slightly damp cloth. Do not use chemical cleaners.
- Store the dashcam in a cool, dry place when not in use.
9. Troubleshooting
| Problem | Possible Cause | Solution |
|---|---|---|
| Dashcam does not power on. | No power supply; faulty charger; dead internal battery. | Check car charger connection; try a different 12V outlet; charge the device for a few hours. |
| Recording stops unexpectedly. | Memory card full; faulty memory card; G-Sensor triggered too often. | Format the MicroSD card; replace the card; adjust G-Sensor sensitivity. |
| Video footage is blurry or unclear. | Dirty lens; protective film still on lens; incorrect focus. | Clean the lens; remove any protective film; ensure proper mounting. |
| Dashcam freezes or crashes. | Software issue; memory card error. | Press the reset button (if available); format or replace the MicroSD card. |
| Date and time are incorrect. | Settings not saved; internal battery low. | Set date/time in menu and save; ensure device is powered for a period to charge internal battery. |
10. Specifications
| Feature | Specification |
|---|---|
| G-Sensor | Support |
| LCD Screen Size | 2.7 LTPS 16:9 |
| Lens | 140 degree A + grade high resolution ultra-wide angle lens |
| Files Format | AVI |
| Image Sensor | AR0330 |
| Video Resolution | 1920*1080; 1280*720; 848*480; 640*480 |
| Recording Video Format | MJPG, Audio: AAC |
| Language Support | Portuguese / English / Russian / Simplified Chinese / Traditional Chinese / Japanese / French / Spanish / German / Italian |
| Continuous Loop Video | Seamless Loop Recording, no leak second |
| Automatically Power on/off | Support Auto ignition boot, turn off shutdown |
| Interface | USB; HDMI; AV OUT |
| Motion Detection | Support |
| Night Vision | Support |
| Time Synchronization | Support |
| Photo Format | 500W |
| Support Memory Card | Support TF (max 32GB) |
| Built-in stereo | Support |
| Video format | PAL/NTSC |
| Frequency | 50HZ/60HZ |
| USB Function | USB-Disk; PC-Camera; Charging |
| Power Interface | 5V 1A |
11. Warranty and Support
For warranty information and technical support, please refer to the product packaging or contact your retailer. Keep your purchase receipt as proof of purchase.