1. Introduction
Thank you for choosing the Hisense DH-7019KP1WG 70 Pint Dehumidifier. This manual provides essential information for the safe and efficient operation, maintenance, and troubleshooting of your appliance. Please read it thoroughly before using the dehumidifier and retain it for future reference.
2. Important Safety Information
To reduce the risk of fire, electric shock, or injury when using your dehumidifier, follow these basic precautions:
- Read all instructions before using the appliance.
- Connect to a properly rated, protected, and grounded power supply.
- Do not operate the unit with a damaged power cord or plug.
- Do not block air inlets or outlets.
- Ensure the unit is placed on a level, stable surface.
- Keep children and pets away from the unit during operation.
- Unplug the dehumidifier before cleaning or servicing.
3. Product Overview
3.1 Components
The Hisense DH-7019KP1WG dehumidifier is designed to remove excess moisture from the air, featuring a built-in pump for continuous drainage and a washable filter for improved air quality.

Figure 1: Front view of the Hisense DH-7019KP1WG Dehumidifier, showing its compact design and Hisense branding.
3.2 Control Panel
The control panel allows you to manage all functions of the dehumidifier. It includes buttons for power, mode selection, fan speed, timer, and pump operation, along with a digital display and indicator lights.
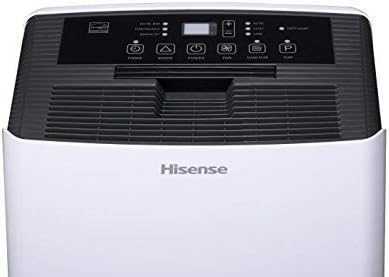
Figure 2: Close-up of the top control panel, displaying various function buttons and the digital humidity display.
4. Setup
4.1 Unpacking
Carefully remove the dehumidifier from its packaging. Remove all packing materials and ensure no components are missing or damaged. Keep the packaging for future storage or transport.
4.2 Placement
Place the dehumidifier on a firm, level surface in an area where the temperature will not fall below 38°F (3°C). Allow at least 8 inches of air space on all sides of the unit for proper air circulation. Avoid placing it near heat sources or in direct sunlight.
4.3 Power Connection
Plug the power cord into a grounded electrical outlet. Ensure the voltage and frequency of the power supply match the specifications on the unit's rating label.
5. Operating Instructions
5.1 Power On/Off
Press the POWER button to turn the unit on or off.
5.2 Setting Humidity Level
When the unit is on, press the MODE button to select your desired humidity level. Use the + or - buttons to adjust the humidity setting between 30% and 80% relative humidity (RH) in 5% increments. The unit will operate until the set humidity level is reached.
5.3 Fan Speed
Press the FAN button to cycle through fan speeds: High, Medium, and Low. A lower fan speed results in quieter operation.
5.4 Operating Modes
- Auto Dry: The unit automatically sets the humidity level to 50% RH and operates at high fan speed.
- Continuous: The unit operates continuously regardless of the humidity level. This mode is useful for very damp conditions.
- Manual Set: Allows you to set your desired humidity level and fan speed.
5.5 Timer Function
The 24-hour programmable timer allows you to set a delayed start or stop time for the dehumidifier. Press the TIMER button and use the + or - buttons to set the desired delay in hours.
5.6 Continuous Drainage (Gravity Drain)
For continuous operation without emptying the bucket, you can connect a standard garden hose (not included) to the gravity drain port. Ensure the hose is sloped downwards to allow water to drain by gravity to a suitable floor drain.
5.7 Built-in Pump Operation
The DH-7019KP1WG features a built-in pump and includes a drain hose for automatic water removal. This allows water to be pumped upwards or over a longer distance to a sink or drain.
- Connect the included pump drain hose to the pump drain port on the back of the unit.
- Direct the other end of the hose to a suitable drain location.
- When the water bucket fills, the pump will automatically activate to empty the water through the hose. The unit will continue to dehumidify.
- To manually activate the pump, press the PUMP button. This can be useful after initial setup or if the unit has been moved.

Figure 3: Rear view of the dehumidifier, highlighting the power cord storage and the gravity and pump drain ports.
6. Maintenance
6.1 Emptying the Water Bucket
When the water bucket is full, the unit will stop operating, and the 'Bucket Full' indicator will illuminate. Carefully remove the bucket, empty the water, and replace it securely. The unit will resume operation.
6.2 Cleaning the Air Filter
The 'Filter' indicator light will illuminate after approximately 250 hours of operation, reminding you to clean the air filter. A dirty filter reduces efficiency and can affect air quality.
- Turn off and unplug the dehumidifier.
- Remove the air filter from the back of the unit.
- Wash the filter with warm, soapy water. Rinse thoroughly and allow it to air dry completely before reinstalling.
- Once the filter is reinstalled, press the FILTER button to reset the filter timer.
6.3 Cleaning the Pump Filter
If using the built-in pump, periodically check and clean the pump filter located inside the water bucket. A clogged pump filter can prevent the pump from operating correctly and may lead to a 'Bucket Full' error even when the pump hose is connected.
- Turn off and unplug the dehumidifier.
- Remove the water bucket.
- Locate the pump filter (often a small screen) within the bucket.
- Carefully remove and clean the filter with an old toothbrush and warm water.
- Reinstall the pump filter and water bucket.
6.4 Storage
If storing the unit for an extended period, ensure the water bucket is empty and clean, and the air filter is clean and dry. Wrap the power cord and store the unit upright in a dry place.
7. Troubleshooting
Before contacting customer service, review the following common issues and solutions:
| Problem | Possible Cause | Solution |
|---|---|---|
| Unit does not turn on. | No power; power cord loose; circuit breaker tripped. | Check power connection; reset circuit breaker. |
| No dehumidification. | Air filter clogged; room temperature too low; humidity setting too high. | Clean air filter; ensure room temperature is above 38°F; lower humidity setting. |
| 'Bucket Full' indicator on, but bucket is empty. | Bucket not seated correctly; float switch malfunction. | Ensure bucket is fully inserted; check float switch for obstructions. |
| Pump not working or water not draining. | Pump filter clogged; drain hose kinked or blocked; pump malfunction. | Clean pump filter; check and clear drain hose; contact support if issue persists. |
| Unit is noisy. | Fan speed too high; unit not on a level surface; internal component vibration. | Reduce fan speed; place on a level surface; ensure no loose parts. |
8. Specifications
- Brand: Hisense
- Model Name: DH-7019KP1WG
- Capacity: 70 Pints per day
- Floor Area Coverage: Up to 1000 Square Feet
- Special Features: Quiet Operation, Timer, Washable Filter, Built-in Pump
- Operation Mode: Auto Dry, Continuous, Manual Set
- Minimum Operating Temperature: 38°F (3°C)
- Product Dimensions: 16 x 12 x 25 inches
- Material: Plastic
9. Warranty and Support
9.1 Warranty Information
This Hisense DH-7019KP1WG Dehumidifier comes with a 90-day limited warranty. Please refer to your purchase documentation for specific terms and conditions.
9.2 Customer Support
For technical assistance, troubleshooting beyond this manual, or warranty claims, please contact Hisense customer support. Contact details can typically be found on the manufacturer's website or your product registration materials.