
1. Product Overview
The Geekpure 6 Watt UV Water Filter is designed as an upgrade or additional stage for Reverse Osmosis (RO) water filtration systems. It utilizes ultraviolet light to disinfect water, effectively eliminating bacteria and viruses without the use of chemicals. This system is suitable for flow rates between 0.5 and 1 Gallon Per Minute (GPM) and is intended for under-sink installation.
The UV purification method ensures no change in water taste, odor, pH, conductivity, or general chemistry. It is important to note that this UV filter does not reduce impurities, chemical contaminants, hardness, or TDS. It functions as a final stage for microbiological purification.
2. Components Included
Verify that all components listed below are present in your package:
- 1 x Stainless steel 304 UV Chamber
- 1 x UV Lamp (6 Watt)
- 1 x Quartz Sleeve
- 1 x Ballast (with audible and visual alarm)
- 2 x Quick fittings for 1/4 inch female inlet/outlet
- 2 x Fixed clamps
- User Manual
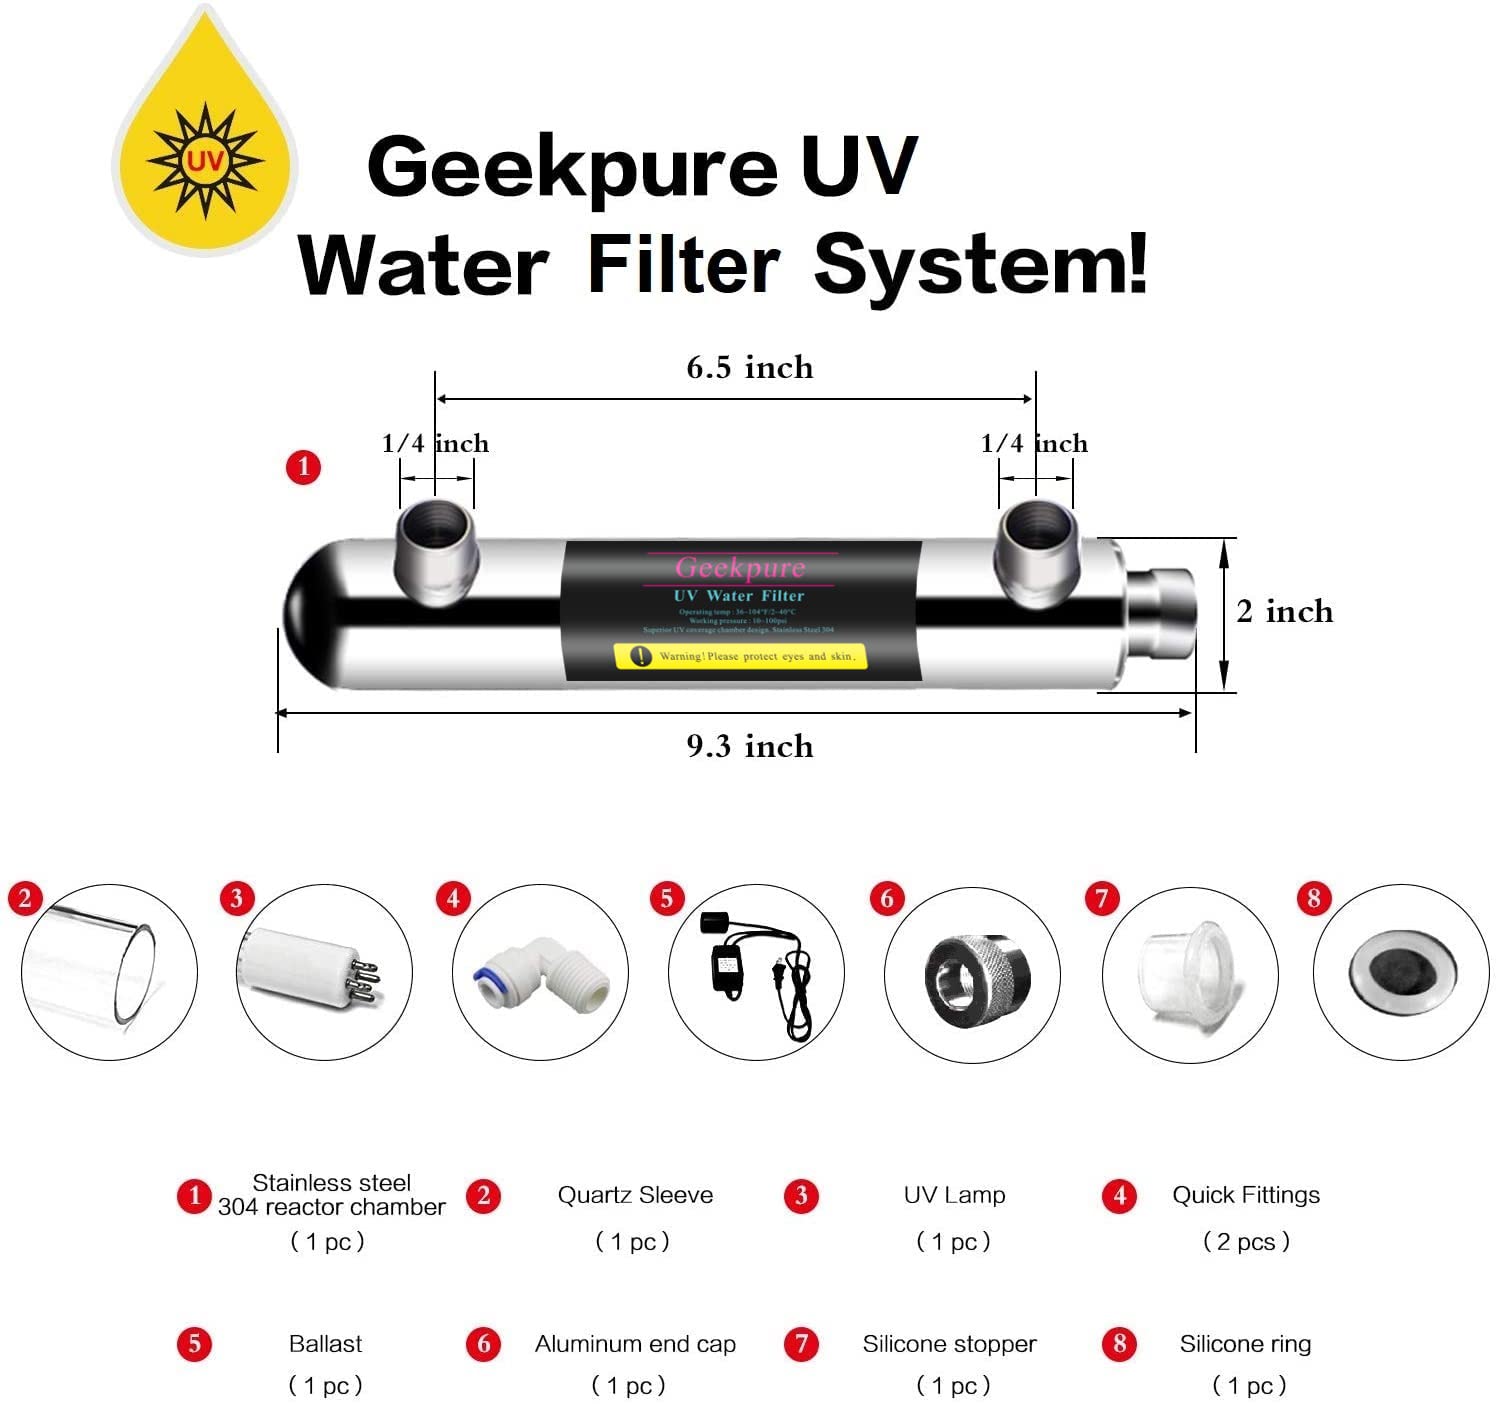
Figure 2.1: Exploded view of the Geekpure UV Water Filter components. This diagram illustrates the stainless steel 304 reactor chamber, quartz sleeve, UV lamp, quick fittings, ballast, aluminum end cap, silicone stopper, and silicone ring, along with their respective quantities.
3. Specifications
| Feature | Specification |
|---|---|
| Brand | Geekpure |
| Model Name | GP-UV6W |
| Product Dimensions (L x W x H) | 9.3" x 2" x 2" |
| Material | Stainless Steel 304 |
| Purification Method | Ultraviolet (UV) |
| UV Lamp Wattage | 6 Watt |
| Flow Rate | 0.5 - 1 GPM (Gallons Per Minute) |
| Feed Water Pressure | 40 - 100 PSI (Recommended: 50-60 PSI) |
| Feed Water Temperature | 40 - 110°F (5 - 45°C) |
| Max TDS | 500 PPM |
| Residual Chlorine Tolerance | <0.1 mg/L (ppm) |
| Turbidity | <1.0 NTU |
| Max SDI | <4.0 |
| Hardness | <5 GPG |
| Iron | <0.1 |
| Manganese | <0.05 |
| Power Source | Corded Electric (100-140V / 50-60Hz) |
| Installation Type | Under Sink |
| Item Weight | 2 Pounds |
4. Installation Guide
This UV filter is designed to be integrated into an existing Reverse Osmosis (RO) system, typically as the final stage. Ensure you have sufficient space (approximately 10"x2"x2") for the unit.
4.1 Safety Precautions
- Always disconnect power to the RO system and turn off the water supply before beginning installation.
- Handle the UV lamp and quartz sleeve with care. Avoid touching the glass parts directly with bare hands; use gloves or a clean cloth to prevent oil residue.
- Ensure all connections are secure to prevent leaks.
- The UV lamp emits strong ultraviolet radiation. Never look directly at an illuminated UV lamp.
4.2 Assembly Steps
- Prepare the UV Lamp and Quartz Sleeve: Carefully remove the UV lamp and quartz sleeve from their protective packaging. The quartz sleeve is a glass tube. The silicone stopper should be placed around the open end of the glass sleeve.
- Insert Quartz Sleeve: Insert the quartz sleeve into the stainless steel UV chamber. Ensure it is seated correctly. The spring inside the chamber helps center the glass sleeve.
- Connect UV Lamp: Connect the UV lamp to the ballast. It is often easier to plug in the UV lamp before inserting it into the quartz sleeve and chamber. Gently insert the UV lamp into the quartz sleeve, ensuring the four electrical prongs are properly seated. Avoid forcing it.
- Secure End Cap: Secure the end cap onto the UV chamber, ensuring a watertight seal.
- Mount the UV Filter: Use the provided fixed clamps to mount the UV filter horizontally or vertically in a suitable location under your sink, typically after the final stage of your RO system.
- Connect Water Lines: Connect the 1/4 inch water lines from your RO system to the inlet and outlet quick fittings of the UV filter. The UV light works regardless of water flow direction, so inlet/outlet orientation does not matter. Use Teflon tape on threaded connections if applicable to ensure a leak-free seal.
- Final Checks: Double-check all connections for tightness. Ensure the ballast is not yet plugged into a power outlet.

Figure 4.1: Installation diagram for integrating the UV filter as a 6th stage. This image shows the connection points for 1/4" PE tubing, elbow fittings, and the placement of clamps to secure the filter.

Figure 4.2: Example of the UV filter installed under a sink. This image provides a visual reference for the typical placement of the UV filter within a complete reverse osmosis water filtration setup.
4.3 Accessory Information
Additional accessories for installation can be sourced using the ASINs below:
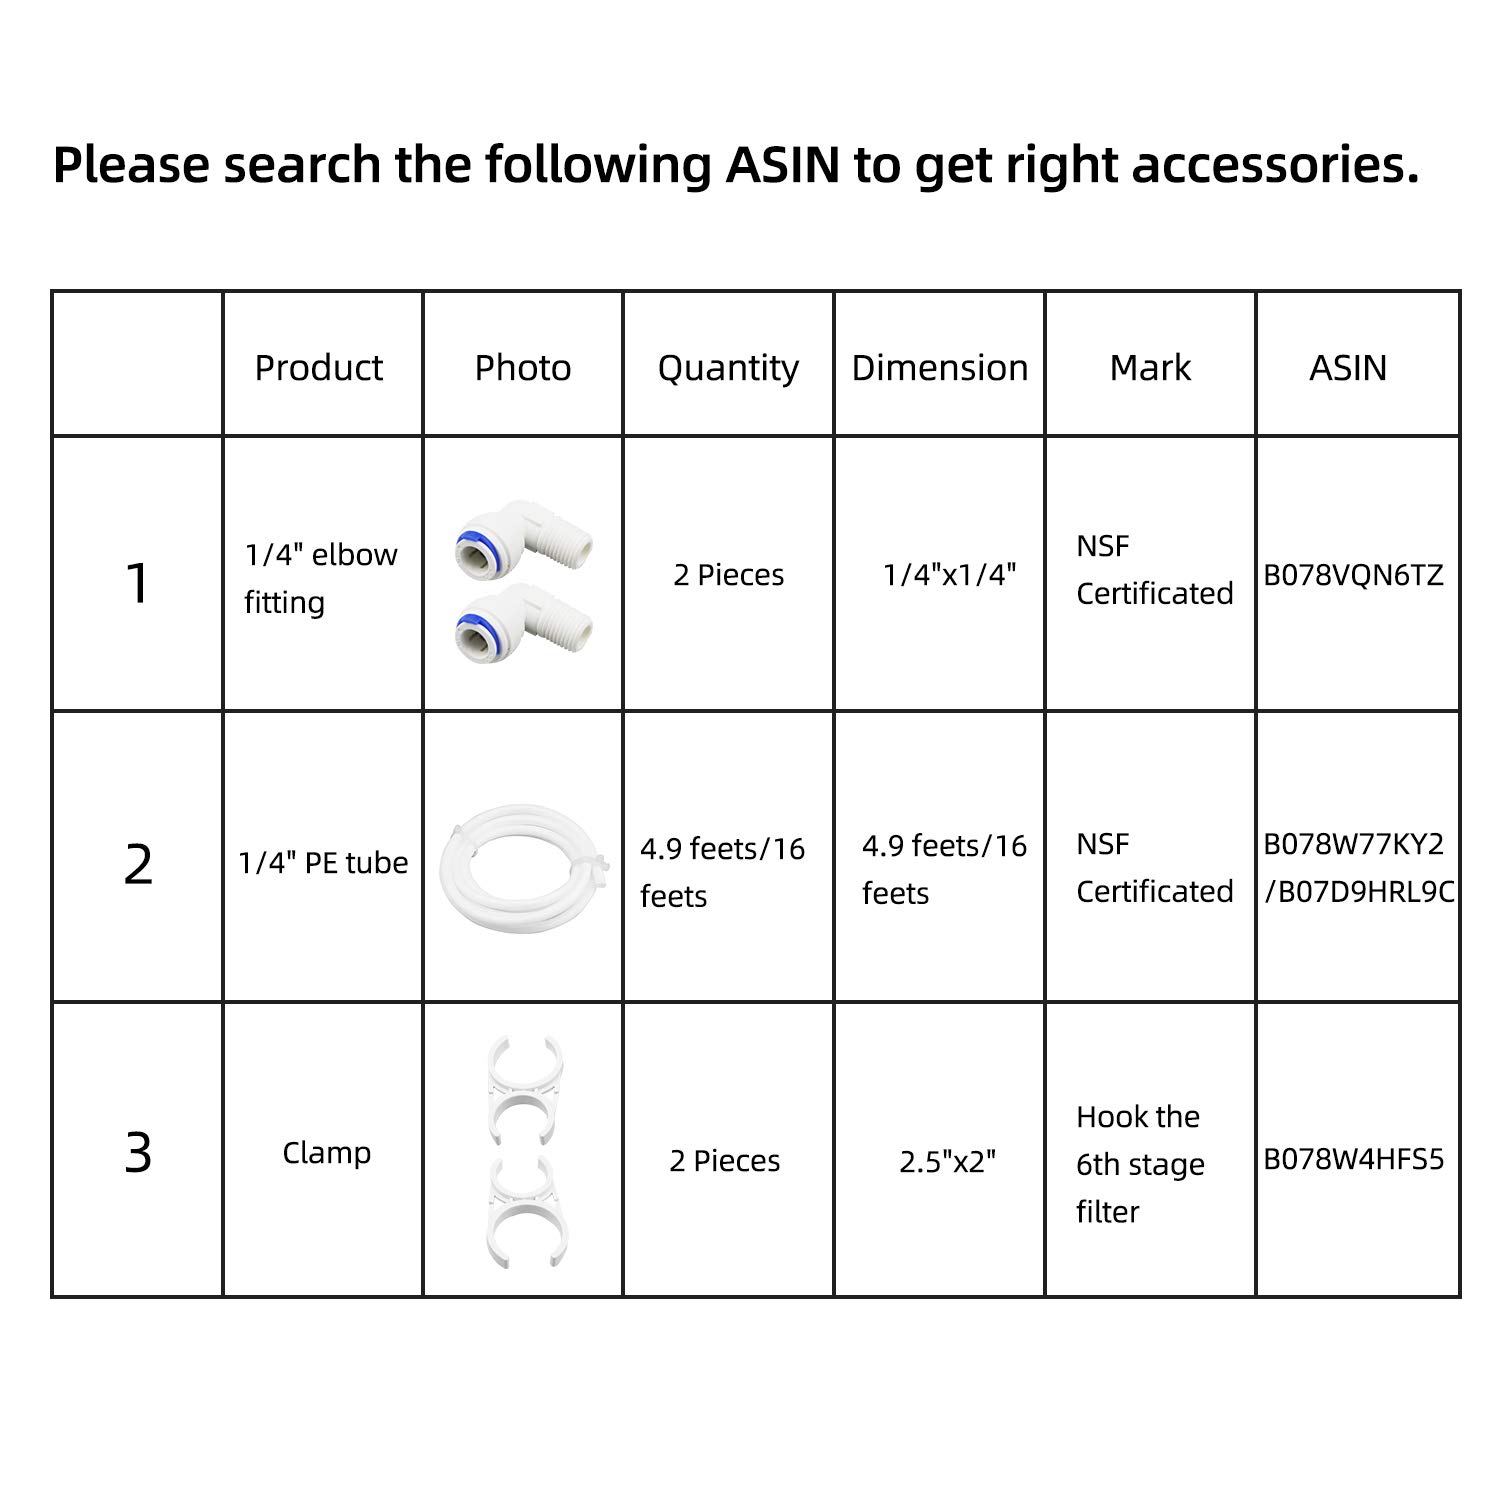
Figure 4.3: Table of recommended accessories and their ASINs. This table details 1/4" elbow fittings, 1/4" PE tube, and clamps, providing product photos, quantities, dimensions, and corresponding Amazon Standard Identification Numbers for easy reordering.
4.4 Video Installation Guide
Video 4.1: Official installation guide for the Geekpure 6 Watt UV Water Filter. This video demonstrates the unboxing and assembly process for the UV filter, showing how to connect the components and integrate the unit into a water filtration system.
5. Operating Instructions
- Initial Startup: After installation, slowly turn on the water supply to the RO system. Check for any leaks around the UV filter connections. It is recommended to wait until the entire system is pressurized and re-check for any leaks before leaving the installation site.
- Power Connection: Plug the ballast into a standard electrical outlet. The ballast includes an audible and visual alarm to indicate proper operation or potential issues.
- First Use: The first 2 gallons of water produced after installation should not be consumed. Allow the system to flush thoroughly.
- Continuous Operation: The UV lamp is designed for continuous operation. It will remain on as long as the ballast is powered. This ensures constant disinfection of water passing through the system.
- Monitoring: Observe the visual indicator on the ballast to confirm the UV lamp is functioning. An alarm or lack of light indicates a potential issue with the lamp or ballast.
6. Maintenance
6.1 UV Lamp Replacement
The UV lamp has an effective lifespan of approximately 9000 hours, which translates to about 1 year of continuous operation. After this period, the lamp undergoes photochemical changes and loses its effectiveness, even if it still illuminates. Regular replacement is crucial for maintaining water quality.
- Replacement Frequency: Annually.
- Replacement Part ASIN: B07BGWXS43 (UV filter lamp).
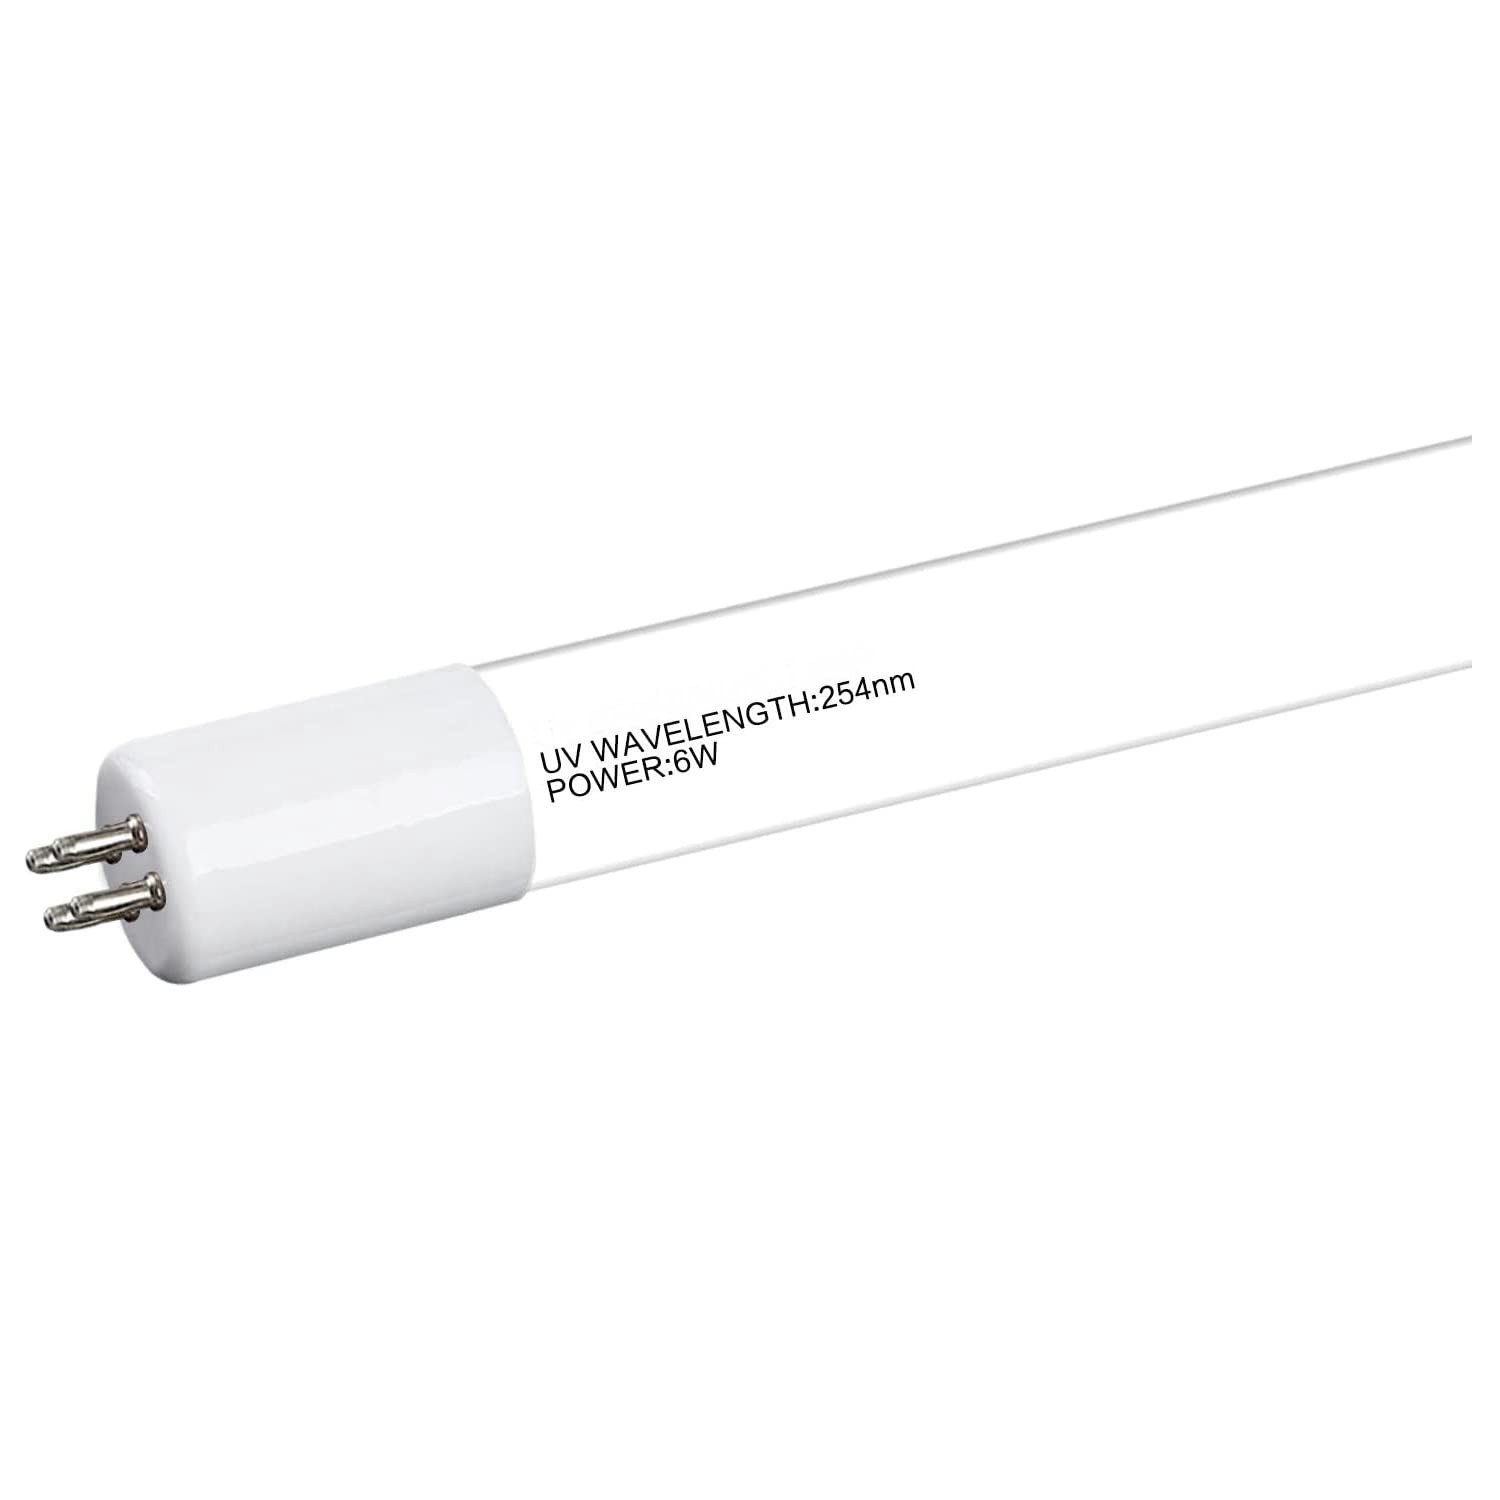
Figure 6.1: Geekpure 6 Watt UV Lamp. This image displays the UV lamp with its specifications (254nm wavelength, 6W power) and the four-pin connector for the ballast.
Replacement Procedure:
- Disconnect the power supply to the UV filter.
- Turn off the water supply to the RO system and relieve pressure if necessary.
- Carefully remove the end cap and slide out the old UV lamp from the quartz sleeve.
- Handle the new UV lamp by its ends (not the glass) and insert it into the quartz sleeve. Ensure the four electrical prongs align correctly with the ballast connector.
- Re-secure the end cap.
- Restore water supply and check for leaks before restoring power.
6.2 Quartz Sleeve Replacement
The quartz sleeve should be inspected periodically for cracks or significant fouling. Replace if damaged or if cleaning does not restore clarity.
- Replacement Part ASIN: B08VNDPKY6 (Quartz sleeve).
6.3 Ballast Replacement
If the ballast alarm sounds continuously or the UV lamp does not light up after replacement, the ballast may need to be replaced.
- Replacement Part ASIN: B07BFVVFRW (Ballast).
7. Troubleshooting
| Problem | Possible Cause | Solution |
|---|---|---|
| UV lamp not lighting up / Ballast alarm sounds |
|
|
| Water leaks from connections |
|
|
| Reduced water flow |
|
|
| Water quality concerns (e.g., taste, odor) |
|
|
Important Note: This UV filter is not suitable for whole house water filter systems or for directly filtering well water with high levels of impurities without prior filtration. It cannot reduce impurities, chemical contaminants, hardness, or TDS. For such applications, consider professional whole house water filter systems or complete reverse osmosis systems.
8. Warranty and Support
8.1 Warranty Information
The Geekpure 6 Watt UV Water Filter comes with a 1-year limited warranty from the date of purchase. This warranty covers manufacturing defects under normal use and service. Please retain your proof of purchase for warranty claims.
The EU spare part availability duration is 3 years.
8.2 Technical Support
Geekpure provides 24/7 technical support. For assistance with installation, operation, troubleshooting, or warranty claims, please contact Geekpure customer service. Refer to the contact information provided in your product packaging or visit the official Geekpure website.
Geekpure is an ISO9001:2015 certified manufacturer with over 20 years of expertise in water filtration.


