1. Introduction
The Leelbox S3 ATSC Converter Box is designed to convert over-the-air (OTA) digital television broadcasts for viewing on analog televisions or for enhancing digital TV capabilities. This device allows you to receive free digital channels, record programs, pause live TV, and play multimedia files via USB. It supports HD 1080P output for compatible displays.
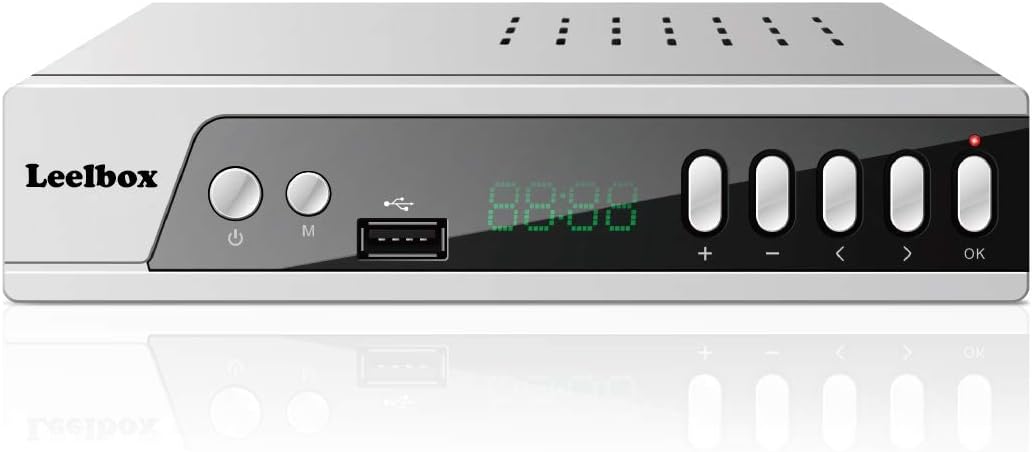
Figure 1: Front view of the Leelbox S3 ATSC Converter Box, showing the display, USB port, and control buttons.
2. Package Contents
Please verify that all items are present in the package:
- Leelbox S3 ATSC Converter Box
- Remote Control (requires 2 AAA batteries, not included)
- AV Cable (RCA: Yellow, Red, White)
- User Manual

Figure 2: Contents of the Leelbox S3 package, showing the converter box, remote control, user manual, and AV cables.
3. Product Features
The Leelbox S3 offers a range of features to enhance your television viewing experience:
- ATSC Digital Tuner: Receives free over-the-air digital broadcasts.
- HD 1080P Output: Supports high-definition video output via HDMI.
- USB Multimedia Playback: Play videos, music, and photos from a USB storage device.
- PVR (Personal Video Recorder) Function: Record live TV programs to a connected USB drive.
- Timeshift: Pause and rewind live television.
- Parental Controls: Manage access to channels and programs.
- Dolby Audio Support: Enhanced audio experience.
- Multiple Output Options: HDMI, Component (YPbPr), Coaxial, and RCA (AV) outputs.

Figure 3: Key features of the Leelbox S3, including USB port, Timeshift, program recording, and parental controls, alongside examples of receivable channels.
4. Setup Instructions
Follow these steps to connect your Leelbox S3 converter box to your television and antenna.
4.1 Connecting the Antenna
- Connect your outdoor or indoor antenna to the ANT IN port on the back of the Leelbox S3 using a coaxial cable.
4.2 Connecting to Your TV
Choose one of the following connection methods based on your TV's available inputs:
- HDMI (Recommended for HD TVs): Connect an HDMI cable from the HD 1080 port on the converter box to an HDMI input on your TV.
- Component (YPbPr): Connect component cables (Green, Blue, Red for video) from the Y, Pb, Pr ports on the converter box to the corresponding inputs on your TV. Connect RCA audio cables (Red for Right, White for Left) from the R, L ports to your TV's audio inputs.
- RCA (AV): Connect the yellow RCA cable from the VIDEO port on the converter box to the yellow video input on your TV. Connect the red and white RCA cables from the R, L ports to your TV's audio inputs.
- Coaxial (RF): Connect a coaxial cable from the ANT OUT CH3-CH4 port on the converter box to the antenna input on your TV. Set your TV to Channel 3 or 4.
4.3 Power Connection
- Plug the power cord of the Leelbox S3 into a standard electrical outlet.
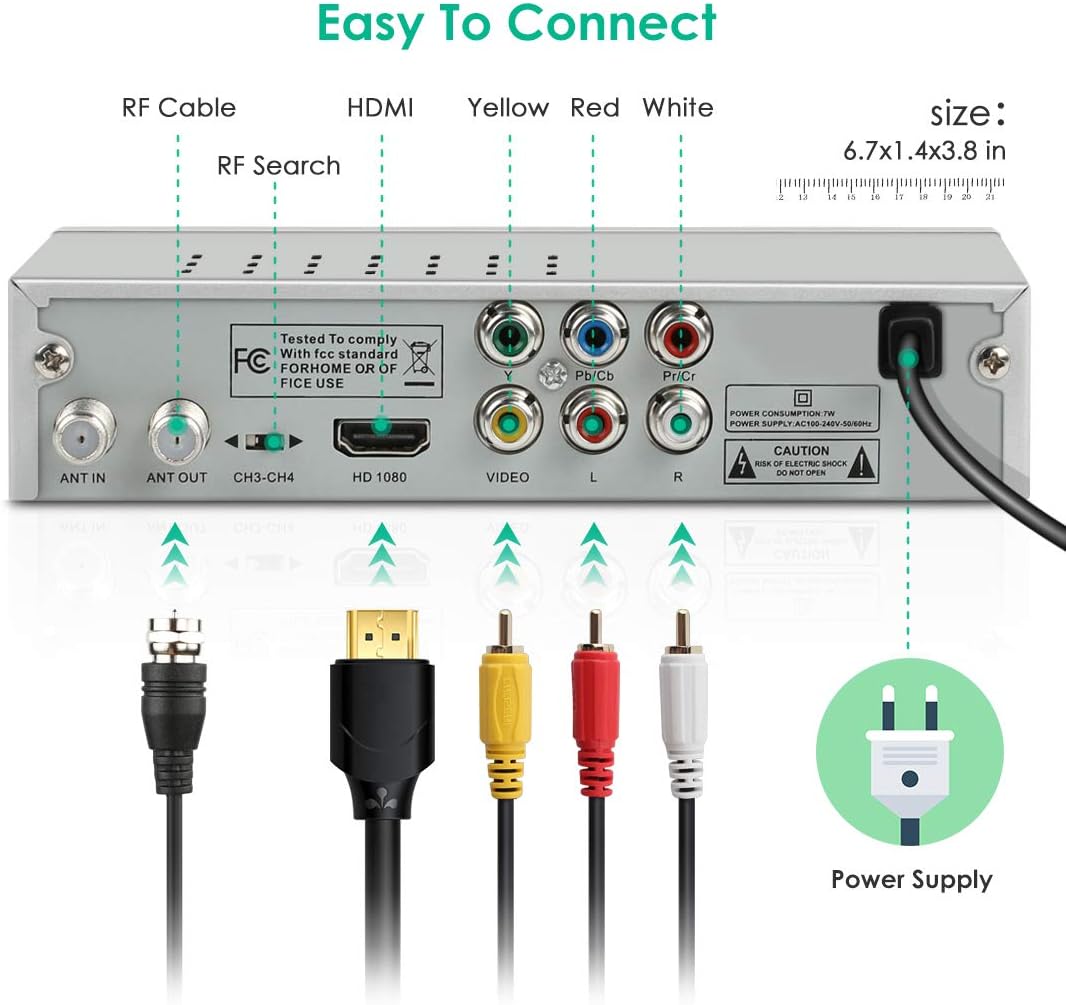
Figure 4: Rear panel of the Leelbox S3, illustrating various connection ports including ANT IN, ANT OUT, HDMI, Component, RCA, and power input.
4.4 Initial Setup and Channel Scan
- Turn on your TV and select the correct input source (e.g., HDMI 1, AV, TV/Antenna).
- Turn on the Leelbox S3 using the power button on the front panel or the remote control.
- The first time you power on the box, an installation guide may appear. Follow the on-screen prompts to select your language, country, and initiate an automatic channel scan.
- If the installation guide does not appear, press the MENU button on the remote, navigate to the 'Channel' or 'Installation' menu, and select 'Auto Scan' or 'Auto Search'.
- Allow the scan to complete. This process may take several minutes.
5. Operating Instructions
5.1 Basic Remote Control Functions
- POWER: Turns the converter box on or off.
- CH +/-: Changes channels up or down.
- VOL +/-: Adjusts the volume level.
- MUTE: Mutes or unmutes the audio.
- MENU: Accesses the main menu for settings and features.
- EXIT: Exits the current menu or screen.
- OK: Confirms a selection or displays channel information.
- ARROW KEYS: Navigates through menus and options.
- INFO: Displays program information.
- EPG: Accesses the Electronic Program Guide.
5.2 Electronic Program Guide (EPG)
Press the EPG button on the remote control to view the Electronic Program Guide. This guide displays program schedules for available channels, allowing you to browse upcoming shows and set reminders or recordings.
5.3 Parental Controls
To set up parental controls:
- Press the MENU button.
- Navigate to the 'Parental Control' or 'System' menu.
- Enter the default password (usually 0000 or 1234). You can change this password later.
- Configure settings such as channel lock, program rating lock, or change password.
6. USB Multimedia Playback
The Leelbox S3 supports playback of various media files from a USB storage device.
6.1 Connecting a USB Device
- Insert a USB flash drive or external hard drive (formatted as FAT32 or NTFS) into the USB port on the front panel of the converter box.
6.2 Playing Media Files
- Press the USB or MEDIA button on the remote control, or navigate to the 'Multimedia' menu via the MENU button.
- Select the desired media type (e.g., Movie, Music, Photo).
- Browse your USB device's folders and files.
- Select a file and press OK to start playback.
Supported formats include MP3, AAC, AVI, MPG, DAT, VOB, MKV, MJPEG, JPEG, BMP, and PNG.

Figure 5: The Leelbox S3 connected to a television, demonstrating USB media playback from a connected flash drive.
7. Recording and Timeshift
The PVR and Timeshift functions require a USB storage device connected to the converter box.
7.1 Recording Live TV
- While watching a program, press the REC button on the remote control to start recording immediately.
- Press STOP to end the recording.
- Recorded programs can be accessed through the 'PVR' or 'Record' section in the Multimedia menu.
7.2 Scheduled Recording
- Press the EPG button to open the Electronic Program Guide.
- Navigate to the desired program and press the OK button.
- Select 'Record' or 'Timer Record' from the options. Confirm the recording settings (start time, end time, channel).
- The box will automatically record the program at the scheduled time. Ensure the box is powered on or in standby mode.
7.3 Timeshift Function
- While watching live TV, press the PAUSE button on the remote control to activate Timeshift. The program will pause.
- You can then use the PLAY, REWIND, and FAST FORWARD buttons to control playback.
- Press STOP to exit Timeshift and return to live TV.

Figure 6: Illustration of how to schedule, record, and watch programs later using the Leelbox S3 and a USB storage device.
8. Troubleshooting
If you encounter issues with your Leelbox S3, refer to the following common problems and solutions:
- No Picture/No Signal:
- Ensure all cables (antenna, HDMI/AV) are securely connected.
- Verify your TV is set to the correct input source.
- Perform an 'Auto Scan' for channels if you haven't already or if channels are missing.
- Check your antenna connection and position for optimal signal reception.
- No Audio:
- Check the volume level on both the converter box and your TV.
- Ensure the MUTE function is not active.
- Verify audio cables (if using RCA or Component) are correctly connected.
- Remote Control Not Responding:
- Ensure there are fresh AAA batteries installed correctly.
- Point the remote directly at the front panel of the converter box.
- Remove any obstacles between the remote and the box.
- PVR Recording Issues (Freezing/Failed Recordings):
- Ensure the USB drive has sufficient free space and is formatted correctly (FAT32 or NTFS).
- Try a different USB drive. Some drives may have compatibility issues or insufficient write speeds.
- Ensure the converter box remains powered on or in standby mode during scheduled recordings.
9. Specifications
| Brand | Leelbox |
| Model Number | LBX S3 ZHH US |
| Product Dimensions | 5 x 3 x 1 inches |
| Item Weight | 6.4 ounces |
| Interface Type | Coaxial, Component, HDMI, USB |
| Mounting Type | Coaxial, Surface Mount, Plug Mount |
| Number of Channels | 16 |
| Batteries Required | 2 AAA batteries (for remote) |
10. Safety Information
Please read and follow these safety guidelines to ensure proper operation and prevent damage:
- Do not expose the device to rain or moisture.
- Do not open the casing; there are no user-serviceable parts inside. Refer all servicing to qualified personnel.
- Ensure proper ventilation around the device to prevent overheating.
- Use only the power adapter supplied with the unit.
- Keep the device away from direct sunlight, heat sources, and strong magnetic fields.
11. Warranty and Support
For warranty information and technical support, please refer to the documentation included with your product or visit the official Leelbox website. Keep your purchase receipt as proof of purchase.


