1. Introduction
This manual provides comprehensive instructions for the safe and efficient operation of your Retevis RT18 Rechargeable Walkie Talkies. Please read this manual thoroughly before use and retain it for future reference.
2. Package Contents
Upon unpacking, please verify that all items listed below are included:
- 2 x Retevis RT18 Two-Way Radios
- 2 x Belt Clips
- 1 x User Manual
- 2 x Hand-Straps
- 1 x Adapter (USB charger)

Figure 2.1: Contents of the Retevis RT18 package.
3. Product Features
- Compact and Lightweight Design: Less than 0.6 inches thick and weighing only 0.26 pounds, designed for easy handling by adults and children.
- Dual PTT (Push-to-Talk) Buttons: Features both a side PTT button and a large central round PTT button for flexible communication.
- Breathing Light Indicator: A colored LED circle around the front PTT button indicates device status (on, working, standby, charging).
- Sturdy Metal Back Clip: Allows secure attachment to a belt or backpack.
- Key Lock Function: Prevents accidental channel changes.

Figure 3.1: Dual PTT design for flexible communication.

Figure 3.2: Breathing Light and Large PTT button.
4. Setup
4.1 Battery Installation
- Locate the battery compartment cover on the back of the radio.
- Gently pry open the cover using a fingernail or small tool.
- Insert the provided Lithium Metal battery (Model: BL18, 1000mAh, 3.7Wh) into the compartment, ensuring the contacts align.
- Replace the battery compartment cover until it clicks securely into place.

Figure 4.1: Battery installation for the Retevis RT18.
4.2 Charging the Radios
The RT18 radios are equipped with rechargeable Lithium Metal batteries. Use the provided adapter and Y-type USB cable for charging.
- Connect the USB adapter to a power outlet.
- Plug the Y-type USB cable into the adapter.
- Connect the micro USB ends of the Y-cable to the charging ports on each walkie talkie.
- The breathing light indicator will show red during charging and turn green when fully charged. Charging time is approximately 3 hours.

Figure 4.2: Charging the Retevis RT18 walkie talkies.
4.3 Attaching the Belt Clip
The sturdy metal back clip allows for convenient carrying.
- Align the belt clip with the designated slots on the back of the radio.
- Slide the clip into place until it securely locks.
- To remove, gently lift the tab on the clip and slide it off.
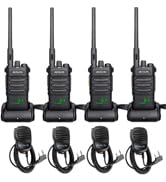
Figure 4.3: Attaching the metal belt clip.
5. Basic Operation
5.1 Power On/Off
To power on the radio, rotate the top-left knob clockwise until you hear a click and a voice prompt announces the channel number. To power off, rotate the same knob counter-clockwise until it clicks off.
5.2 Channel Selection
The RT18 has 16 channels. To change channels, use the 'CH+' and 'CH-' buttons located on the side of the radio. A voice prompt will announce the selected channel number.
5.3 Volume Adjustment
Adjust the volume by rotating the top-right knob. Rotate clockwise to increase volume and counter-clockwise to decrease volume.
Video 5.1: Demonstration of volume adjustment on the Retevis RT18 walkie talkie.
5.4 Push-to-Talk (PTT)
The RT18 features two PTT buttons: a side PTT and a large central PTT button. Press and hold either PTT button to transmit your voice. Release the button to listen.
Video 5.2: Overview of the easy-to-use dual PTT and smart breathing lights on the Retevis RT18.
5.5 Key Lock Function
To prevent accidental channel changes, you can lock the current channel:
- Long press the 'CH-' (channel down) button until you hear two beeps. The current channel is now fixed.
- To unlock, long press the 'CH-' button again until you hear one beep. You can now change the channel normally.
Video 5.3: Demonstration of the keylock function on the Retevis RT18.
5.6 Breathing Light Indicator
The colored LED ring around the front PTT button provides visual feedback:
- Flashing: Indicates standby state.
- Red: Transmitting or charging.
- Green: Receiving or fully charged.
6. Advanced Features
6.1 Programming and Customization
The Retevis RT18 radios can be customized using programming software (CPS) and a CPS cable connected to a computer. This allows for setting privacy codes (CTCSS/CDCSS) and assigning functions to side keys (e.g., Monitor, VOX, Scan, Emergency Alarm, FM Radio).
Video 6.1: Guide on how to set privacy codes and customize feature settings using programming software.
Video 6.2: Instructions for programming the TD-M11 (similar programming process for RT18) using the Odmaster app.
7. Specifications
| Feature | Detail |
|---|---|
| Brand | Retevis |
| Model Number | FA9152A-C9034A |
| Item Weight | 0.01 ounces |
| Product Dimensions | 2.04 x 0.55 x 3.54 inches |
| Batteries | 2 Lithium Metal batteries required (included) |
| Color | Black |
| Number of Channels | 16 |
| Frequency Range | FRS |
| Talking Range Maximum | 2 Miles |
| Voltage | 3.7 Volts |
| Water Resistance Level | Not Water Resistant |
| FCC ID | 2ASNSRT18 |
8. Safety Information
Your Retevis RT18 walkie talkies are FRS (Family Radio Service) compliant and meet FCC rule part 95. The FCC ID is 2ASNSRT18. Please ensure you operate the devices in accordance with local regulations.
9. Troubleshooting
If you encounter issues with your RT18 walkie talkies, consider the following common solutions:
- No Power: Ensure the battery is correctly installed and fully charged.
- Cannot Communicate: Verify both radios are powered on and set to the same channel. Check if the key lock function is active on either device.
- Poor Audio Quality: Ensure radios are within range and there are no major obstructions. Adjust volume levels.
- Accidental Channel Changes: Utilize the key lock function to prevent unintended channel switching.
10. Warranty and Support
Retevis provides a 2-year warranty for the radio body and a 1-year warranty for accessories. Within the warranty period, maintenance service is offered. Beyond the warranty period, maintenance service is still available, with buyers responsible for corresponding costs. For support, please contact Retevis customer service on Amazon; they will reply within 12 hours.


