1. Introduction
The Stemedu VK172 USB GPS/GLONASS Module Receiver is a compact and versatile device designed to provide accurate positioning data. It supports both GPS and GLONASS satellite systems, offering enhanced reliability and coverage. This module is compatible with various operating systems, including Windows, Android, Linux, and Raspberry Pi, making it suitable for a wide range of applications such as navigation, tracking, and data logging.
This manual provides detailed instructions for setting up, operating, and maintaining your VK172 module to ensure optimal performance.
2. What's in the Box
- 1x VK172 USB GPS Module
3. Setup
3.1. Hardware Connection
Connect the VK172 USB GPS/GLONASS Module to an available USB port on your computer or compatible device. Ensure the module is placed in an area with a clear view of the sky to receive optimal satellite signals. The side of the module labeled "GPS/GLONASS" should face upwards towards the sky.

Figure 1: Stemedu VK172 USB GPS/GLONASS Module with cap off, showing the USB connector.

Figure 2: Examples of the VK172 module connected to a laptop, car navigation system, and Raspberry Pi.
3.2. Driver Installation (Windows)
For Windows operating systems (Windows 7/8/10/Vista/XP), driver installation is required. You can download the necessary drivers from the official U-Blox website. Navigate to the product resources section and locate the appropriate driver for your Windows version. For Raspberry Pi and Linux systems, no additional drivers are typically required as the module is usually detected as a ttyACM0 device.
Driver Download Link: https://www.u-blox.com/en/product-resources/2673
3.3. Software Installation (U-Center)
U-Center is a GNSS evaluation software provided by U-Blox that allows you to configure and monitor the GPS module. It is recommended for advanced users to verify data output and adjust settings.
U-Center Software Download Link: https://www.u-blox.com/en/product/u-center-windows
When downloading, select the version compatible with M9 products and below, typically labeled as "Download u-center, v22.02" or similar.
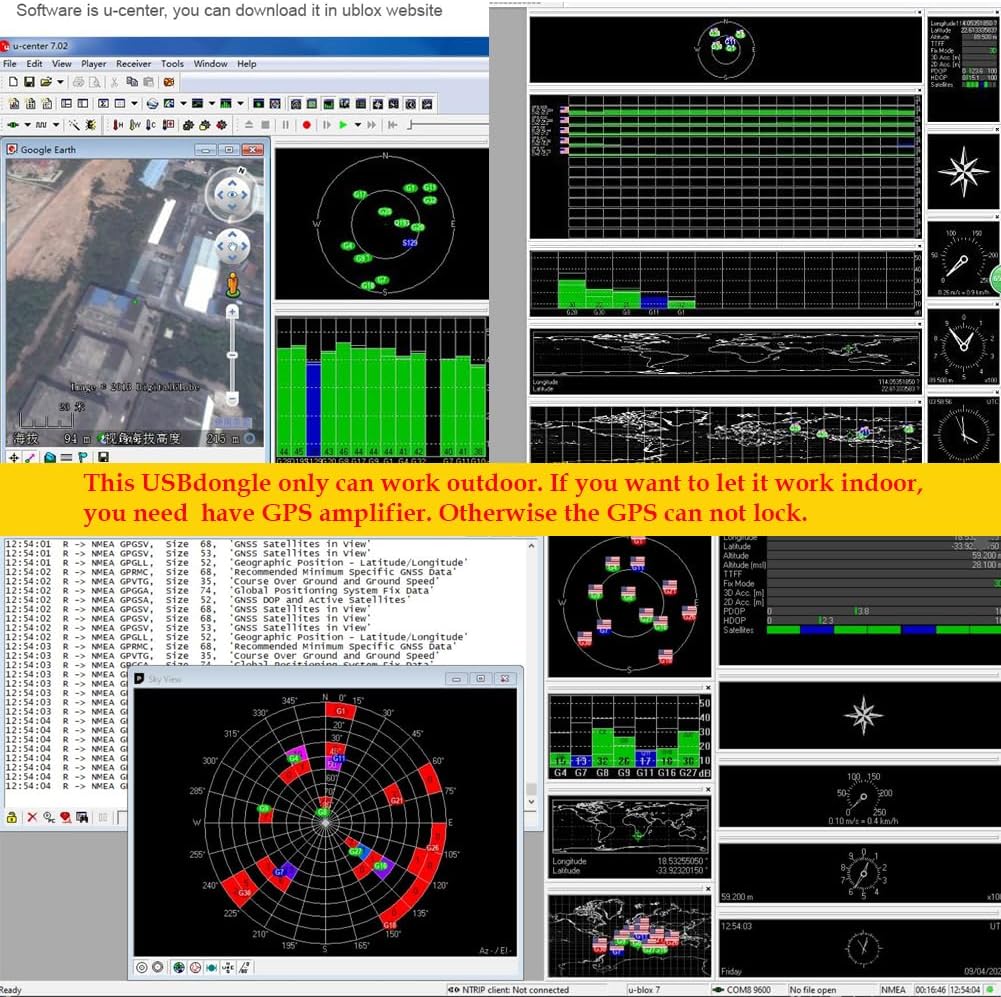
Figure 3: U-Center software interface showing satellite data and configuration.
3.4. Initial Connection and Testing
After installing the drivers and U-Center software (if applicable), connect the VK172 module. Open U-Center and select the correct COM port for the module. You should begin to see NMEA data streams, indicating successful communication with satellites. Initial satellite lock may take a few minutes, especially if the module is being used for the first time or after a long period of inactivity.
Video 1: Stemedu VK172 USB GPS Dongle Module Overview and Raspberry Pi Connection. This video illustrates the physical module and its integration with a Raspberry Pi, displaying the resulting GPS data output.
4. Operating Instructions
4.1. Optimal Signal Reception
For best performance, ensure the VK172 module has an unobstructed view of the sky. Indoor use, especially within buildings with thick walls or metal structures, may significantly reduce signal strength and accuracy. If indoor use is necessary, consider using a GPS amplifier or placing the module near a window.
Video 2: Vfan USB GPS Antenna/Receiver Setup and U-Center Demonstration. This video shows the unboxing, connection to a laptop, and live data display in U-Center, highlighting the importance of outdoor placement for satellite signal acquisition.
4.2. Modifying GPS Protocol Data (U-Center)
The default output of the VK172 module is GPS protocol data. You can use U-Center software to modify or switch between GPS and GLONASS protocol data using serial commands.
Changing Baud Rate:
- Open U-Center. Navigate to View > Configuration View and open the configuration bar.
- Find View > Configuration View > PRT (Ports). Enter the desired baud rate (e.g., 115200) and click "Send".
- After changing the baud rate, switch to the new baud rate. Only the NMEA-0183 protocol can be output in the Text Console.
- To save the modification, go to View > Configure View > CFG (Configuration), select "Save current configuration" and choose the appropriate device (e.g., FLASH), then click "Send".
Modifying Work Mode (GNSS Configuration):
- Open U-Center. Navigate to View > Configure View > GNSS (GNSS Config). Check the desired frequencies (e.g., GPS, GLONASS) and click "Send".
- To save the modification, go to View > Configure View > CFG (Configuration), select "Save current configuration" and choose the appropriate device (e.g., FLASH), then click "Send".
Modifying NMEA Output Details:
- Open U-Center. Navigate to View > Configure View > NMEA (NMEA Protocol). Check or uncheck options as needed (e.g., filters, compatibility mode) and click "Send".
- To save the modification, go to View > Configure View > CFG (Configuration), select "Save current configuration" and choose the appropriate device (e.g., FLASH), then click "Send".
Turning UBX Protocol Output On or Off:
- Open U-Center. Navigate to View > Messages View > UBX-NAV. Find the corresponding statement (e.g., PVT). Right-click on it and select "Enable Message" or "Disable Message".
- To save the modification, go to View > Configure View > CFG (Configuration), select "Save current configuration" and choose the appropriate device (e.g., FLASH), then click "Send".
Resetting the GPS Module:
- Open U-Center. Navigate to View > Configure View > CFG (Configuration). Select "Revert to default configuration" and choose the appropriate device (e.g., FLASH), then click "Send" to reset the GPS.
Video 3: Vk-172 Gmouse USB GPS GLONASS Dongle Module Configuration Guide. This video demonstrates how to adjust various settings of the module using U-Center software, including baud rate, work mode, NMEA output, UBX output, and how to perform a reset.
5. Specifications
| Feature | Detail |
|---|---|
| Brand | Stemedu |
| Model Number | VK172 |
| Item Weight | 0.317 ounces |
| Product Dimensions | 2.36 x 1.18 x 0.39 inches |
| Hardware Interface | USB |
| Color | White |
| Compatible Devices | Smartphone, Tablet |
| Compatible Operating Systems | Linux, Windows |
| UPC | 768390744552 |
6. Troubleshooting
6.1. No Satellite Signal / Poor Accuracy
- Outdoor Placement: Ensure the module is placed outdoors with a clear, unobstructed view of the sky. Indoor environments, especially near large metal structures or thick walls, can severely degrade GPS/GLONASS signal reception.
- First Fix Time: The initial satellite lock (cold start) can take several minutes. Be patient and allow the module sufficient time to acquire signals.
- Interference: Keep the module away from other electronic devices that might cause electromagnetic interference.
6.2. Module Not Recognized (Windows)
- Driver Installation: Verify that the correct drivers for your Windows operating system have been installed. Refer to Section 3.2 for driver download links.
- USB Port: Try connecting the module to a different USB port. Avoid USB 3.0 ports if experiencing issues, as some older modules may have compatibility problems.
- Device Manager: Check Windows Device Manager to see if the device is listed and if there are any driver-related errors.
6.3. No Data Output in U-Center
- COM Port Selection: Ensure the correct COM port is selected in U-Center.
- Baud Rate: Confirm that the baud rate in U-Center matches the module's default or configured baud rate (typically 9600 or 115200).
- Protocol Settings: Check the NMEA and UBX protocol output settings in U-Center to ensure desired messages are enabled. Refer to Section 4.2.
7. Maintenance
- Cleaning: Keep the module clean and free from dust and debris. Use a soft, dry cloth for cleaning.
- Storage: Store the module in a cool, dry place when not in use.
- Environmental Conditions: Avoid exposing the module to extreme temperatures, humidity, or direct water contact.
8. Warranty and Support
For warranty information and technical support, please refer to the product's purchase platform or contact Stemedu directly through their official channels. Keep your purchase receipt as proof of purchase.

