1. Introduction
The Walfront PZEM-022 is a multi-function AC digital meter designed for measuring electrical parameters such as voltage, current, active power, energy, frequency, and power factor. It features a large LCD display with backlight, an overload alarm function, and data storage capability. This manual provides detailed instructions for the safe and effective use of your PZEM-022 meter.
2. Important Safety Information
Please read and understand all safety warnings and instructions before installation and operation. Failure to follow these instructions may result in electric shock, fire, or serious injury.
- This module is designed for indoor use only. Do not use it outdoors or in wet environments.
- The applied load must not exceed the rated power of 100A/22000W. Overloading can damage the device and pose a safety risk.
- Ensure the wiring order is correct as per the provided diagrams. Incorrect wiring can lead to malfunction or damage.
- All electrical work should be performed by a qualified electrician or knowledgeable individual.
- Disconnect power before making any connections or disconnections.
3. Product Overview
The Walfront PZEM-022 meter consists of the main display unit and a closed-type current transformer (CT). The display unit shows various electrical parameters, while the CT measures the current flowing through the circuit.

Figure 3.1: Walfront PZEM-022 AC Digital Meter and Closed Type Current Transformer.
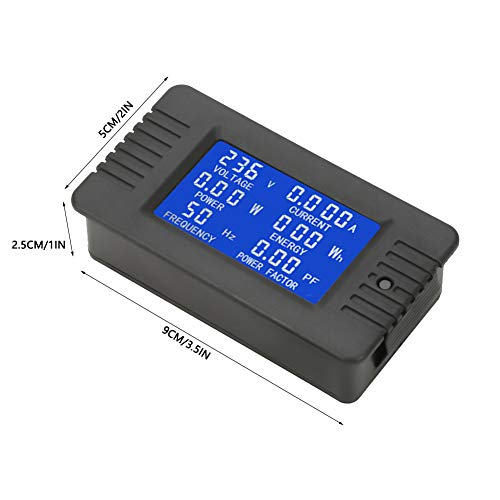
Figure 3.2: Physical dimensions of the PZEM-022 meter (approx. 9cm x 5cm x 2.5cm).
4. Specifications
| Parameter | Value |
|---|---|
| Operating Voltage | 80 ~ 260VAC |
| Test Voltage | 80 ~ 260VAC |
| Current Rating | 100A |
| Rated Power | 100A/22000W |
| Operating Frequency | 45-65 Hz |
| Measurement Accuracy | 1.0 Grade |
| Product Dimensions (L x W x H) | 9 x 5 x 2.5 cm (3.5 x 2 x 1 inch) |
| CT Cable Length | 19 cm (7.5 inch) |
| Item Weight | Approx. 110g (3.9oz) |
5. Setup and Installation
Proper installation is crucial for the accurate and safe operation of the PZEM-022 meter. Refer to the wiring diagram below and follow the steps carefully.
5.1 Wiring Diagram

Figure 5.1: Wiring connections for the PZEM-022 meter and current transformer.
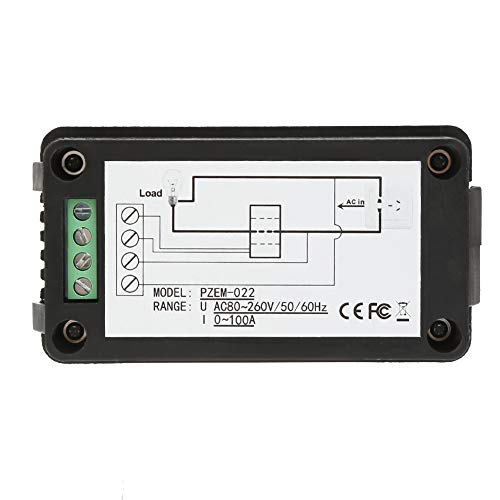
Figure 5.2: Back view of the meter showing terminal connections and simplified wiring.
5.2 Installation Steps
- Power Disconnection: Before starting any wiring, ensure that the main power supply to the circuit is completely disconnected to prevent electric shock.
- Connect Power Input: Connect the AC power supply (80-260V AC) to the input terminals of the meter. Typically, these are labeled as 'AC IN' or similar. Refer to the diagram for specific terminal locations.
- Connect Load Output: Connect the load to the output terminals of the meter. These are usually labeled 'LOAD'.
- Install Current Transformer (CT): Pass the live wire of the circuit through the hole of the closed-type current transformer. Ensure the direction of current flow through the CT matches the indicated direction if any.
- Connect CT to Meter: Connect the two wires from the current transformer to the dedicated CT input terminals on the meter. These are typically distinct from the main power terminals.
- Verify Connections: Double-check all wiring connections to ensure they are secure and correctly aligned with the wiring diagram. Incorrect wiring can cause damage or inaccurate readings.
- Restore Power: Once all connections are verified, restore power to the circuit. The meter display should illuminate.
6. Operation
The PZEM-022 meter provides real-time measurement of various electrical parameters and offers convenient control functions.
6.1 Display Functions
The large LCD display shows the following parameters simultaneously:
- Voltage (V): Measures the AC voltage of the circuit.
- Current (A): Measures the AC current flowing through the circuit.
- Active Power (W): Displays the instantaneous active power consumed by the load.
- Energy (Wh): Accumulates the total energy consumed over time. This value is stored when power is off.
- Frequency (Hz): Shows the frequency of the AC power supply.
- Power Factor (PF): Indicates the power factor of the load.
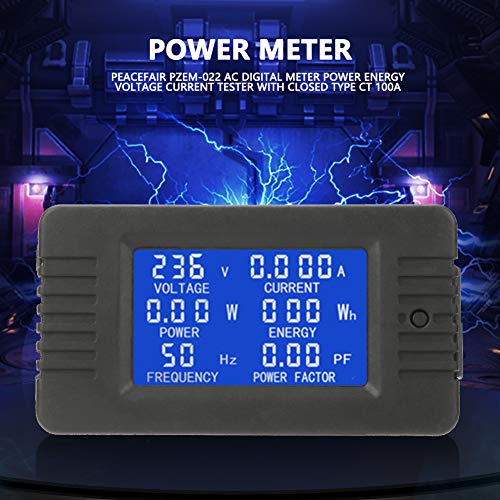
Figure 6.1: The meter's LCD display showing various electrical parameters.
6.2 Button Functions
The meter features a single button for controlling the backlight and resetting energy data.
- Backlight Control: A short press of the button will toggle the backlight on or off. The backlight has a memory function, retaining its last state (on or off) even after power is disconnected.
- Overload Alarm: If the active power exceeds the preset alarm threshold, the backlight and the power value will flash to indicate an overload condition.
6.3 Resetting Energy Data
To reset the accumulated energy (Wh) value, follow these steps:
- Step 1: Long press the button for approximately 5 seconds. The energy value on the display will begin to flash. Release the button once flashing begins.
- Step 2: While the energy value is flashing, short press the button again. The energy value will be cleared (reset to 0), and the display will exit the flashing state.
- Step 3: If there is no button operation within 5 seconds after the energy value starts flashing (from Step 1), the energy value will not be cleared, and the meter will exit the reset state, retaining the current energy reading.
7. Maintenance
The Walfront PZEM-022 meter requires minimal maintenance to ensure its longevity and accurate performance.
- Cleaning: Use a soft, dry cloth to clean the display and casing. Do not use abrasive cleaners or solvents, as they may damage the surface.
- Environment: Keep the meter in a dry, dust-free environment. Avoid exposure to extreme temperatures, direct sunlight, or high humidity.
- Connections: Periodically check all wiring connections to ensure they remain tight and secure. Loose connections can lead to inaccurate readings or potential hazards.
8. Troubleshooting
If you encounter issues with your PZEM-022 meter, refer to the following common problems and solutions:
| Problem | Possible Cause | Solution |
|---|---|---|
| Display is blank | No power supply; Incorrect wiring; Damaged unit. | Check power connections and ensure voltage is within 80-260VAC. Verify wiring against diagram. If issues persist, the unit may be faulty. |
| Inaccurate readings | Incorrect CT installation; Loose wiring connections; Load exceeds rated power. | Ensure the live wire passes correctly through the CT. Check all terminal connections for tightness. Verify that the load does not exceed 100A/22000W. |
| Energy (Wh) not resetting | Incorrect button press sequence. | Follow the energy reset steps precisely: long press until flashing, then short press to confirm. |
| Backlight not responding | Button malfunction; Internal issue. | Ensure a clear, short press. If unresponsive, there might be an internal fault. |
If the problem persists after attempting these solutions, please contact Walfront customer support for further assistance.
9. Warranty and Support
Walfront products are manufactured to high-quality standards. For information regarding warranty coverage, technical support, or service, please refer to the product packaging or contact Walfront customer service through their official channels. Please have your model number (PZEM-022) and purchase details ready when contacting support.


