
1. Introduction
This manual provides detailed instructions for the installation, programming, and operation of your Orbit 2-Outlet Programmable Hose Faucet Timer, Model 24621. This device is designed to automate your watering schedule, ensuring efficient irrigation for your garden or lawn. Please read these instructions carefully before use to ensure proper function and longevity of the product.
2. Product Overview
The Orbit 2-Outlet Programmable Hose Faucet Timer features a large digital display and intuitive controls for easy programming. It allows for independent programming of two watering zones from a single faucet.

Image 2.1: Front view of the Orbit 2-Outlet Programmable Hose Faucet Timer, displaying the digital screen and control dial.
Key Features:
- Dual Outlets: Control two separate watering zones independently.
- Easy Programming: Simple interface with a large, easy-to-read digital display.
- Flexible Scheduling: Program watering intervals from every hour up to every 7th day.
- Adjustable Duration: Set watering times from 1 to 360 minutes.
- Rain Delay: Pause your watering schedule for 1 to 7 days.
- Manual Operation: Instant faucet use without interrupting programmed schedules.
- Battery Powered: Operates on batteries for convenience.
3. Installation
3.1. Battery Installation
- Locate the battery compartment on the back of the timer.
- Remove the battery cover.
- Insert two fresh AA alkaline batteries, ensuring correct polarity (+/-).
- Replace the battery cover securely.
3.2. Attaching the Timer to the Faucet
- Ensure the faucet is turned off.
- Thread the timer's inlet collar onto your outdoor hose faucet. Hand-tighten only; do not use tools.
- Connect your garden hoses to the two outlets at the bottom of the timer. Hand-tighten only.
- Slowly turn on the faucet completely.

Image 3.1: The timer connected to a water faucet with two hoses attached, ready for use in a garden setting.
4. Programming Instructions
The timer features a large dial and buttons for easy navigation through programming steps. Use the STATION button to select which outlet (1 or 2) you are programming.
4.1. Set Clock
- Turn the dial to SET CLOCK.
- Use the < and > buttons to adjust the current time.
- Press the OK button to confirm.
4.2. Set Start Time
- Turn the dial to START TIME.
- Use the < and > buttons to set your desired watering start time.
- Press OK to confirm.
4.3. Set Watering Duration (How Long)
- Turn the dial to HOW LONG.
- Use the < and > buttons to set the watering duration (from 1 to 360 minutes).
- Press OK to confirm.
4.4. Set Watering Frequency (How Often)
- Turn the dial to HOW OFTEN.
- Use the < and > buttons to set the watering frequency (from every hour up to every 7th day).
- Press OK to confirm.
4.5. Manual Operation
To water manually without affecting your programmed schedule:
- Turn the dial to AUTO/MANUAL.
- Press the MANUAL button.
- Use the < and > buttons to set the desired manual watering duration.
- Press OK to start manual watering.
- To stop manual watering, press the MANUAL button again or turn the dial to OFF.
4.6. Rain Delay Function
To temporarily pause your watering schedule due to rain or other reasons:
- Turn the dial to AUTO/MANUAL.
- Press and hold the RAIN DELAY button (often integrated with AUTO/MANUAL or a dedicated button).
- Use the < and > buttons to select the delay duration (1 to 7 days).
- Press OK to activate the rain delay. The timer will resume its programmed schedule after the delay period.
5. Maintenance
5.1. Battery Replacement
It is recommended to replace the batteries annually, or when the low battery indicator appears on the display, to ensure continuous operation. Refer to section 3.1 for battery installation steps.
5.2. Winter Storage
Before the first frost, remove the timer from the faucet. Drain any water from the timer and store it indoors in a dry, protected location. Freezing temperatures can damage the internal components of the timer.
6. Troubleshooting
| Problem | Possible Cause | Solution |
|---|---|---|
| Timer does not turn on or display is blank. | Dead or incorrectly installed batteries. | Replace batteries with fresh AA alkaline batteries, ensuring correct polarity. |
| Water does not flow at scheduled time. | Faucet is off; rain delay is active; incorrect programming; low water pressure. | Ensure faucet is fully open. Check if rain delay is active. Verify programming settings (start time, duration, frequency). Check water pressure. |
| Timer does not shut off. | Internal valve malfunction; low battery. | Replace batteries. If problem persists, the unit may require replacement. |
| Water leaks from faucet connection. | Loose connection; worn washer. | Ensure connection is hand-tight. Check and replace the rubber washer inside the timer's inlet if it is worn or missing. |
| Timer resets or loses program. | Low batteries; power interruption. | Replace batteries. Reprogram the timer. |
7. Specifications
- Model: 24621
- Brand: Orbit
- Material: Plastic
- Color: Gray
- Product Dimensions: 3"D x 2"W x 4"H
- Item Weight: 1.2 Pounds
- Power Source: 2 x AA Alkaline Batteries (not included)
- Number of Settings: 3 (Start Time, How Long, How Often)
- Watering Duration: 1 to 360 minutes
- Watering Frequency: Every hour up to every 7th day
- Rain Delay Options: 1 to 7 days
- UPC: 046878246218
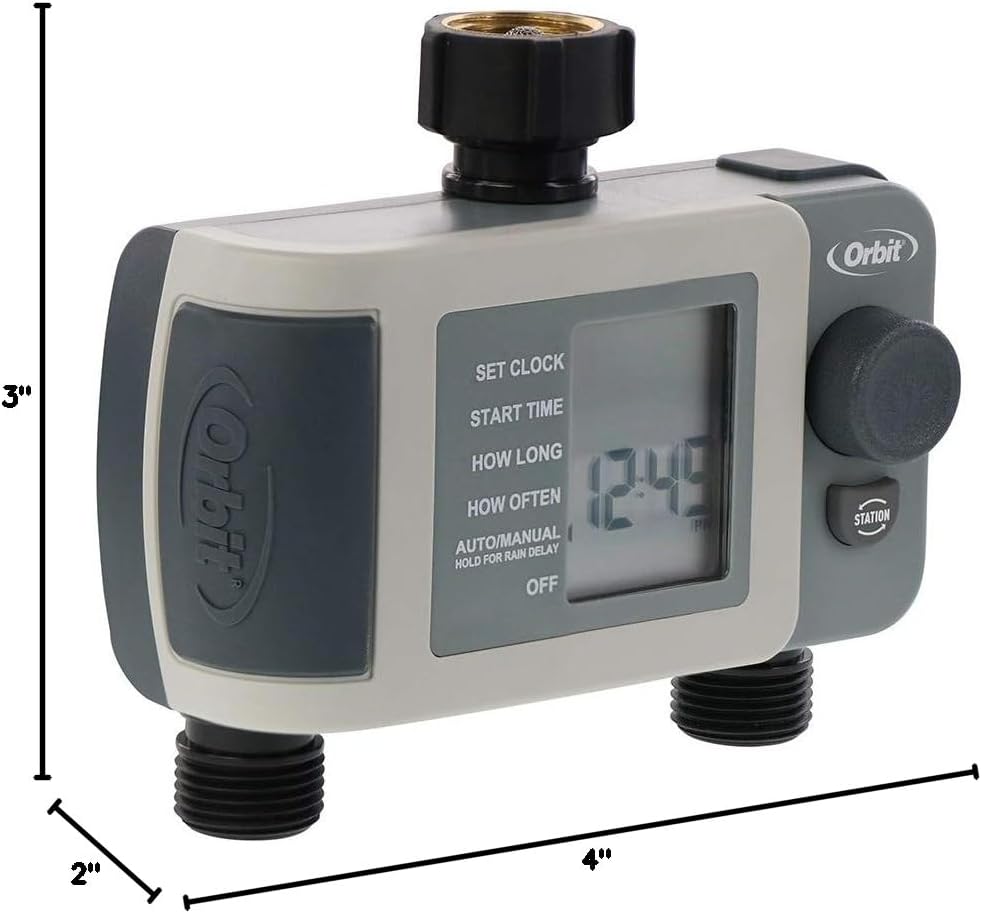
Image 7.1: Diagram showing the approximate dimensions of the timer: 3 inches deep, 2 inches wide, and 4 inches high.
8. Warranty and Support
Orbit products are designed for durability and performance. For specific warranty information or technical support, please refer to the official Orbit website or contact their customer service directly. Keep your purchase receipt for warranty claims.


