1. Introduction
The Denver NVI-450 is a digital night vision monocular designed for observation in low light conditions and complete darkness. It features a built-in video recorder and photo function, allowing you to capture images and videos of your observations. This manual provides essential information for the safe and effective use of your device, including setup, operation, maintenance, and troubleshooting.
2. Safety Information
- Do not look directly at the sun: Never point the monocular directly at the sun or any other strong light source, as this can cause permanent eye damage and damage to the device's sensor.
- Battery Safety: Use only the specified rechargeable lithium battery. Do not expose batteries to excessive heat, direct sunlight, or dispose of them in fire. Do not short-circuit the battery terminals.
- Water Exposure: This device is not waterproof. Avoid exposure to rain, moisture, or submersion in water.
- Operating Temperature: Operate the device within the recommended temperature range to prevent damage.
- Cleaning: Use a soft, dry cloth for cleaning. For lenses, use a specialized lens cleaning cloth and solution.
- Disassembly: Do not attempt to disassemble or modify the device. This will void the warranty and may cause damage.
3. Package Contents
Please check the package contents to ensure all items are present:
- Denver NVI-450 Digital Night Vision Monocular
- 1x Rechargeable Lithium Battery (4500 mAh)
- AC/DC Adapter with USB Output
- Black Carrying Bag with Strap
- Black Accessory Bag
- Polishing Cloth
- AV Cable
- Mini USB Cable
- Round DC Connector to USB Cable
- Rubber Lens Protection
- User Manual (this document)
4. Product Overview
Familiarize yourself with the components of your Denver NVI-450 monocular.

Figure 4.1: Side view of the NVI-450 monocular, highlighting the USB and AV ports.

Figure 4.2: Angled view of the NVI-450, showing the eyepiece and diopter adjustment.
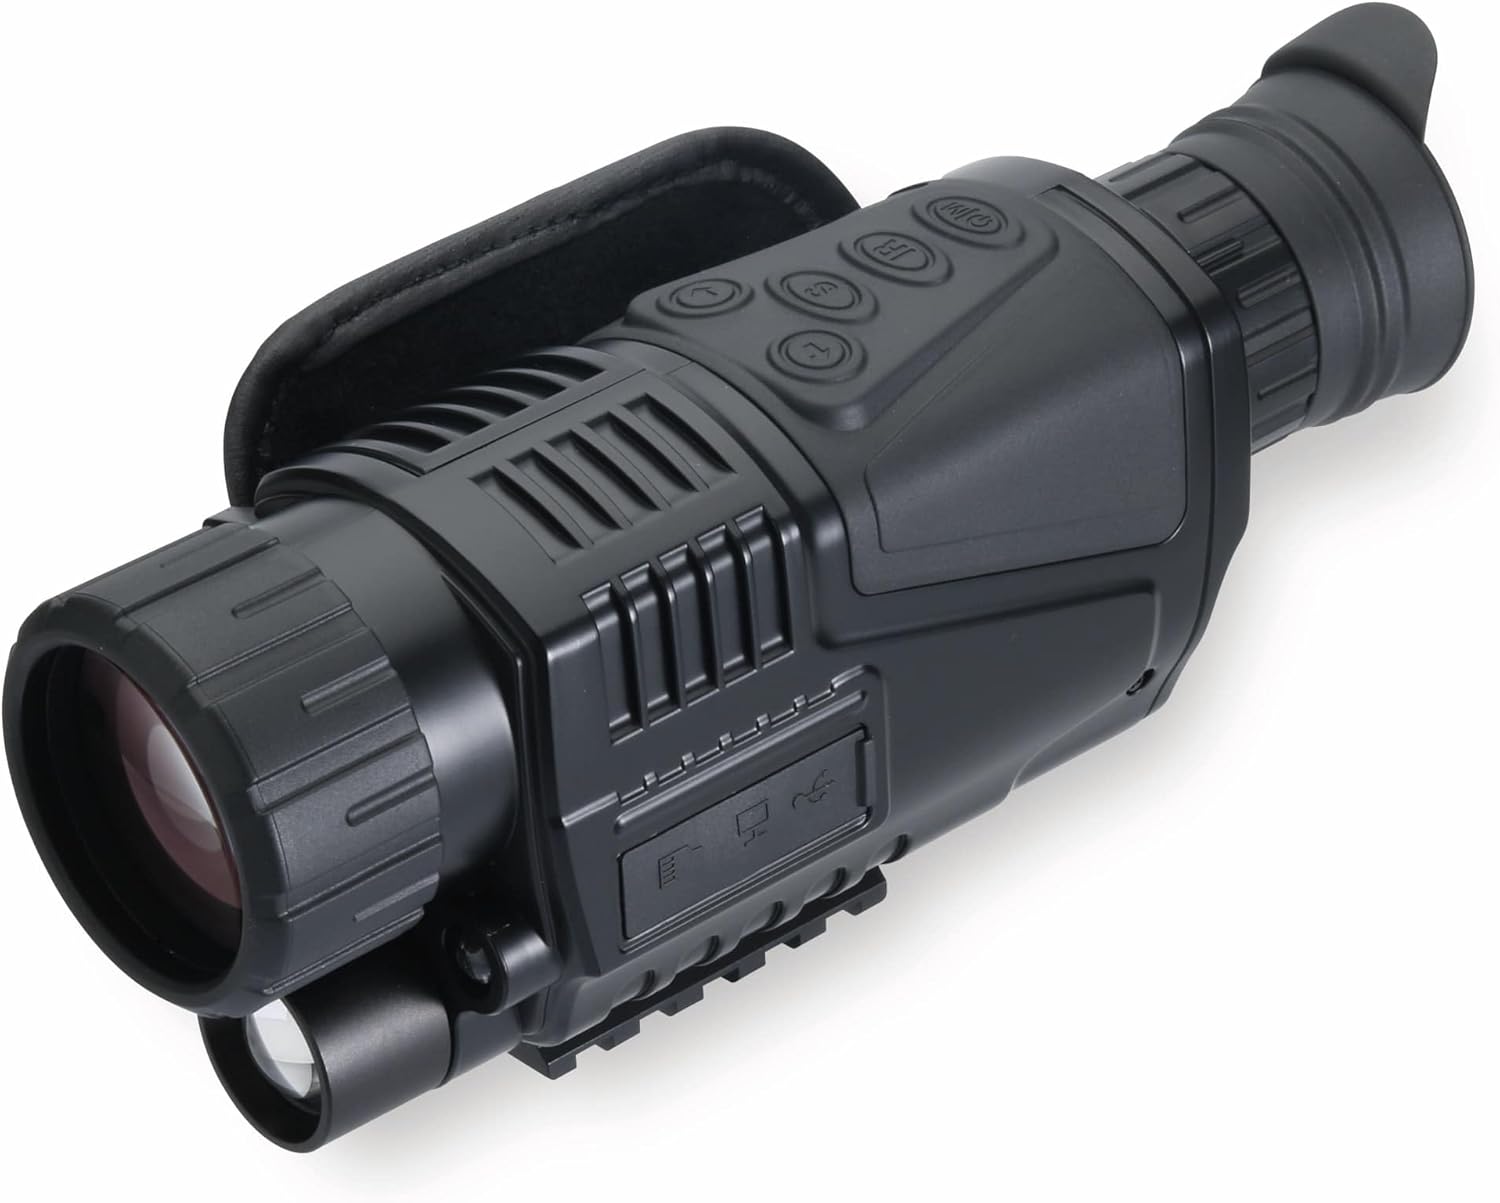
Figure 4.3: Top view of the NVI-450, displaying the main control buttons for power, IR, zoom, and mode selection.

Figure 4.4: The NVI-450 monocular held in hand, demonstrating its ergonomic and portable design.
5. Setup
5.1 Battery Installation and Charging
- Locate the battery compartment on the device.
- Insert the provided rechargeable lithium battery, ensuring correct polarity.
- Close the battery compartment securely.
- Connect the AC/DC adapter to the device's charging port and plug it into a power outlet to charge the battery. The charging indicator will show the charging status.
5.2 MicroSD Card Insertion
A MicroSD card (not included) is required to save photos and videos.
- Locate the MicroSD card slot, typically protected by a rubber cover.
- Insert the MicroSD card with the gold contacts facing down until it clicks into place.
- To remove, gently push the card until it springs out.
6. Operating Instructions
6.1 Powering On/Off
- To Power On: Press and hold the Power button (usually marked with $ or a power symbol) for a few seconds until the screen illuminates.
- To Power Off: Press and hold the Power button again until the device shuts down.
6.2 Adjusting Focus and Diopter
- Objective Lens Focus: Rotate the objective lens ring to adjust the focus for distant objects.
- Diopter Adjustment: Rotate the eyepiece diopter adjustment ring (+/- 0.6d) to achieve a sharp image for your individual eyesight.
6.3 Night Vision Mode and Infrared Illuminator
- The device automatically switches to night vision mode in low light.
- To activate the infrared (IR) illuminator for complete darkness, press the IR button. Multiple levels of IR intensity may be available; press the button repeatedly to cycle through them. The 940 nm IR illuminator provides visibility up to 200 meters.
6.4 Zoom Function
- The monocular features a 5x fixed optical zoom and up to 5x digital zoom.
- Use the designated zoom buttons (often marked with '+' and '-') to adjust the digital magnification.
6.5 Taking Photos and Recording Videos
- Photo Mode: Press the Mode button to select photo mode. Press the Shutter/Record button to take a picture (1280 x 960 resolution).
- Video Mode: Press the Mode button to select video mode. Press the Shutter/Record button to start recording (640 x 480/15 fps resolution). Press again to stop recording.
6.6 Menu Navigation
- Press the Menu button to access settings such as date/time, language, video resolution, photo resolution, and IR brightness.
- Use the navigation buttons (e.g., up/down, left/right) to move through menu options.
- Press the OK/Enter button to confirm selections.
6.7 Connecting to TV/Computer
- To TV: Use the provided AV cable to connect the monocular's AV output port to your television's AV input. Select the correct input source on your TV to view the monocular's display.
- To Computer: Use the provided Mini USB cable to connect the monocular to your computer. The device will appear as a removable storage device, allowing you to transfer photos and videos.
7. Maintenance
7.1 Cleaning
- Lenses: Gently wipe the lenses with the provided polishing cloth or a specialized lens cleaning cloth. For stubborn smudges, use a small amount of lens cleaning solution. Avoid touching the lens surface with your fingers.
- Body: Wipe the monocular's body with a soft, dry cloth. Do not use abrasive cleaners or solvents.
7.2 Battery Care
- Charge the battery fully before first use.
- If storing the device for an extended period, remove the battery and store it in a cool, dry place.
- Recharge the battery periodically (every 3-6 months) even if not in use to maintain its lifespan.
7.3 Storage
- Store the monocular in its carrying bag in a cool, dry, and dust-free environment.
- Avoid storing in direct sunlight or areas with extreme temperatures.
8. Troubleshooting
If you encounter issues with your Denver NVI-450, refer to the following common problems and solutions:
| Problem | Possible Cause | Solution |
|---|---|---|
| Device does not power on. | Battery is depleted or incorrectly installed. | Ensure battery is charged and correctly inserted. |
| Image is blurry. | Focus or diopter not adjusted. | Adjust the objective lens focus and diopter ring. |
| Cannot see in complete darkness. | IR illuminator is off or too low. | Activate the IR illuminator and adjust its intensity. |
| Cannot take photos or record videos. | No MicroSD card, card full, or card error. | Insert a MicroSD card, check available space, or format the card (this will erase all data). |
| Device not recognized by computer. | Incorrect cable or connection. | Ensure the Mini USB cable is securely connected to both the device and the computer. Try a different USB port. |
9. Specifications
- Model: NVI-450
- Sensor: 1.3 Mpx CCD
- Photo Resolution: 1280 x 960
- Video Resolution: 640 x 480 at 15 fps
- Optical Zoom: 5x (fixed)
- Digital Zoom: Up to 5x
- Objective Lens Diameter: 40 mm
- Infrared Illuminator: 940 nm wavelength
- Night Vision Range: Up to 200 meters
- Field of View: 7.6 degrees
- Diopter Adjustment: +/- 0.6d
- Storage: MicroSD card (not included)
- Battery: 1x Rechargeable Lithium-ion (4500 mAh)
- Connections: Mini USB, AV Out
- Material: Plastic
- Color: Black
- Dimensions (L x W x H): 8.6 x 20 x 5.6 cm
- Weight: 740 grams
10. Warranty and Support
For warranty information, please refer to the warranty card included with your product or contact your retailer. For technical support or service inquiries, please contact Denver customer service through their official website or the contact information provided by your point of purchase.


