1. Introduction
The Walfront DT2234C is a handheld digital tachometer designed for non-contact measurement of rotational speed (RPM). It offers a wide measuring range and high resolution, providing accurate readings without physical contact with the rotating object. This manual provides detailed instructions for the proper setup, operation, and maintenance of your DT2234C tachometer to ensure optimal performance and longevity.
Key features include:
- Wide measuring range and high resolution for precise RPM readings.
- Non-contact measurement, enhancing safety and convenience.
- Memory function to store the last, maximum, and minimum measured values.
- Low battery power indication for timely battery replacement.
- Easy-to-read 5-digit 18mm LCD display.
2. Safety Information
Please read and understand all safety instructions before operating the device. Failure to follow these instructions may result in injury or damage to the instrument.
- Laser Radiation Warning: This device emits laser radiation. AVOID DIRECT EYE EXPOSURE. The laser output is 3mW MAX at 650-670nm, classified as a Class II Laser Product. Do not stare into the laser beam or direct it towards others' eyes.
- Ensure the device is used within its specified operating environment.
- Do not attempt to disassemble or modify the tachometer. Refer all servicing to qualified personnel.
- Keep the device away from water, moisture, and extreme temperatures.
- Remove batteries if the device will not be used for an extended period to prevent leakage.
3. Product Overview
The Walfront DT2234C tachometer is designed for ergonomic handling and clear display of measurements. Below are the main components and their functions.

Figure 3.1: Front view of the Walfront DT2234C Digital Tachometer, showing the LCD display, control button, laser aperture, and included reflective strips.
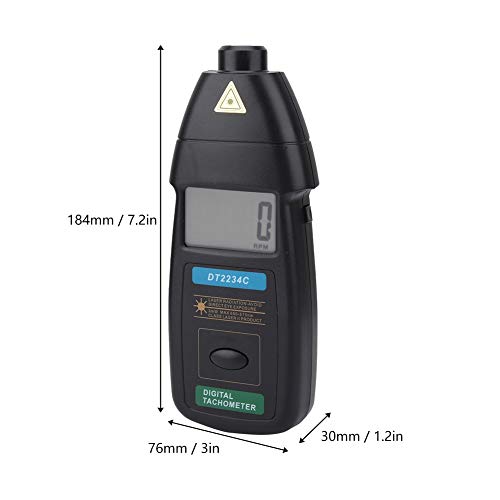
Figure 3.2: Dimensions of the DT2234C tachometer: approximately 184mm (7.2 inches) in length, 76mm (3 inches) in width, and 30mm (1.2 inches) in thickness.

Figure 3.3: Close-up view of the laser sensor and aperture, which emits the laser beam for non-contact RPM measurement.
4. Specifications
| Parameter | Specification |
|---|---|
| Model | DT2234C |
| Display | 5 digits, 18mm (0.6") LCD |
| Accuracy | ±(0.05% + 1 digit) |
| Sampling Time | 0.5 seconds (over 120 RPM) |
| Range Select | Auto-ranging |
| Memory | Maximum value, Minimum value, Last value |
| Measuring Range | 2.5 - 99,999 RPM |
| Resolution | 0.1 RPM (2.5 - 999.9 RPM), 1 RPM (over 1,000 RPM) |
| Detecting Distance | 50 - 500 mm |
| Power Source | 3 x 1.5V AA batteries (not included) |
| Time Base | 10 x 10-6 (0-50°C) |
| Power Consumption | Approx. 40mA |
| Dimensions (L x W x H) | 184 x 76 x 30 mm (7.2 x 3 x 1.2 inches) |
| Weight | Approx. 364g (12.8 oz) |
| Material | Acrylonitrile Butadiene Styrene (ABS) |
5. Setup
5.1 Battery Installation
- Locate the battery compartment cover on the back of the tachometer.
- Slide or unclip the cover to open the compartment.
- Insert three (3) 1.5V AA batteries, ensuring correct polarity (+/-) as indicated inside the compartment.
- Replace the battery compartment cover securely.
5.2 Reflective Tape Application
For accurate non-contact measurement, a piece of reflective tape must be applied to the rotating object.
- Ensure the surface of the rotating object where the tape will be applied is clean, dry, and free of grease or dust.
- Cut a small piece of the provided reflective tape (approximately 10-12mm in length).
- Firmly apply the reflective tape to the rotating shaft or disk. Ensure it is flat and smooth, without wrinkles or air bubbles.
- For best results, apply the tape perpendicular to the direction of rotation.
- If the object is highly reflective, cover the surrounding area with non-reflective black tape or paint to prevent false readings.

Figure 5.1: Illustrative image of the tachometer being used to measure RPM, with reflective tape applied to a rotating component.
6. Operating Instructions
6.1 Taking a Measurement
- Ensure batteries are installed and reflective tape is applied to the target object as described in Section 5.
- Hold the tachometer firmly in your hand.
- Point the laser beam towards the reflective tape on the rotating object. The detecting distance should be between 50mm and 500mm (2 to 20 inches).
- Press and hold the "TEST" button (usually the main button on the front). The laser will activate, and the display will show the RPM reading.
- Adjust the distance and angle slightly until a stable reading appears on the LCD. The tachometer automatically selects the appropriate range.
- Release the "TEST" button to stop the measurement. The last measured value will remain on the display.
6.2 Memory Functions
The DT2234C tachometer automatically stores the following values during a measurement session:
- LAST Value: The most recent measurement taken.
- MAX Value: The highest RPM recorded during the measurement session.
- MIN Value: The lowest RPM recorded during the measurement session.
These values can typically be recalled by pressing a dedicated "MEM" or "MODE" button, or by cycling through display modes after a measurement. Refer to the device's specific button layout for exact recall procedures.
7. Maintenance
7.1 Cleaning
- Wipe the device with a soft, dry cloth.
- Do not use abrasive cleaners, solvents, or harsh chemicals.
- Keep the laser aperture and LCD display clean and free of dust for optimal performance.
7.2 Battery Replacement
When the low battery indicator appears on the display, replace all three 1.5V AA batteries promptly to ensure accurate readings and proper device function. Refer to Section 5.1 for battery installation instructions.
7.3 Storage
Store the tachometer in a cool, dry place away from direct sunlight and extreme temperatures. If storing for an extended period, remove the batteries to prevent potential leakage and damage to the device.
8. Troubleshooting
| Problem | Possible Cause | Solution |
|---|---|---|
| No display or device does not power on. | Dead or incorrectly installed batteries. | Check battery polarity; replace with fresh 1.5V AA batteries. |
| "LO BAT" indicator appears. | Low battery power. | Replace all batteries immediately. |
| Unstable or erratic readings. |
|
|
| No reading (display shows "0" or dashes). |
|
|
9. Warranty and Support
Walfront products are manufactured to high-quality standards. For any technical support, warranty claims, or service inquiries, please contact your retailer or the Walfront customer service department.
Please retain your proof of purchase for warranty purposes. Specific warranty terms and conditions may vary by region and retailer.
For more information, you may visit the official Walfront store: Walfront Store on Amazon.
