1. Introduction
Thank you for choosing Tasmor 32.8ft 5050 RGB LED Strip Lights. This product is designed to provide dynamic and customizable lighting for various indoor and outdoor settings. Featuring 16 color options, music synchronization, and remote control functionality, these LED strips offer versatile illumination. Please read this manual thoroughly before installation and use to ensure proper operation and safety.
2. Package Contents
Verify that all components are present in your package:
- 2 x 16.4ft (5m) LED Strip Lights (Total 32.8ft / 10m)
- 1 x Remote Control
- 1 x Set of Adapters (Power Adapter and IR Receiver)
- 1 x User Manual
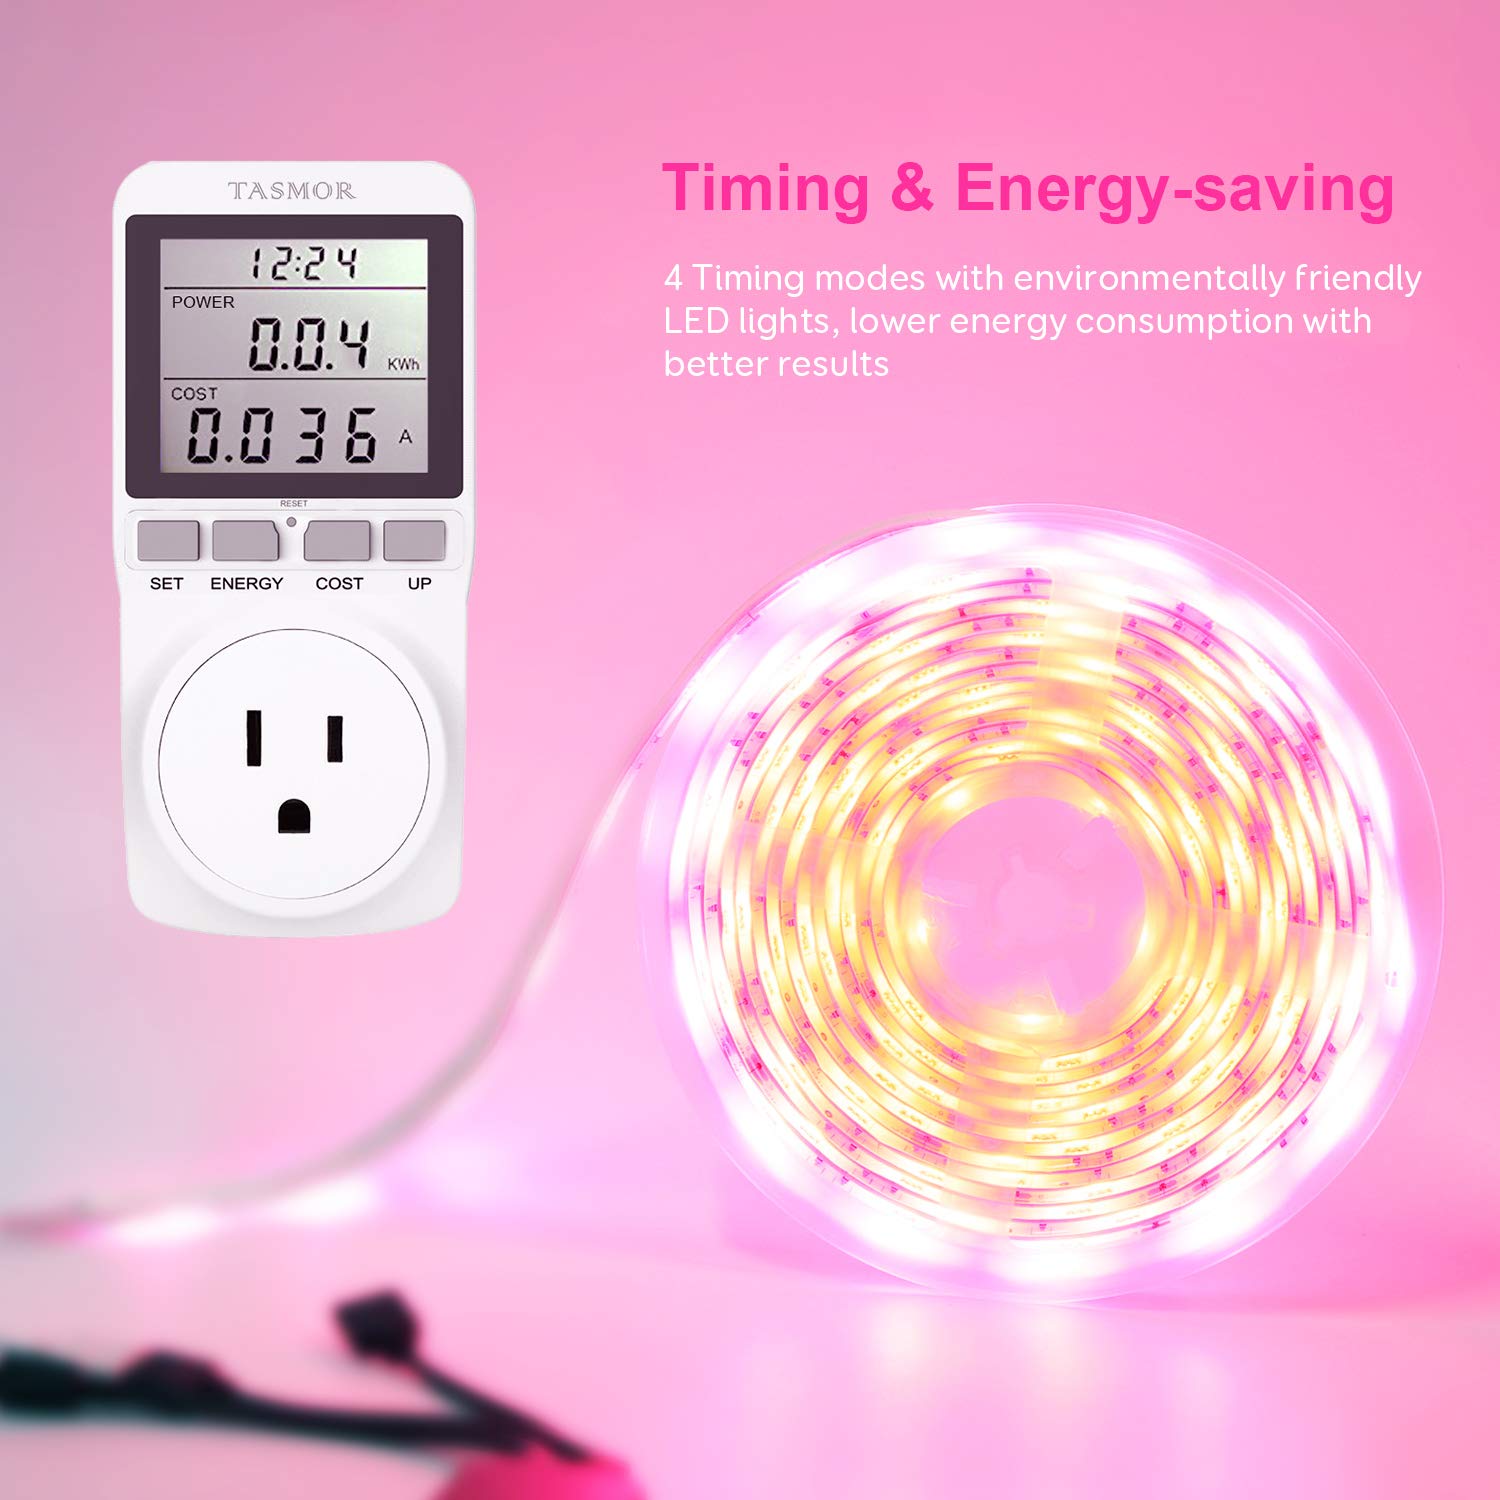
Figure 2.1: Item Overview. This image displays the complete contents of the Tasmor LED Strip Lights package, including two rolls of 16.4ft LED strips, the remote control, the power adapter, and the IR receiver.
3. Safety Information
- Ensure the power supply is disconnected before installation or maintenance.
- Use only the provided power adapter. Using an incompatible adapter may damage the product or pose a safety risk.
- Do not connect the LED strips directly to mains voltage without the adapter.
- Avoid bending the LED strips sharply, as this can damage the circuit board or LEDs.
- While the LED strips are IP65 waterproof, the power adapter and IR receiver are not. Ensure these components are protected from water exposure, especially during outdoor use.
- The LED strips generate low heat and are safe to touch.
- Keep out of reach of children.
4. Setup and Installation
Follow these steps for proper installation:
- Prepare the Surface: Clean and dry the surface where you intend to install the LED strips. Ensure it is smooth and free of dust or grease for optimal adhesion.
- Measure and Cut (Optional): If necessary, measure the desired length for your installation. The LED strips can be cut at designated marks (usually indicated by a copper pad and scissor icon). Cut only along these marks to avoid damaging the circuit.
- Apply the Strip: Peel off the protective backing from the adhesive tape on the back of the LED strip. Carefully press the strip onto the prepared surface, ensuring firm contact along its entire length. For enhanced adhesion, especially on textured or uneven surfaces, consider using additional mounting clips or double-sided tape.
- Connect Components: Connect the LED strips to the IR receiver, and then connect the IR receiver to the power adapter. Ensure all connections are secure. The product supports parallel connection for two strips.

Figure 4.1: Product Presentation. This image illustrates key features of the LED strip, including its cuttable design, self-adhesive backing, IP65 waterproof rating, and the use of SMD 5050 LED bulbs.

Figure 4.2: Parallel Connection. This diagram shows how to connect two LED strip rolls to a single IR receiver and power adapter for extended coverage.
- Power On: Plug the power adapter into a standard electrical outlet. The LED strips should illuminate.
5. Operating Instructions
Control your LED strip lights using the included remote control.
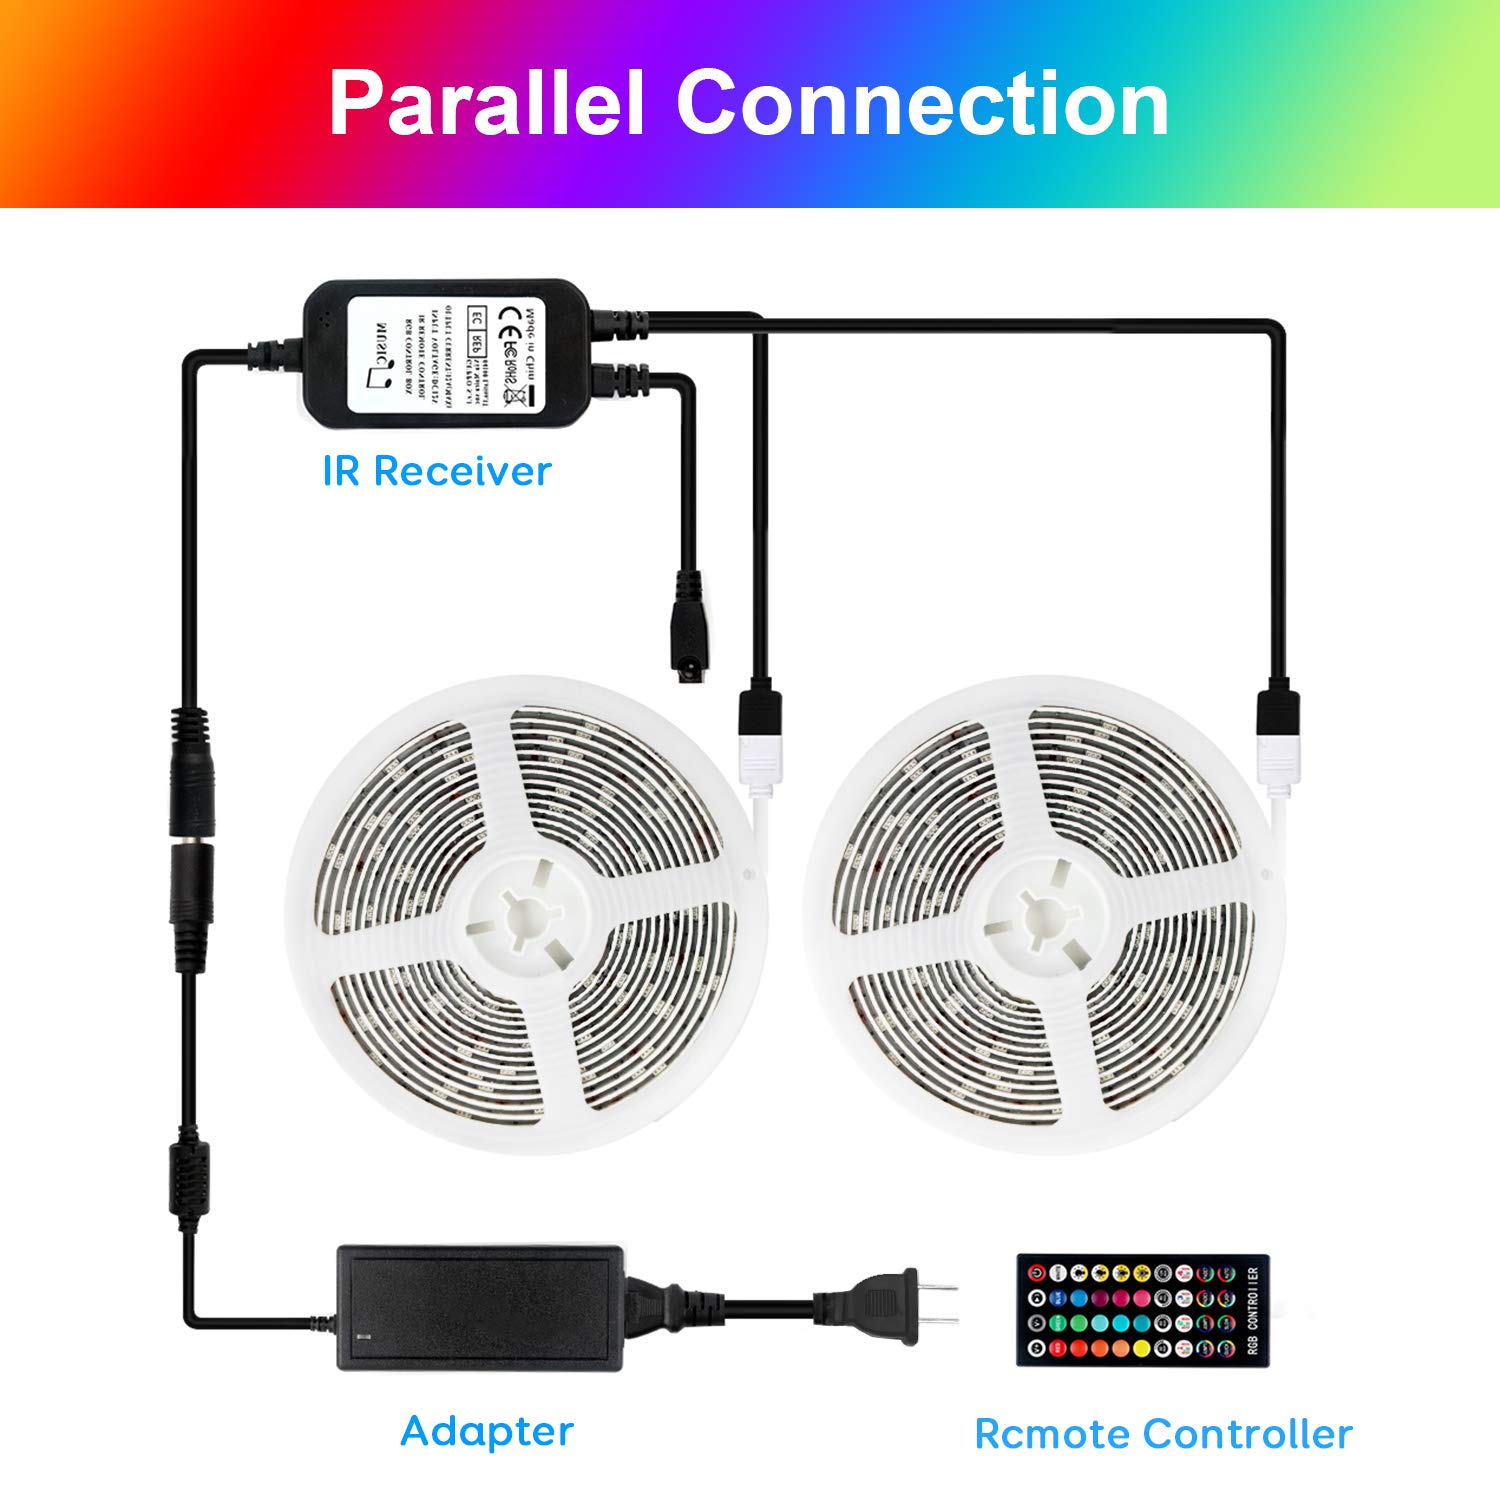
Figure 5.1: Remote Control. This image details the layout and functions of the RGB controller, including 16 level brightness adjustment, 4 timing settings, 4 music modes, and 3/7 color jump/fade modes.
5.1 Remote Control Functions
- Power On/Off: Press the Power button to turn the lights on or off.
- Color Selection: Choose from 16 static colors using the dedicated color buttons.
- Brightness Adjustment: Use the V+ and V- buttons to increase or decrease the brightness (16 levels available).
- Lighting Modes: Select from 4 dynamic lighting modes (e.g., Flash, Strobe, Fade, Smooth) using the corresponding buttons.
- Music Modes: Activate one of the 4 music synchronization modes. The lights will change color and intensity based on ambient sound.
- Timing Settings: Set the lights to automatically turn off after 30, 60, 90, or 120 minutes using the timer buttons.
5.2 Music Mode Operation
The built-in high-sensitivity microphone allows the LED strips to respond to sound, creating a dynamic lighting experience synchronized with music or voice.
- Ensure the IR receiver (which contains the microphone) is not obstructed and is placed in an area where it can pick up sound effectively.
- Select one of the 4 music modes on the remote control.
- The lights will adapt their colors and patterns to the rhythm and melody of the music.

Figure 5.2: Music Mode. This image illustrates the LED strip lights responding to sound, creating a vibrant and synchronized lighting display in different environments.
5.3 Timing and Energy-Saving
Utilize the timing function to conserve energy and manage your lighting schedule.
- Press the 30min, 60min, 90min, or 120min button on the remote to set an automatic shut-off timer.
- The lights will turn off after the selected duration, promoting energy efficiency.
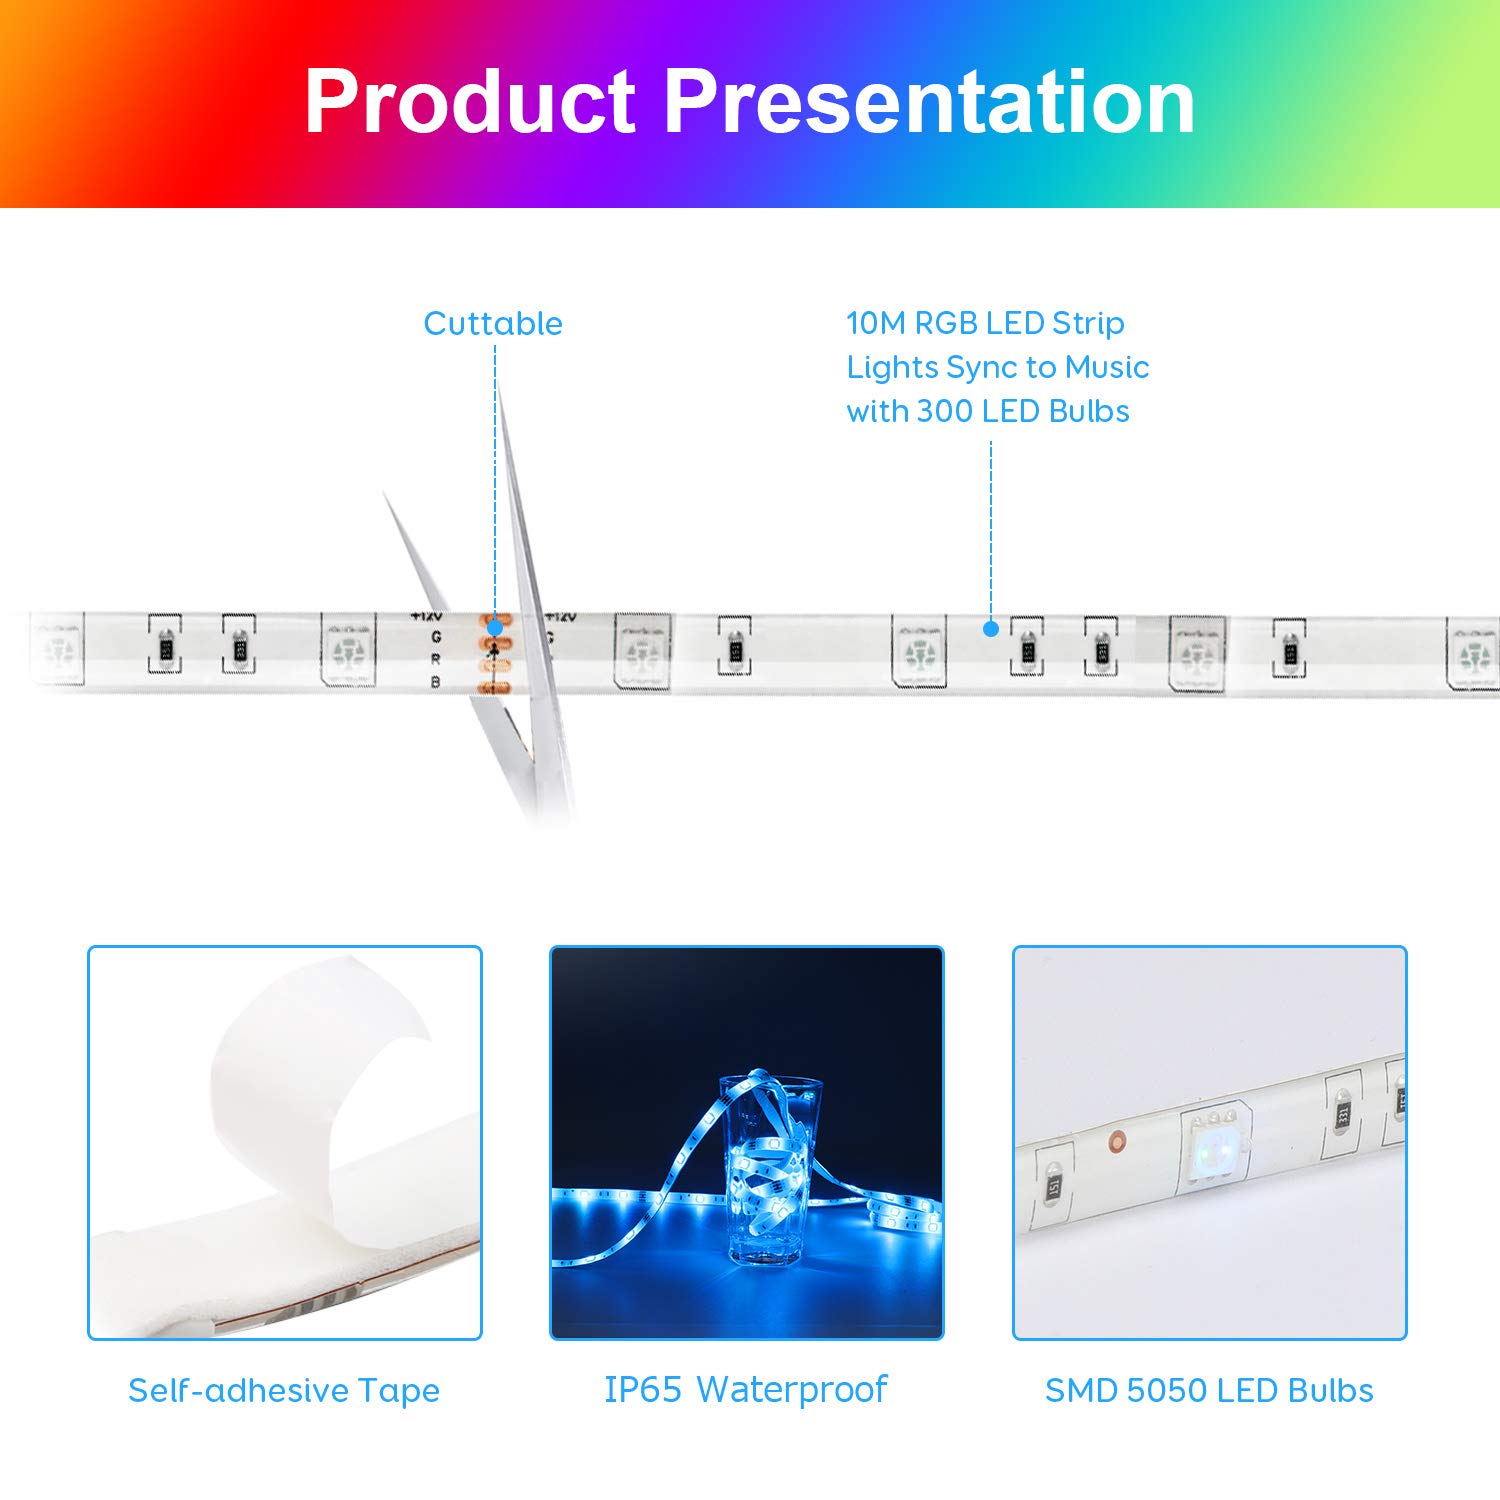
Figure 5.3: Timing & Energy-saving. This image demonstrates the energy-efficient nature of the LED lights and the convenience of the timing functions.
6. Maintenance
- Cleaning: Gently wipe the LED strips with a dry, soft cloth to remove dust. Do not use harsh chemicals or abrasive cleaners.
- Connections: Periodically check all connections (strip to receiver, receiver to adapter) to ensure they are secure and free from corrosion.
- Storage: If storing the LED strips, ensure they are coiled loosely and kept in a dry, cool place away from direct sunlight.
7. Troubleshooting
| Problem | Possible Cause | Solution |
|---|---|---|
| Lights do not turn on. | Power adapter not plugged in; loose connections; remote control battery depleted. | Check power connection; ensure all cables are securely connected; replace remote control battery. |
| Remote control not working. | IR receiver obstructed; remote control battery depleted; remote too far from receiver. | Ensure clear line of sight to IR receiver; replace battery; operate remote within range. |
| Lights not syncing with music effectively. | Microphone on IR receiver obstructed or too far from sound source; sound volume too low. | Ensure IR receiver is unobstructed and closer to the sound source; increase music volume. |
| LED strip falling off surface. | Surface not clean/dry; adhesive weakened; heavy strip weight on vertical surface. | Clean and dry surface thoroughly before reapplication; use additional mounting clips or stronger double-sided tape. |
| Some LEDs not lighting up. | Damage to the strip (e.g., sharp bend, improper cut). | Inspect the strip for visible damage. If a section is damaged, it may need to be replaced. Ensure cuts are made only at designated marks. |
8. Specifications
- Brand: Tasmor
- Model Number: 748323798395
- Light Type: LED Strip Light
- LED Type: SMD 5050 RGB
- Total Length: 32.8ft (10m) - 2 x 16.4ft rolls
- Color: RGB (Red, Green, Blue) - Multicolor
- Special Features: Dimmable, Music Sync, Timing Function
- Power Source: Corded Electric
- Waterproof Rating: IP65 (for LED strips only; adapter and receiver are not waterproof)
- Indoor/Outdoor Use: Primarily designed for indoor use, but LED strips can be used outdoors with proper protection for non-waterproof components.
- Package Dimensions: 17.5 x 16.99 x 7.11 cm
- Package Weight: 621 g
9. Warranty and Support
For warranty information or technical support, please refer to the contact details provided with your purchase or visit the official Tasmor website. Keep your purchase receipt as proof of purchase.


