VANMASS VMEZ11CTBK1-DE-02
VANMASS 4-in-1 Car Phone Holder User Manual
Model: VMEZ11CTBK1-DE-02
Introduction
Thank you for choosing the VANMASS 4-in-1 Car Phone Holder. This manual provides detailed instructions for the safe and effective use of your device. Please read this manual thoroughly before installation and operation, and keep it for future reference. This holder is designed for versatile use on dashboards, windshields, and air vents, offering a secure and adjustable solution for your smartphone in your vehicle.
Product Overview
Components
- Main Phone Holder Unit (with adjustable arms and rear release button)
- Suction Cup Base (for dashboard/windshield mounting)
- Air Vent Clip (for air vent mounting)
- Adjustable Telescopic Arm (integrated with suction cup base)
- Locking Nuts (for securing adjustments)
The holder features a robust design with aviation-grade carbon fiber and soft silicone pads to protect your phone from scratches. The widened feet allow convenient access to charging ports.
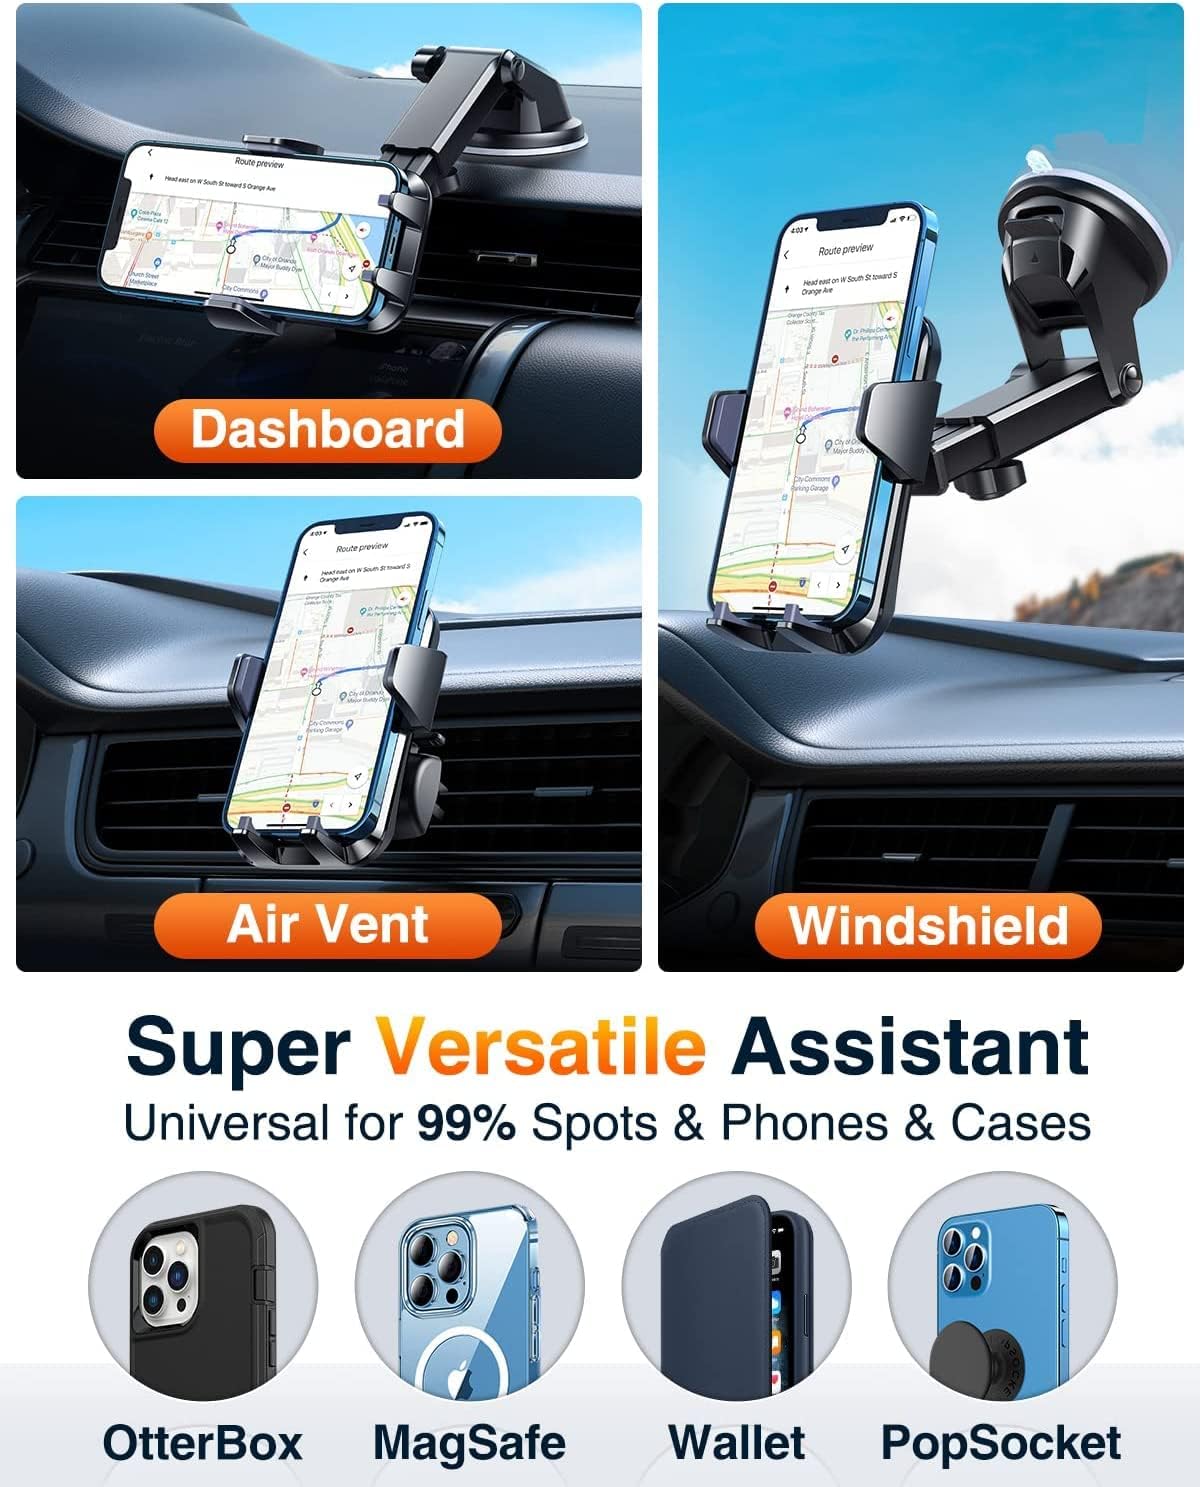
Image: Overview of the VANMASS 4-in-1 Car Phone Holder demonstrating its versatility across different mounting locations (dashboard, air vent, windshield) and its compatibility with various phone cases, including those with OtterBox, MagSafe, Wallet, and PopSocket designs.

Image: Close-up details of the phone holder, illustrating the widened feet designed for easy charging cable access, the ergonomic rear release button for secure and convenient phone handling, and the durable steel-cored air vent clip for stable attachment.
Setup and Installation
1. Attaching the Phone Holder to the Mount
- Unscrew the locking nut from the back of the phone holder unit.
- Place the locking nut over the ball joint of your chosen mount (suction cup arm or air vent clip).
- Push the ball joint into the socket on the back of the phone holder until it clicks into place.
- Tighten the locking nut clockwise to secure the phone holder to the mount.
2. Suction Cup Mount Installation (Dashboard/Windshield)
- Choose a clean, flat surface on your dashboard or windshield. Ensure the surface is free of dust and grease.
- Remove the protective film from the suction cup.
- Press the suction cup firmly against the chosen surface.
- Push down the locking lever on the suction cup base to create a vacuum seal.
- Adjust the telescopic arm and phone holder angle as desired (see "Operating Instructions" for details).
Note: For optimal adhesion, ensure the surface is smooth. The upgraded suction cup with PTFE material offers enhanced temperature resistance (-40℃ to 110℃) and can support up to 28kg.
3. Air Vent Mount Installation
- Identify a suitable air vent slat in your vehicle.
- Loosen the screw on the air vent clip to open the clamp.
- Carefully slide the clip onto an air vent slat.
- Tighten the screw to secure the clip firmly to the vent. Ensure it is stable and does not wobble.
- Adjust the phone holder angle as desired.

Image: The phone holder's adjustable arm, illustrating its extendable length from 5.0 to 7.5 inches, its full 360-degree rotational capability, and a 270-degree tilt range for optimal positioning.
Operating Instructions
1. Inserting Your Phone
- Gently open the clamping arms of the phone holder.
- Place your smartphone into the holder, ensuring it rests on the bottom feet.
- Press the clamping arms together until they securely grip your phone. The holder is designed for 1-second locking.

Image: The phone holder illustrating its easy clamping mechanism and the convenient rear button for quick release. The design ensures that phone side buttons remain unobstructed during use.
2. Releasing Your Phone
- Press the release button located on the back of the phone holder.
- The clamping arms will automatically open, allowing you to remove your phone.
3. Adjusting Viewing Angle
- Telescopic Arm: Loosen the locking nut on the telescopic arm to extend or retract its length (from 4.4 to 7.5 inches) and adjust its angle (up to 270 degrees). Tighten the nut to secure.
- Ball Joint: Loosen the locking nut behind the phone holder unit to rotate your phone 360 degrees for portrait or landscape view. Tighten the nut to secure.
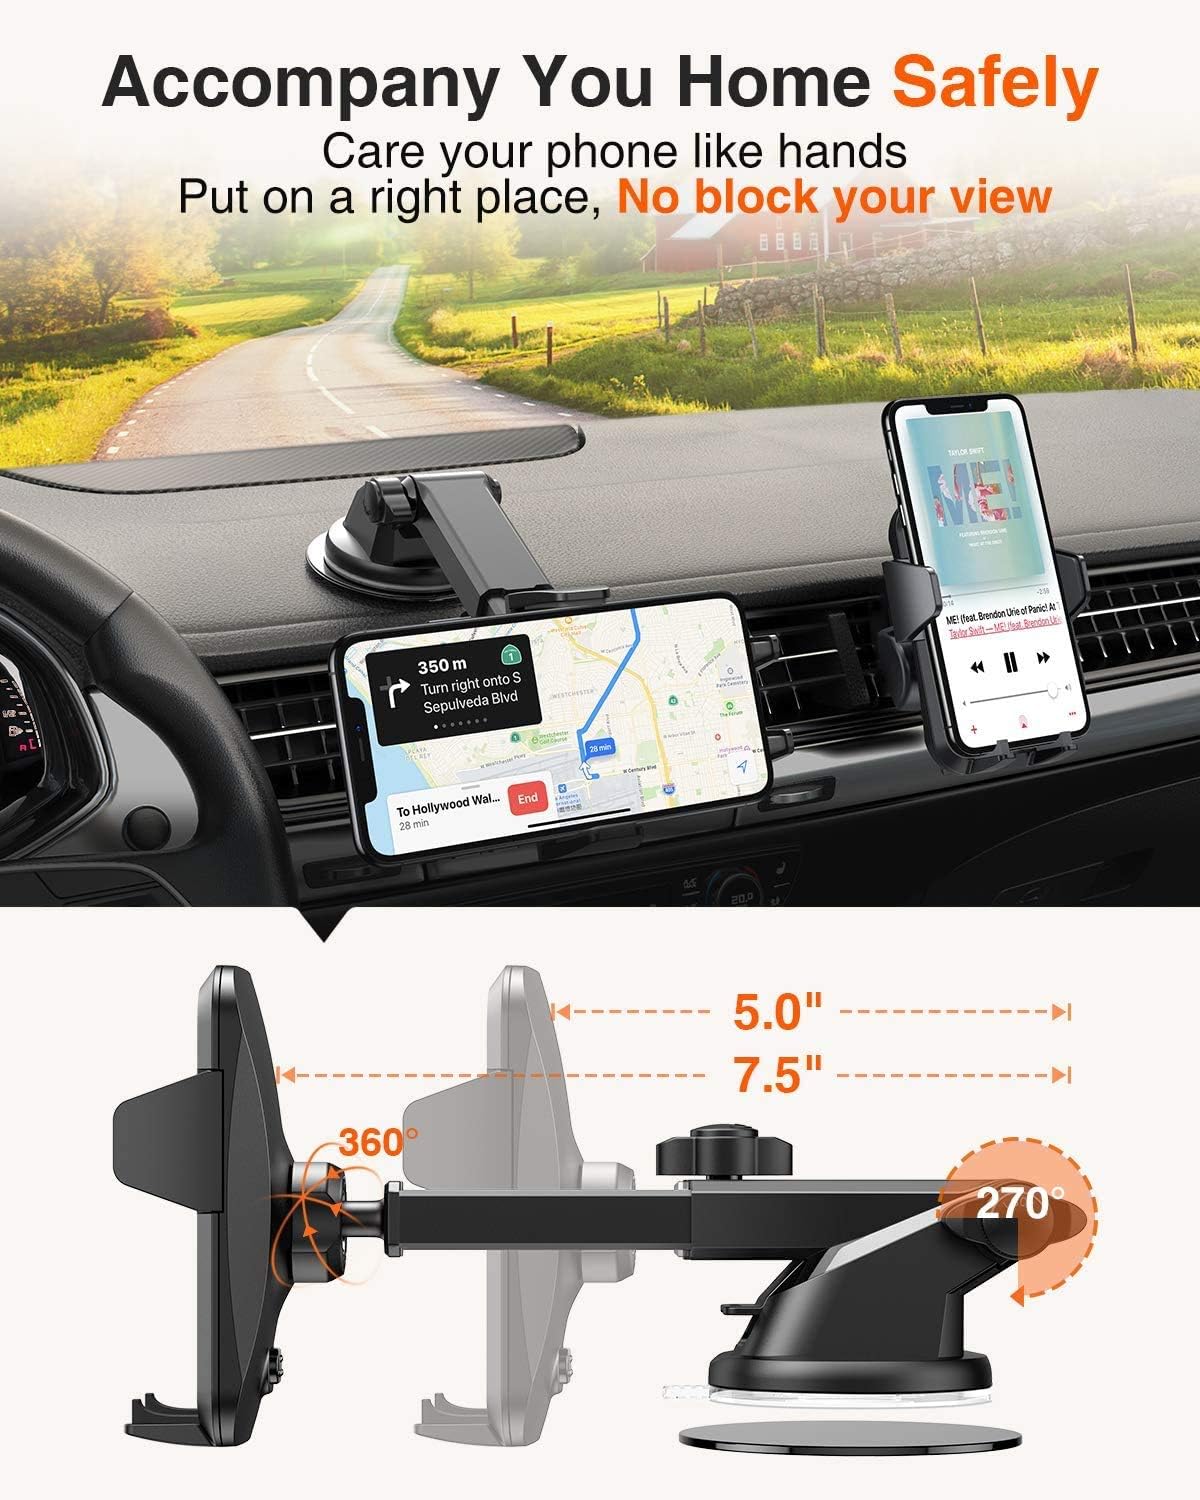
Image: The phone holder securely mounted on a car dashboard, displaying a smartphone with navigation. Arrows highlight the extensive adjustability, including 360-degree rotation for the phone and a 270-degree range of motion for the telescopic arm, allowing for optimal viewing angles.
Maintenance
Cleaning the Suction Cup
If the suction cup loses its adhesion, rinse the bottom of the suction cup with warm water. Allow it to air dry completely before re-applying. Do not use harsh chemicals or abrasive materials.
General Cleaning
Wipe the holder with a soft, damp cloth. Avoid using solvents or strong cleaning agents that may damage the materials.
Troubleshooting
- Problem: The suction cup does not stick firmly.
Solution: Ensure the mounting surface is clean, flat, and dry. Rinse the suction cup with warm water and let it air dry to restore adhesion. Press firmly and engage the locking lever. Avoid porous or heavily textured surfaces. - Problem: The phone holder wobbles on the air vent.
Solution: Ensure the air vent clip is securely tightened to a sturdy vent slat. Avoid mounting on loose or fragile vent slats. - Problem: Phone is difficult to insert or remove.
Solution: Ensure the clamping arms are fully open before inserting the phone. When releasing, press the rear button firmly. Check for any obstructions. - Problem: The adjustable arm or ball joint does not hold its position.
Solution: Tighten all locking nuts securely after adjusting the position.
Specifications
| Model Number | VMEZ11CTBK1-DE-02 |
| Brand | VANMASS |
| Item Weight | 310 g |
| Product Dimensions (L x W x H) | 12.4 x 9.2 x 11.5 cm |
| Material | Carbon Fiber, ABS, Silicone, Polycarbonate |
| Mounting Type | Suction Cup, Air Vent Clip |
| Compatible Devices | Smartphones (Universal fit for most models including iPhone, Samsung, Huawei, Google Pixel, Xiaomi, Sony, LG, OnePlus, Motorola, Nokia) |
| Adjustable Arm Length | 4.4 to 7.5 inches |
| Rotation Angle | 360 degrees (phone holder), 270 degrees (telescopic arm) |
| Weight Limit (Suction Cup) | Up to 28 kg |
| Temperature Resistance | -40℃ to 110℃ (Suction Cup) |
| Water Resistance Level | Waterproof |

Image: The phone holder installed on a car dashboard, emphasizing its robust features including temperature resistance from -40℃ to 110℃, a 36-month warranty, ISO certification for quality, and RoHS compliance for environmental safety.
Warranty and Support
VANMASS provides a 36-month quality assurance and lifetime service for this product.
If you encounter any issues with your VANMASS 4-in-1 Car Phone Holder, please do not hesitate to contact our customer support team. We are committed to resolving any problems and can offer a refund or exchange as appropriate. Our support team is available 24 hours a day, 7 days a week to assist you.
For support, please visit the official VANMASS website or refer to the contact information provided with your purchase.
Ask a question about this manual
Ask about setup, troubleshooting, compatibility, parts, safety, or missing instructions. Manuals+ will review the question and use this page’s manual context to help answer it.