1. Important Safety Instructions
When using an electrical appliance, basic safety precautions should always be followed, including the following:
- Read all instructions before using this sewing machine.
- Keep these instructions in a convenient place near your machine.
- Unplug the machine from the electrical outlet immediately after using and before cleaning, removing covers, lubricating, or making any other user servicing adjustments mentioned in the instruction manual.
- Do not allow to be used as a toy. Close attention is necessary when this appliance is used by or near children.
- Use this appliance only for its intended use as described in this manual. Use only attachments recommended by the manufacturer.
- Never operate this appliance if it has a damaged cord or plug, if it is not working properly, if it has been dropped or damaged, or dropped into water.
- Never drop or insert any object into any opening.
- Do not use outdoors.
- Do not operate where aerosol (spray) products are being used or where oxygen is being administered.
- To disconnect, turn all controls to the off position, then remove plug from outlet.
- Keep fingers away from all moving parts. Special care is required around the sewing machine needle.
- Always use the proper needle plate. The wrong plate can cause the needle to break.
- Do not use bent needles.
- Do not pull or push fabric while stitching. This may deflect the needle causing it to break.
- Wear safety glasses.
2. Getting Started & Setup
2.1 Unpacking Your Machine
Carefully remove the Janome Sewist 721 from its packaging. Retain all packaging materials for future transport or storage. Ensure all accessories listed in the packing list are present.
2.2 Power Connection
Connect the power cord to the machine and then to a suitable electrical outlet. Ensure the machine is placed on a stable, flat surface.
2.3 Winding the Bobbin
Proper bobbin winding is crucial for consistent stitch quality. Follow these steps to wind a bobbin:
- Place your spool of thread on the spool pin.
- Guide the thread through the upper thread guide and around the bobbin winding tension disc.
- Insert the thread through one of the small holes in the bobbin from the inside out.
- Place the bobbin onto the bobbin winder spindle and push the spindle to the right until it clicks into place.
- Hold the thread end and gently press the foot pedal. The bobbin will start to wind. Once a few layers are wound, trim the excess thread tail.
- Continue winding until the bobbin is full. The machine will automatically stop or slow down when the bobbin is full.
- Push the bobbin winder spindle to the left and remove the wound bobbin.

Image: The bobbin winding area on the Janome Sewist 721, illustrating the thread path for winding a new bobbin.
Video: This video demonstrates the complete process of winding a bobbin and threading the upper thread on a Janome sewing machine. It highlights how to properly guide the thread through tension areas for a clean bobbin wind and the step-by-step upper threading process, including using the built-in needle threader.
2.4 Threading the Upper Thread
Follow the numbered guides on your machine for correct upper threading:
- Raise the presser foot lifter.
- Place the thread spool on the spool pin.
- Guide the thread through the upper thread guide (1).
- Bring the thread down the right channel (2) and up the left channel (3), ensuring it passes through the take-up lever.
- Thread the needle bar guide (4).
- Thread the needle from front to back. Use the built-in needle threader for convenience (see section 3.3).
- Pull about 6 inches of thread through the needle eye and pass it under the presser foot.
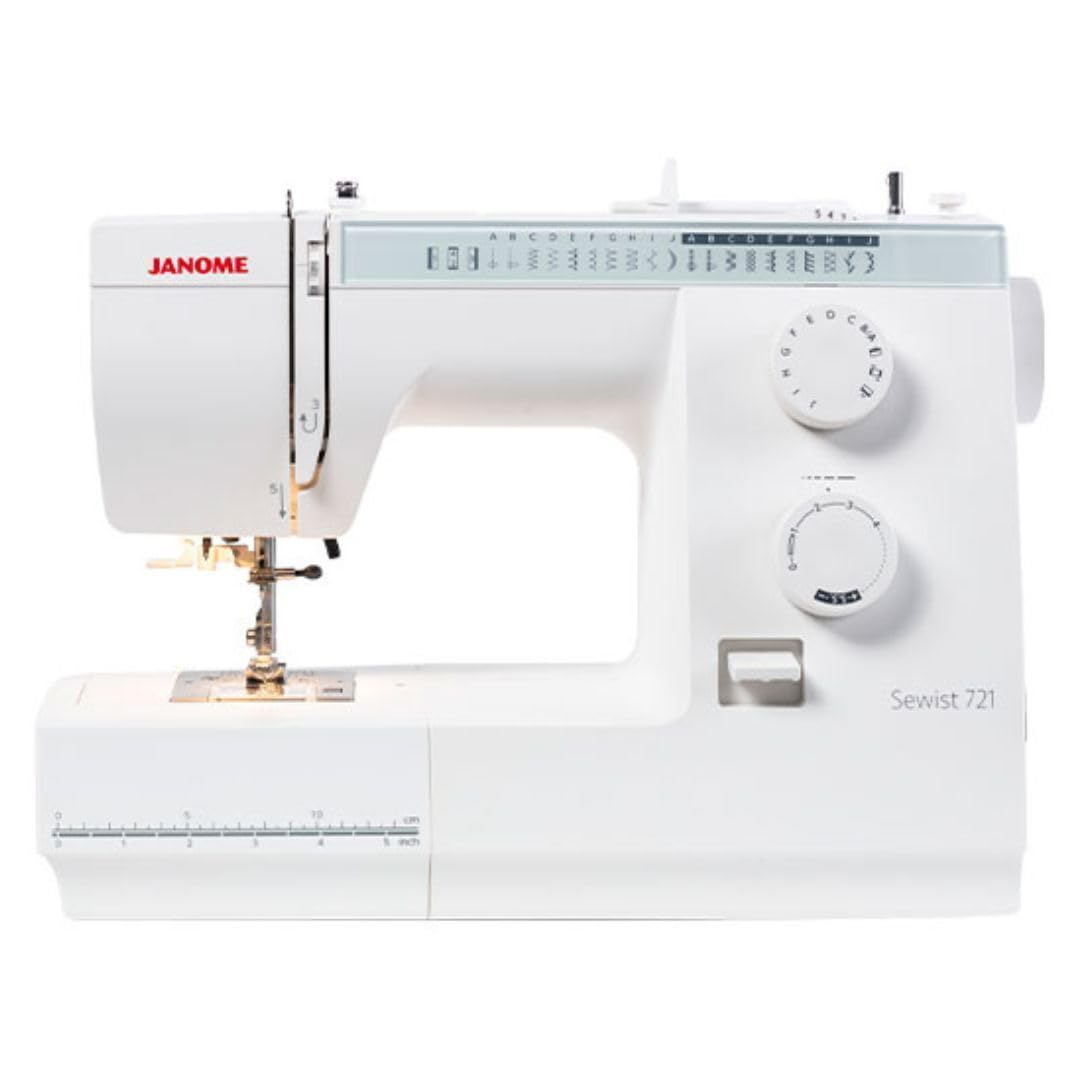
Image: Overview of the Janome Sewist 721, highlighting the main components and threading guides.
2.5 Inserting the Bobbin
The Janome Sewist 721 features a top-loading full rotary hook bobbin system:
- Open the bobbin cover plate located on the needle plate.
- Insert the wound bobbin into the bobbin case, ensuring the thread unwinds counter-clockwise.
- Guide the bobbin thread through the tension spring and into the thread guide slot.
- Hold the upper thread lightly with one hand, and turn the handwheel towards you to lower and raise the needle. This will catch the bobbin thread and bring it up through the needle plate opening.
- Pull both upper and bobbin threads to the back under the presser foot.
- Close the bobbin cover plate.

Image: The needle plate and top-loading bobbin area of the Janome Sewist 721, with the clear cover allowing visibility of the bobbin.
3. Operating the Machine
3.1 Stitch Selection
The Janome Sewist 721 offers 19 built-in stitches, including utility stitches, stretch stitches, and a 4-step buttonhole. Use the stitch selection dial to choose your desired stitch. The stitch patterns are clearly displayed on the front of the machine.

Image: The stitch selection dials and the visual guide for 19 built-in stitches on the Janome Sewist 721.
3.2 Adjusting Stitch Length and Width
Adjust the stitch length and width using the dedicated dials on the front of the machine. The maximum stitch width is 5mm and maximum stitch length is 4mm. For stretch stitches, refer to the gray section on the stitch pattern display and adjust the stitch length dial accordingly.
3.3 Using the Built-in Needle Threader
The built-in needle threader simplifies threading the needle. Ensure the needle is in its highest position. Lower the needle threader lever, align the small hook with the needle eye, and pass the thread through the hook. Release the lever, and a loop of thread will be pulled through the needle eye.
3.4 Changing Presser Feet
The Janome Sewist 721 features snap-on presser feet for quick and easy changes. To remove a presser foot, lift the presser foot lifter and press the release button at the back of the presser foot holder. To attach a new foot, align it under the holder and lower the presser foot lifter until it snaps into place.
4. Maintenance
Regular maintenance ensures the longevity and optimal performance of your sewing machine.
4.1 Cleaning
- Always unplug the machine before cleaning.
- Remove the needle, presser foot, and needle plate.
- Use the brush provided with your machine to remove lint and dust from the bobbin case area and feed dogs.
- Wipe the exterior of the machine with a soft, dry cloth. Do not use harsh chemicals or abrasive cleaners.
4.2 Lubrication
The Janome Sewist 721 is designed for minimal lubrication. Refer to the detailed service manual or consult a qualified technician for any internal lubrication needs. Do not attempt to lubricate internal components unless specifically instructed.
5. Troubleshooting
This section addresses common issues you might encounter. For more complex problems, please contact Janome customer support.
- Skipped Stitches:
- Ensure the needle is inserted correctly and is not bent or dull.
- Check if the needle size is appropriate for the fabric and thread.
- Re-thread the upper thread and bobbin, ensuring correct tension.
- Thread Breaking:
- Check for incorrect threading of the upper thread or bobbin.
- Ensure the thread tension is not too tight.
- Inspect the needle for burrs or damage.
- Use good quality thread.
- Fabric Jamming:
- Do not pull or push the fabric forcefully; let the feed dogs guide it.
- Ensure the presser foot is lowered before sewing.
- Check for tangled threads in the bobbin area.
- Machine Not Starting:
- Verify the power cord is securely plugged in.
- Check if the foot pedal is properly connected.
- Ensure the bobbin winder spindle is pushed to the left (sewing position).
6. Specifications
| Feature | Detail |
|---|---|
| Brand | Janome |
| Model Number | Sewist 721 |
| Product Dimensions | 7 x 16 x 11.9 inches (7"D x 16"W x 11.9"H) |
| Item Weight | 14.8 pounds |
| Built-in Stitches | 19 (including stretch stitches and 4-step buttonhole) |
| Bobbin Type | Top loading full rotary hook |
| Needle Threader | Built-in |
| Presser Feet | Snap-on |
| Max Stitch Width | 5mm |
| Max Stitch Length | 4mm |
| Power Source | AC Electric |
| Material | Metal |
| Color | White |
| UPC | 732212371165 |
7. Warranty and Support
Your Janome Sewist 721 Sewing Machine comes with a manufacturer's warranty. Please refer to the warranty card included with your product for specific terms and conditions. For technical assistance, spare parts, or service, please contact Janome customer support through their official website or authorized service centers.
Keep your purchase receipt as proof of purchase for warranty claims.


