1. Introduction
The XTU S6 Action Camera is a high-performance device designed to capture your adventures in stunning 4K resolution. Featuring 4.0 EIS anti-shake technology, dual screens, and a waterproof case, it is built for various environments, from underwater exploration to extreme sports. This manual provides detailed instructions for setup, operation, and maintenance to ensure you get the most out of your camera.
2. What's Included
Upon unboxing your XTU S6 Action Camera, please verify that all the following components are present:
- XTU S6 Action Camera
- Waterproof Case
- Remote Control
- 1350mAh Battery
- 64GB U3 Micro SD Card
- USB Card Reader
- Mounting Kit (various mounts for bikes, helmets, tripods)
- USB Type-C Cable
- Cleaning Cloth
- User Manual (this document)

Image: The XTU S6 Action Camera, along with its remote control, battery, 64GB Micro SD card, and USB card reader, illustrating the complete package contents.

Image: A visual representation of all items included in the XTU S6 Action Camera package, including the camera, waterproof case, remote, battery, various mounts, and the 64GB SD card.
3. Product Overview
The XTU S6 Action Camera features a compact design with intuitive controls and dual screens for versatile operation.
3.1. Camera Components
- Front Screen: 1.4-inch display for selfies and framing.
- Rear Screen: 2.0-inch touchscreen for navigation and playback.
- Lens: 170° wide-angle lens.
- Buttons: Power/Mode, Shutter/OK, Up, Down.
- Ports: USB Type-C, Micro HDMI, Micro SD card slot.
- Microphone: Built-in for audio recording.
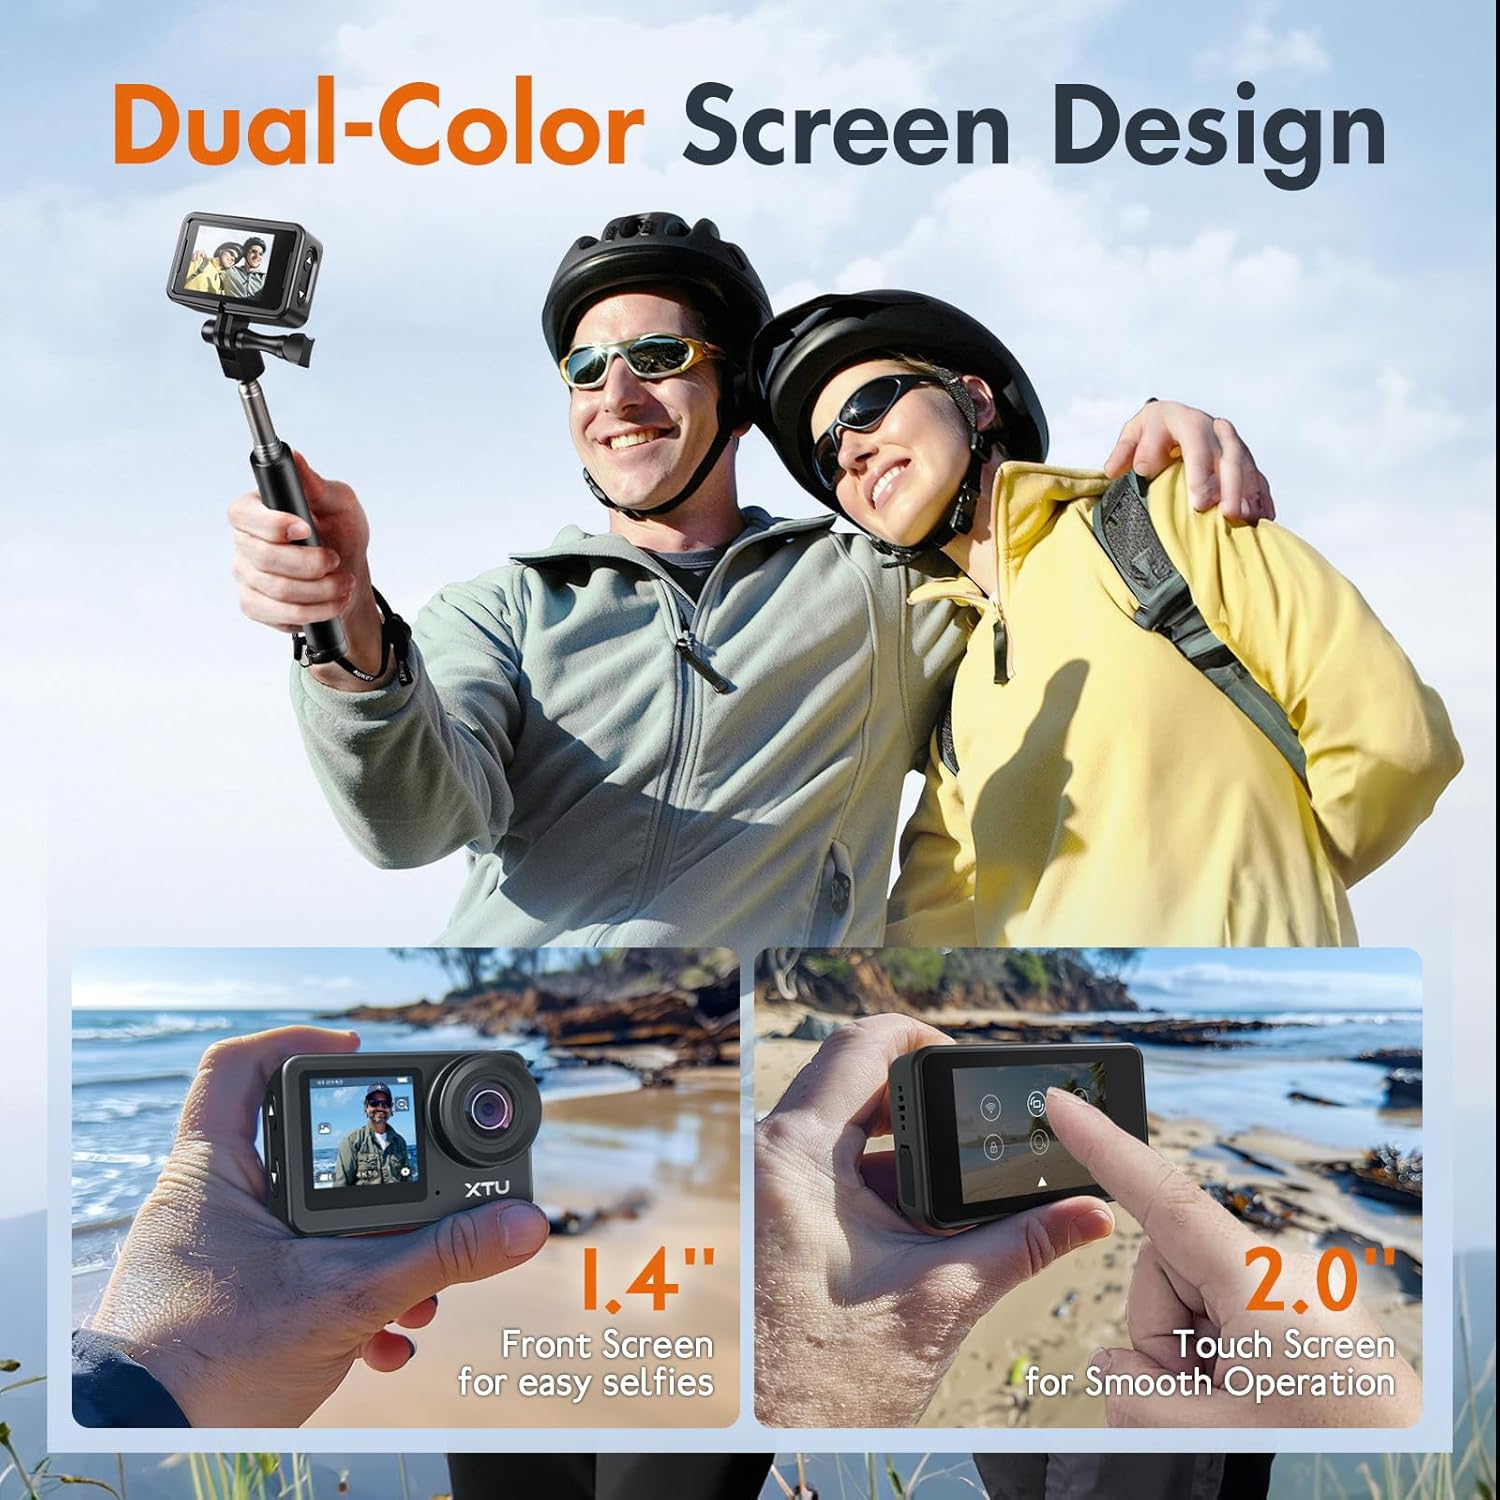
Image: The XTU S6 Action Camera highlighting its 1.4-inch front screen for selfies and a 2.0-inch rear touchscreen for smooth operation, demonstrating the dual-screen design.

Image: A visual explanation of the camera's dual-screen functionality, showing the 2.0-inch touch screen for main operation and the 1.4-inch front screen for easy selfies.

Image: Illustrates the 170-degree wide-angle capability of the XTU S6 camera, demonstrating its ability to capture a broader visual field for more immersive images.
4. Setup
4.1. Battery Installation
- Locate the battery compartment on the bottom of the camera.
- Slide the battery door latch to open the compartment.
- Insert the 1350mAh Lithium Ion battery, ensuring the contacts align correctly.
- Close the battery door until it clicks securely.
4.2. Micro SD Card Installation
The camera supports Micro SD cards up to 64GB. A 64GB U3 Micro SD card is included.
- Locate the Micro SD card slot on the side of the camera.
- Insert the Micro SD card with the gold contacts facing the back of the camera until it clicks into place.
- To remove, gently push the card in until it springs out.
4.3. Charging the Battery
Connect the camera to a USB power source using the provided USB Type-C cable. The charging indicator light will illuminate. It will turn off once fully charged.
4.4. Using the Waterproof Case
The included waterproof case allows the camera to be submerged up to 40 meters (131 feet).
- Ensure the camera is clean and dry before placing it inside the case.
- Securely close the case latch. Perform a dry test without the camera first to ensure no leaks.
- After use in water, rinse the case with fresh water and allow it to air dry.

Image: A diver using the XTU S6 Action Camera in its waterproof case underwater, demonstrating its capability to be submerged up to 131 feet (40 meters).

Image: A visual representation of the XTU S6 Action Camera being used by a diver, emphasizing its waterproof capability up to 131 feet when enclosed in its protective case.
4.5. Mounting Accessories
The camera comes with a versatile mounting kit for various activities.
- Bicycle Holder Mount: Attach the camera to bicycle handlebars for cycling footage.
- Helmet Mounts: Securely mount the camera on top or to the side of a helmet for POV shots.
- Tripod Mount: Use with standard tripods for stable shots.

Image: Demonstrates various mounting configurations for the XTU S6 Action Camera, including bicycle handlebar mount, and helmet mounts for both top and side positions.

Image: A person cycling on a dirt path with the XTU S6 Action Camera mounted on the bicycle handlebars, showcasing a practical application of the mounting accessories.
5. Operating Instructions
5.1. Power On/Off
- Power On: Press and hold the Power/Mode button for 3 seconds.
- Power Off: Press and hold the Power/Mode button for 3 seconds.
5.2. Screen Navigation
The camera features a 2.0-inch rear touchscreen for primary navigation and a 1.4-inch front screen for framing selfies. Only one screen is active at a time to conserve battery.
- Rear Touchscreen: Swipe and tap to navigate menus, change settings, and review footage.
- Front Screen: Primarily for framing. Use physical buttons for mode changes when the front screen is active.
5.3. Recording Video
The XTU S6 supports video recording up to 4K at 30 frames per second (4K30fps) or 1080P at 120 frames per second (1080P120fps).
- Ensure the camera is in Video Mode (indicated by a video camera icon on the screen).
- Press the Shutter/OK button to start recording. A red dot or timer will appear.
- Press the Shutter/OK button again to stop recording.

Image: Illustrates the superior 4K/30FPS video and 20MP photo capabilities of the XTU S6 Action Camera, comparing its real 4K quality to other brands' simulated 4K.

Image: Shows examples of moments captured with the XTU S6 camera, highlighting its ability to record in 4K30FPS video and take 20MP photos.
5.4. Taking Photos
The camera captures 20MP still images.
- Ensure the camera is in Photo Mode (indicated by a camera icon on the screen).
- Press the Shutter/OK button to take a photo.
5.5. Image Stabilization (EIS 4.0)
The XTU S6 features 6-axis Electronic Image Stabilization (EIS 4.0) for ultra-smooth footage, even during intense motion.
- EIS is typically enabled by default. Check camera settings to ensure it is active for optimal stabilization.
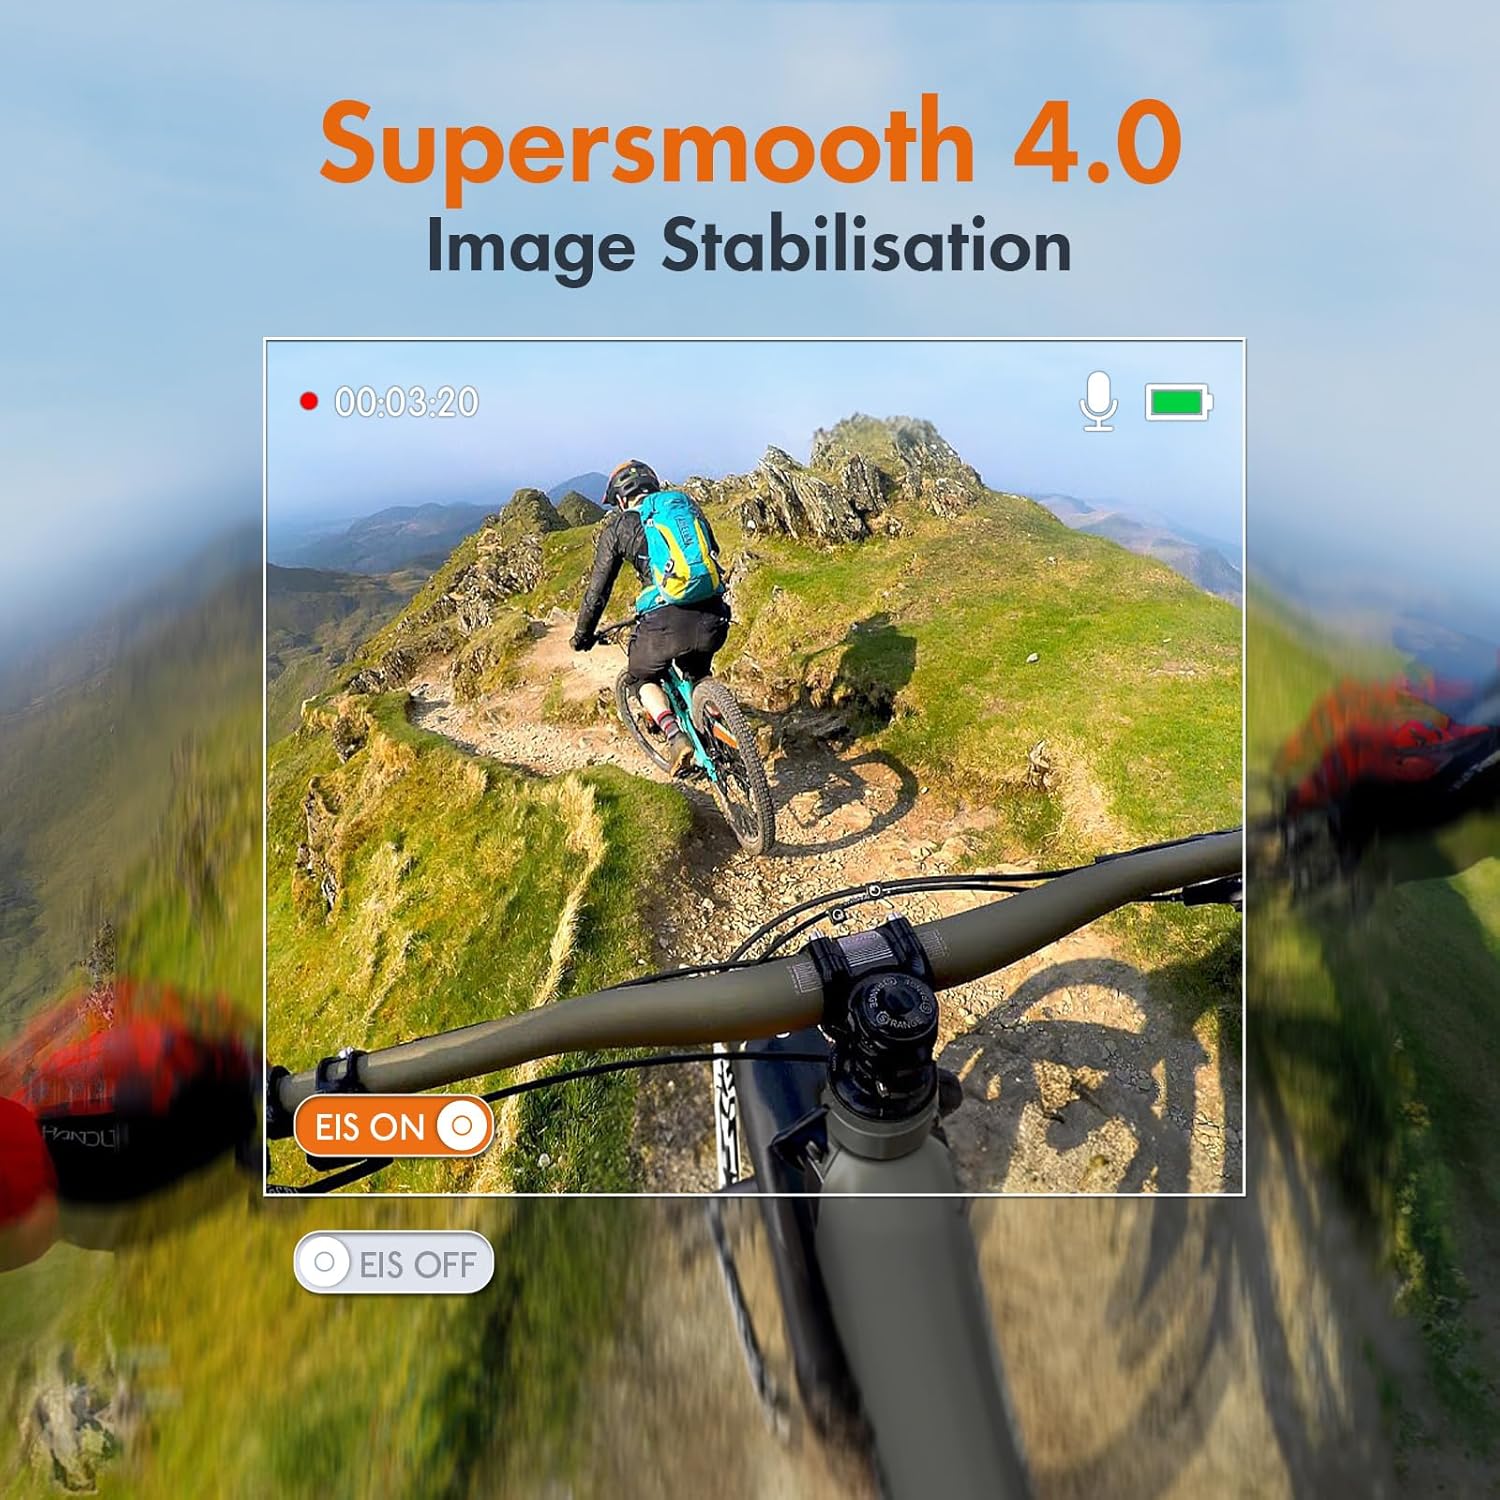
Image: Demonstrates the effectiveness of Supersmooth 4.0 Image Stabilisation on the XTU S6 Action Camera, showing a stable view from a bike ride compared to an unstabilized view.

Image: A visual comparison showing the superior Super Smooth 4.0 Image Stabilization of the XTU S6 camera (EIS ON) versus EIS off and other cameras' stabilization, with a motocross rider as the subject.
5.6. Wi-Fi Connectivity and App
Connect your camera to the XTU GO APP via 2.4GHz Wi-Fi for easy content transfer, editing, and sharing.
- Download the XTU GO APP from your device's app store.
- On the camera, enable Wi-Fi through the settings menu.
- On your smartphone/tablet, connect to the camera's Wi-Fi network (SSID and password displayed on camera screen).
- Open the XTU GO APP to control the camera, view live footage, and transfer files.

Image: Illustrates the process of uploading content from the XTU S6 Action Camera to a laptop, tablet, or smartphone via 2.4GHz Wi-Fi connectivity.

Image: Shows how to easily offload content from the XTU S6 Action Camera using the XTU GO APP via Wi-Fi or by directly accessing the Micro SD card with the included card reader.
5.7. Remote Control and Voice Commands
Control your camera remotely using the included 2.4GHz wireless remote or voice commands.
- Remote Control: Pair the remote with the camera (refer to camera settings for pairing instructions). Use the remote to start/stop recording or take photos from up to 20 meters away.
- Voice Commands: Enable voice control in the camera settings. Use specific commands (e.g., "XTU Start Recording") to operate the camera hands-free.

Image: A person kayaking, demonstrating the use of the 2.4GHz wireless remote control for the XTU S6 Action Camera, which supports operation up to 20 meters.
5.8. Shooting Modes
The XTU S6 offers various shooting modes to enhance your creative possibilities:
- Car Looping: Records video in a loop, ideal for dashcam use.
- Lapse Photo: Captures a series of photos at set intervals to create time-lapse videos.
- Slow Motion: Records video at a higher frame rate for smooth slow-motion playback.
- Night Scene: Optimized settings for low-light photography.
- Long Exposure Photo: Captures light trails and detailed night scenes.
- Burst Photo: Takes multiple photos in quick succession for action shots.
- Timing Photo: Sets a timer before taking a photo.
- Pre-recording: Captures up to 20 seconds of footage before you press the record button.
- Vertical Recording: Allows shooting in a vertical format for social media.

Image: Displays various creative shooting modes available on the XTU S6 Action Camera, including Car Looping, Lapse Photo, Slow Motion, and Night Scene.

Image: Further illustrates the diverse shooting capabilities of the XTU S6 Action Camera, featuring Long Exposure Photo, Lapse Photo, Burst Photo, and Timing Photo modes.

Image: Highlights the small and lightweight design of the XTU S6 Action Camera, showing its dimensions (6.5cm x 4.3cm x 2.5cm) and its weight of 92g, making it highly portable.

Image: Explains the pre-recording feature of the XTU S6 camera, which captures up to 20 seconds of footage before the record button is pressed, ensuring no moment is missed.

Image: Demonstrates the framing versatility of the XTU S6 camera, allowing users to switch between wide screen and vertical frames with a simple tap, suitable for various platforms.
6. Maintenance
6.1. Cleaning
- Use the provided cleaning cloth to gently wipe the lens and screens.
- For stubborn smudges, use a lens cleaning solution designed for optics.
- Do not use harsh chemicals or abrasive materials.
6.2. Storage
- Store the camera in a cool, dry place away from direct sunlight and extreme temperatures.
- Remove the battery if storing for extended periods to prevent discharge or damage.
6.3. Battery Care
- Charge the battery fully before first use.
- Avoid completely draining the battery regularly to prolong its lifespan.
- If the battery is not used for a long time, charge it to about 50% every 3 months.
7. Troubleshooting
| Problem | Possible Cause | Solution |
|---|---|---|
| Camera won't turn on | Low battery; Battery not inserted correctly; Firmware issue | Charge battery; Reinsert battery; Reset camera (if applicable) |
| Video footage is shaky | EIS is off; Extreme vibration | Enable EIS in settings; Use a more stable mount |
| Cannot connect to Wi-Fi | Wi-Fi not enabled on camera; Incorrect password; App issue | Enable camera Wi-Fi; Re-enter password; Restart app/phone |
| Micro SD card error | Card not formatted; Incompatible card; Card full | Format card in camera; Use recommended card (U3); Delete files or use new card |
| Water leakage in case | Case not properly sealed; O-ring damaged/dirty | Ensure case is fully latched; Clean/inspect O-ring; Replace O-ring if damaged |
8. Specifications
| Feature | Detail |
|---|---|
| Model Number | XTU Action Camera S6 |
| Video Resolution | 4K30fps, 1080P120fps |
| Photo Resolution | 20MP |
| Image Stabilization | 6-axis EIS 4.0 |
| Waterproof Depth | Up to 40m (131ft) with case |
| Dual Screens | 2.0" Rear Touchscreen, 1.4" Front Screen |
| Connectivity | 2.4GHz Wi-Fi, USB Type-C, Micro HDMI |
| Battery Capacity | 1350mAh Lithium Ion |
| Storage | Micro SD (up to 64GB, U3 recommended) |
| Dimensions | 2.5 x 6.5 x 4.3 cm |
| Weight | 660 g (product weight, camera is 92g) |
| Processor | Ambarella H22 |
| Sensor | IMX 368 (Sony IMX386) |

Image: Illustrates the battery life of the 1350mAh battery, showing approximate recording times: 90 minutes for 4K30FPS, 120 minutes for 1080/60FPS, and 150 minutes for 1080/30FPS.

Image: Highlights the core components of the XTU S6 Action Camera: the Ambarella H22 Chip and the Sony IMX386 Sensor, which contribute to its performance.
9. Warranty and Support
For warranty information and technical support, please refer to the official XTU website or contact XTU customer service directly. Keep your purchase receipt as proof of purchase for warranty claims.


