1. Introduction
Thank you for choosing the Masterpro Foodies Immersion Blender. This manual provides essential information for the safe and efficient operation, maintenance, and care of your new appliance. Please read these instructions carefully before first use and keep them for future reference.

Image 1.1: Masterpro Foodies Immersion Blender with blending shaft, chopper, and mixing beaker.
2. Important Safety Instructions
When using electrical appliances, basic safety precautions should always be followed to reduce the risk of fire, electric shock, and/or injury to persons, including the following:
- Read all instructions before using the appliance.
- Do not immerse the motor unit in water or other liquids. Clean with a damp cloth only.
- This appliance is not intended for use by persons (including children) with reduced physical, sensory or mental capabilities, or lack of experience and knowledge, unless they have been given supervision or instruction concerning use of the appliance by a person responsible for their safety.
- Children should be supervised to ensure that they do not play with the appliance.
- Unplug from outlet when not in use, before putting on or taking off parts, and before cleaning.
- Avoid contact with moving parts.
- Do not operate any appliance with a damaged cord or plug, or after the appliance malfunctions or has been dropped or damaged in any manner.
- The use of attachments not recommended or sold by the manufacturer may cause fire, electric shock, or injury.
- Do not use outdoors.
- Do not let cord hang over edge of table or counter or touch hot surfaces.
- Keep hands and utensils out of the container while blending to prevent the possibility of severe injury to persons or damage to the unit. A scraper may be used but must be used only when the appliance is not running.
- Blades are sharp. Handle with care.
- Always ensure the appliance is properly assembled before use.
- Do not process extremely hot liquids.
3. Product Components
Your Masterpro Foodies Immersion Blender comes with the following components:
- Motor Unit with Speed Control
- Stainless Steel Blending Shaft
- 600 ml Chopper Bowl with Lid and Blade
- 500 ml Mixing Beaker with Lid
- Stainless Steel Whisk Attachment
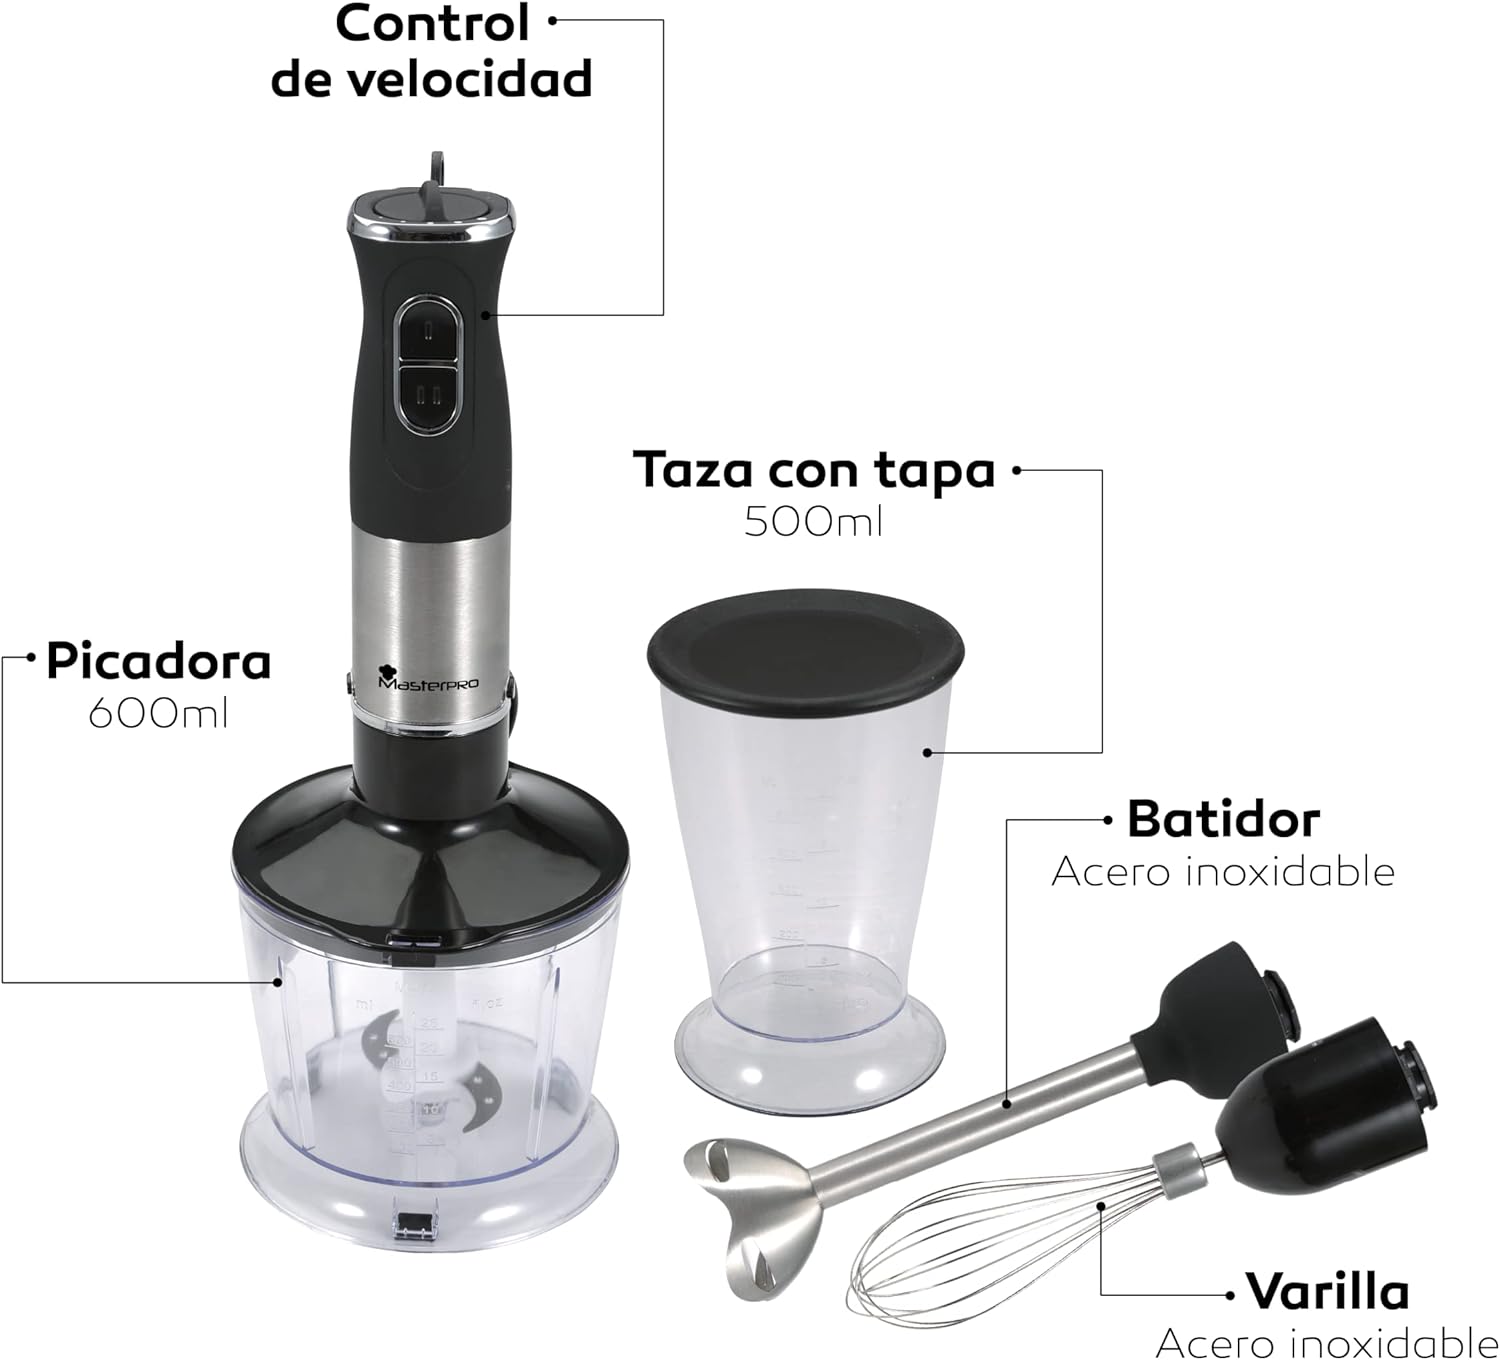
Image 3.1: Labeled diagram of the immersion blender and its accessories. Labels include: Speed Control, 600ml Chopper, 500ml Beaker with Lid, Stainless Steel Whisk, and Stainless Steel Blending Shaft.

Image 3.2: Close-up view of the durable stainless steel blending blade.
4. Setup and Assembly
Before first use, clean all parts that will come into contact with food as described in the "Cleaning and Maintenance" section.
4.1. Attaching the Blending Shaft
- Align the blending shaft with the motor unit.
- Twist the blending shaft clockwise until it locks securely into place.
- To detach, twist counter-clockwise and pull apart.
4.2. Attaching the Whisk Attachment
- Insert the whisk into the whisk gear box.
- Align the whisk gear box with the motor unit.
- Twist the whisk gear box clockwise until it locks securely into place.
- To detach, twist counter-clockwise and pull apart.
4.3. Assembling the Chopper
- Place the chopper blade onto the central pin inside the chopper bowl.
- Add ingredients to the chopper bowl.
- Place the chopper lid onto the bowl, ensuring it is properly seated.
- Align the motor unit with the chopper lid and twist clockwise until it locks.
- To detach, twist counter-clockwise and lift the motor unit.
5. Operating Instructions
Always ensure the appliance is unplugged before assembling or disassembling parts.
5.1. Using the Immersion Blender (Blending Shaft)
- Attach the blending shaft to the motor unit.
- Place the ingredients into the 500 ml mixing beaker or another suitable container.
- Immerse the blending shaft into the ingredients.
- Plug the appliance into a power outlet.
- Press and hold the desired speed button (Low or High) to start blending.
- Move the blender gently up and down to ensure even blending.
- Release the button to stop.
- Unplug the appliance before removing the blending shaft or cleaning.
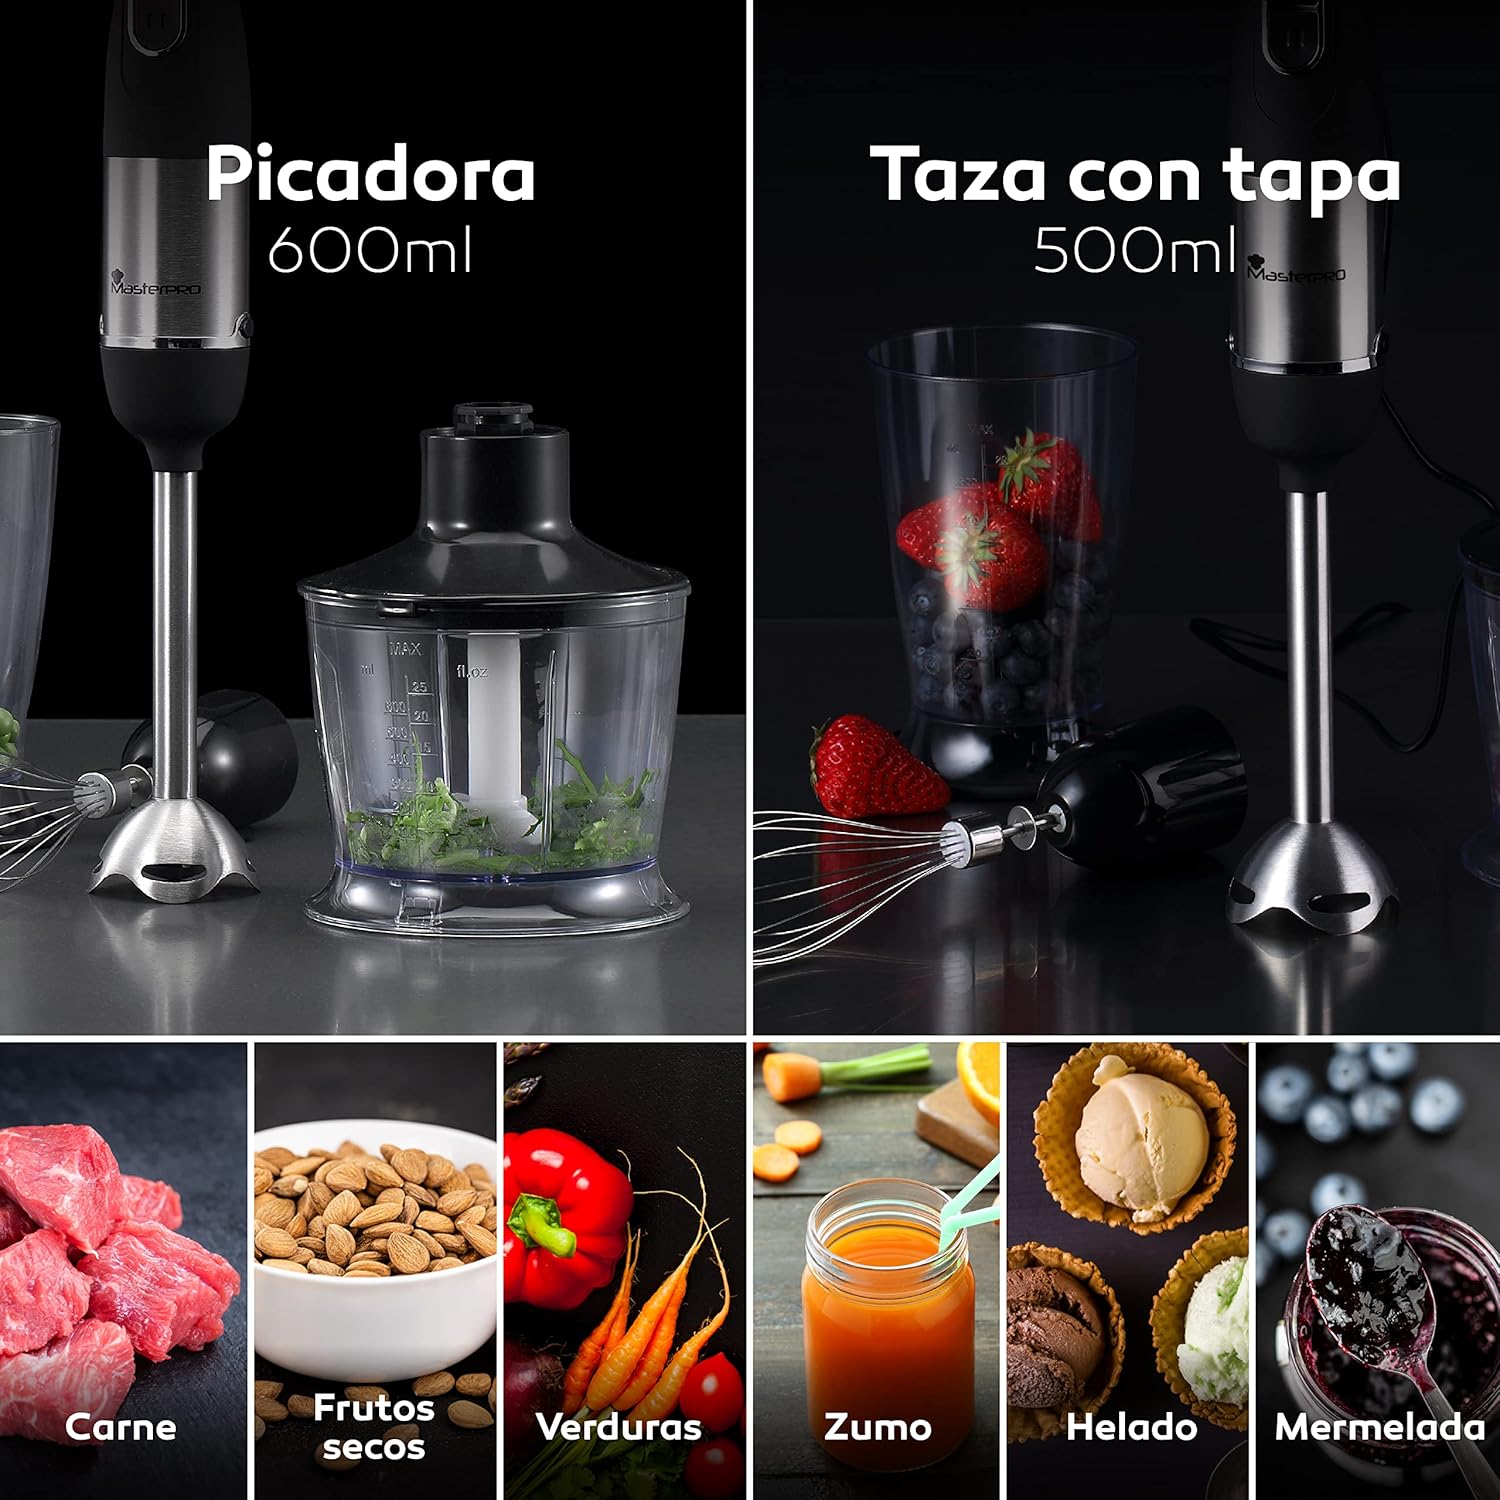
Image 5.1: The immersion blender attachments used for chopping, blending, and whisking various ingredients like vegetables, fruits, and sauces.
5.2. Speed Control
The Masterpro Foodies Immersion Blender features two speed settings and variable speed control:
- Low Speed: Ideal for softer ingredients and smaller quantities.
- High Speed: Suitable for harder ingredients, such as cereals, and larger quantities.
- Variable Speed: Use the dial on top of the motor unit to fine-tune the speed within each setting.

Image 5.2: Illustration of the high and low speed buttons. High speed is recommended for hard ingredients like meat and nuts, while low speed is for soft ingredients like eggs and fruits.

Image 5.3: The motor unit displaying the two speed buttons and the variable speed control dial at the top.
5.3. Using the Chopper Attachment
- Assemble the chopper as described in Section 4.3.
- Ensure the motor unit is securely locked onto the chopper lid.
- Plug the appliance into a power outlet.
- Press and hold the desired speed button to chop ingredients. Use short pulses for coarse chopping, or hold longer for finer results.
- Release the button to stop.
- Unplug the appliance before disassembling or cleaning.
5.4. Using the Whisk Attachment
- Attach the whisk attachment to the motor unit.
- Place ingredients into the 500 ml mixing beaker or another suitable container.
- Immerse the whisk into the ingredients.
- Plug the appliance into a power outlet.
- Press and hold the desired speed button to whisk.
- Move the whisk gently to incorporate air or mix thoroughly.
- Release the button to stop.
- Unplug the appliance before removing the whisk or cleaning.
6. Cleaning and Maintenance
Proper cleaning and maintenance will ensure the longevity and optimal performance of your immersion blender.
- Always unplug the appliance before cleaning.
- Motor Unit: Wipe the motor unit with a damp cloth. Do not immerse it in water or any other liquid.
- Blending Shaft, Whisk, Chopper Blade, Beaker, and Chopper Bowl: These parts are dishwasher safe. Alternatively, they can be washed by hand in warm, soapy water. Rinse thoroughly and dry immediately.
- Sharp Blades: Handle the chopper blade and blending shaft blade with extreme care as they are very sharp.
- Do not use abrasive cleaning agents or scouring pads, as these may scratch the surfaces.
- Store the appliance and its accessories in a dry place.
7. Troubleshooting
If you encounter issues with your immersion blender, please refer to the following common problems and solutions:
| Problem | Possible Cause | Solution |
|---|---|---|
| Appliance does not turn on. | Not plugged in; power outlet not working; motor unit not properly attached to attachment. | Ensure the appliance is securely plugged into a working outlet. Check that the motor unit is correctly locked onto the blending shaft, whisk gear box, or chopper lid. |
| Motor stops during operation. | Overheating due to prolonged use or processing too hard ingredients; food jammed in blades. | Unplug the appliance and let it cool down for at least 15 minutes. Remove any jammed food. Reduce the quantity or hardness of ingredients. |
| Ingredients are not blending/chopping effectively. | Too little liquid; ingredients are too large; blades are dull (unlikely for new product). | Add more liquid if blending. Cut ingredients into smaller pieces before chopping. Ensure blades are clean and free of debris. |
| Excessive vibration or noise. | Improper assembly; uneven load of ingredients. | Check that all attachments are securely locked. Ensure ingredients are evenly distributed. |
8. Specifications
| Brand | MasterPro |
| Model Number | BGMP-9002 |
| Power/Wattage | 400 W |
| Voltage | 220-240 V |
| Frequency | 50/60 Hz |
| Material | Stainless Steel (blades, blending shaft, whisk) |
| Chopper Bowl Capacity | 600 ml |
| Mixing Beaker Capacity | 500 ml |
| Number of Speeds | 2 (with variable speed control) |
| Special Features | Quiet DC Motor, Dishwasher Safe Parts (excluding motor unit), Automatic Shutdown (safety feature) |
| Product Dimensions | 25.8 x 15.2 x 25 cm |
| Weight | 1.48 kg |
9. Warranty and Support
For warranty information, please refer to the documentation provided with your purchase or contact your retailer. For technical support or inquiries, please visit the official MasterPro website or contact their customer service department.
You can find more information about MasterPro products at: MasterPro Store


