1. Introduction
This manual provides essential instructions for the safe and effective use of your Eastwood 5 Gallon Electric Bucket Top Parts Washer. This portable unit is designed for cleaning small parts from automobiles, lawn equipment, and other similar items. Please read this manual thoroughly before operation and retain it for future reference.
2. Safety Information
Always observe basic safety precautions when using electrical appliances to reduce the risk of fire, electric shock, and personal injury.
- Electrical Safety: Ensure the power outlet matches the voltage requirements of the pump. Do not operate with a damaged cord or plug. Keep the power cord away from heat, oil, sharp edges, and moving parts.
- Chemical Safety: Use only cleaning solutions recommended for parts washers. Avoid flammable or corrosive liquids. Always wear appropriate personal protective equipment, such as gloves and eye protection, when handling cleaning solutions.
- Work Area: Operate the parts washer in a well-ventilated area. Keep the work area clean and well-lit. Do not operate in explosive atmospheres, such as in the presence of flammable liquids, gases, or dust.
- General Precautions: Do not immerse the entire unit in water. Always unplug the unit before performing any maintenance or when not in use. Keep children and bystanders away during operation.
3. Package Contents
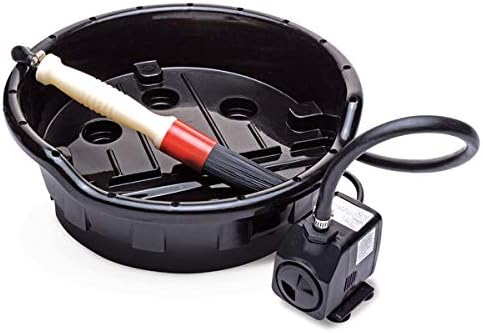
Verify that all components are present upon unpacking:
- 5 Gallon Bucket Top Parts Washer Unit (Basin)
- Submersible Pump (1 GPM)
- Flow-Through Cleaning Brush
4. Setup
- Prepare the Bucket: Place the parts washer basin securely on top of a standard 5-gallon bucket (not included). Ensure the basin is stable and level.
- Add Cleaning Solution: Fill the 5-gallon bucket with an appropriate, non-flammable parts cleaning solution. Ensure the liquid level is sufficient to submerge the pump and allow for effective cleaning without overflowing the basin.
- Install the Pump: Place the submersible pump into the cleaning solution within the 5-gallon bucket. Ensure the pump is fully submerged and resting on the bottom of the bucket.
- Connect the Brush: Connect the hose from the submersible pump to the flow-through cleaning brush. Ensure the connection is secure to prevent leaks.
- Power Connection: Plug the pump's power cord into a grounded electrical outlet.
5. Operation
- Activate Pump: Once the unit is set up and plugged in, the pump will begin to circulate the cleaning solution through the brush.
- Clean Parts: Place the small parts to be cleaned into the basin. Use the flow-through cleaning brush to scrub away dirt, grease, and grime. The continuous flow of solution helps to rinse away debris.
- Soaking: For heavily soiled parts, you may allow them to soak in the cleaning solution within the basin for a period before scrubbing.
- Completion: After cleaning, remove the parts from the basin. Allow excess solution to drain back into the bucket.
- Power Off: Unplug the unit from the electrical outlet to turn off the pump.
6. Maintenance
Regular maintenance ensures optimal performance and longevity of your parts washer.
- Cleaning the Unit: Periodically clean the basin and brush to remove accumulated sludge and debris. Use a mild detergent and water, then rinse thoroughly.
- Solution Replacement: Replace the cleaning solution regularly, or when it becomes excessively dirty, to maintain cleaning effectiveness. Follow the disposal instructions for your specific cleaning solution.
- Pump Inspection: Inspect the submersible pump for any blockages or damage. Clean any debris from the pump intake.
- Storage: When not in use, drain the cleaning solution, clean the unit, and store it in a dry, cool place away from direct sunlight and extreme temperatures.
7. Troubleshooting
| Problem | Possible Cause | Solution |
|---|---|---|
| Pump does not operate | No power to the unit; Pump motor failure; Clogged pump intake | Check power connection and outlet; Contact customer support; Clean pump intake of debris |
| Low flow from brush | Clogged pump or hose; Low cleaning solution level | Clean pump and hose; Add more cleaning solution |
| Solution leaks from hose connection | Loose hose connection | Tighten hose connection securely |
8. Specifications
| Feature | Specification |
|---|---|
| Model Number | 31399 |
| Brand | Eastwood |
| Power Source | Corded Electric |
| Tank Volume | 5 Gallons |
| Maximum Flow Rate | 1 Gallon Per Minute (GPM) |
| Item Weight | 3.5 Pounds |
| UPC | 607174130863 |
9. Warranty and Support
Eastwood products are manufactured to high-quality standards. For warranty information or technical support, please refer to the official Eastwood website or contact their customer service department directly. Keep your purchase receipt as proof of purchase.
Eastwood Customer Service: For assistance, visit www.eastwood.com or consult your product packaging for contact details.


