
1. Introduction
This manual provides essential information for the safe and efficient installation, operation, and maintenance of your Everbilt 3/4 HP Submersible 3-Wire Deep Well Potable Water Pump. Please read all instructions carefully before installation and use. Retain this manual for future reference.

Image 1.1: The Everbilt 3/4 HP Submersible Deep Well Water Pump. This image displays the full length of the stainless steel pump unit, designed for deep well applications.
2. Safety Information
Always observe basic safety precautions to reduce the risk of fire, electric shock, and personal injury. This pump is designed for potable water only. Do not use for flammable liquids or chemicals.
- Electrical Safety: Ensure all electrical connections are made by a qualified electrician and comply with local codes. Disconnect power before servicing.
- Control Box: This is a 3-wire pump and requires an external control box (sold separately) for operation. Do not attempt to operate without the correct control box.
- Well Casing: Install only in wells with a minimum internal diameter of 4 inches.
- Water Quality: This pump is intended for potable water. Do not use for non-potable water or other liquids.
- Personal Protective Equipment: Wear appropriate safety gear, including gloves and eye protection, during installation and maintenance.
3. Package Contents
- Everbilt 3/4 HP Submersible 3-Wire Deep Well Potable Water Pump (Model EFSUB7-123HD)
Note: A control box is required for operation and is sold separately. Ensure you purchase the correct control box for a 3-wire, 3/4 HP pump.
4. Setup and Installation
4.1 Pre-Installation Checks
- Verify well casing diameter is at least 4 inches.
- Confirm power supply matches pump requirements.
- Ensure all necessary plumbing and electrical components, including the control box, are available.
4.2 Electrical Wiring
This pump features a 3-wire motor design. It requires an external control box for proper operation. Connect the pump's wires to the control box according to the control box manufacturer's instructions. Ensure all connections are secure and waterproof.

Image 4.1: Close-up view of the pump's 3-wire electrical connections. The wires are color-coded for proper connection to the external control box.
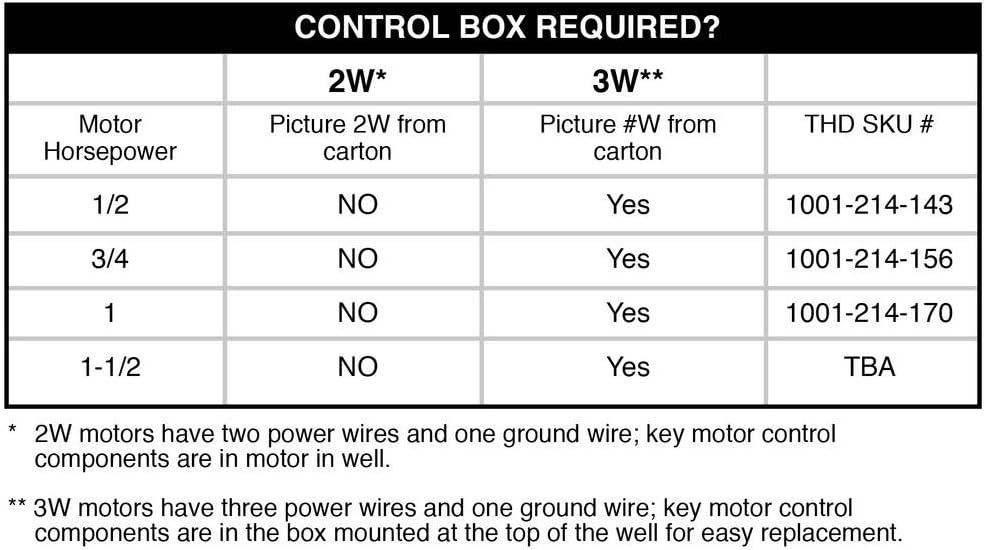
Image 4.2: Table indicating control box requirements for different motor horsepowers. For a 3/4 HP, 3-wire motor, a control box is required.
4.3 Pump Placement
Lower the pump into the well, ensuring it is suspended at the appropriate depth. The pump is designed for wells up to 100 ft. to 150 ft. deep. Ensure the pump is positioned above the bottom of the well to prevent drawing in sediment.
4.4 Plumbing Connections
Connect the discharge pipe to the pump's outlet. This pump includes a built-in check valve to prevent backflow. Ensure all plumbing connections are watertight.

Image 4.3: Water Well Pump Selection Guide. This table assists in selecting the appropriate pump type and horsepower based on well depth, providing context for pump application.
5. Operating Instructions
Once installed and wired correctly, the pump will operate automatically via the control box and pressure switch (if applicable in your system). The pump is designed to deliver 10 GPM (gallons per minute) of potable water.
- Initial Startup: After installation, ensure the well is adequately filled with water before starting the pump to prevent dry running.
- Flow Rate: The pump is rated for a maximum discharge flow of 10 GPM (660 gallons/hour).
- Head Pressure: The pump can achieve a head pressure of up to 40 feet.
- Check Valve: The built-in check valve prevents water from flowing back into the well when the pump is off, maintaining prime in the system.
6. Maintenance
The Everbilt submersible pump is constructed with stainless steel and thermoplastic components for long life and minimal maintenance. However, periodic checks are recommended.
- Intake Screen: Periodically inspect the intake screen for blockages from sediment or debris. If clogged, pull the pump and clean the screen.
- System Leaks: Regularly check the entire water system for leaks, as these can cause the pump to cycle excessively.
- Electrical Connections: Ensure all electrical connections remain secure and free from corrosion.

Image 6.1: Close-up view of the pump's intake screen. This perforated section allows water entry while filtering out larger debris.
7. Troubleshooting
Refer to the table below for common issues and their corrective actions.

Image 7.1: Troubleshooting table for submersible pumps. This table lists common problems, probable causes, and recommended corrective actions.
| Problem | Probable Cause | Corrective Action |
|---|---|---|
| The pump starts too frequently. | There are leaks in the system. | Check all tank connections with soapsuds for air leaks. Check plumbing for leaks. The system must be air and water tight. |
| The pressure switch is defective. | Check for a defective switch or switch out of adjustment. Re-adjust or replace the pressure switch. | |
| The tank's pressure is not set properly. | Pre-charged tanks: check tank pre-charge air pressure and check for leak in the bladder; adjust air pressure to 2 PSI (13.8 kPa) less than the pump cut-in pressure (when there is no water pressure on system). Replace tank bladder if necessary. Air over water tanks: check for air leaks. Check Air Volume Control (AVC). Check snifter valve operation. Repair or replace tanks; replace snifter valves if necessary. | |
| There is a leak in the drop pipe or check valve. | Raise the drop pipe one length at a time until water stands in the pipe. Replace the pipe above that point. | |
| The pressure switch is too far from the tank. | Measure the distance from the pressure switch to the tank. Move the switch to within 1 ft. of the tank. | |
| Little or no water is being delivered. | The bleeder orifice check valve is stuck or installed backwards (standard tank only). | Examine the valve. If stuck, free the valve; if installed backwards, reverse it. |
| The water level is low. | Determine the lowest water level in the well while the pump is running and compare to the pump depth setting. Lower the pump further into the well (but at least 5 ft. (1.6m) above the bottom of the well). Throttle the pump discharge until the discharge equals the recovery rate of the well. NOTICE: Running the pump while airlocked can cause loss of prime and seriously damage the pump. | |
| The voltage is low. | Check the voltage at the control box with the pump running. Check incoming wire size and power supply wire size against the tables in the Wiring section of this manual. Install a larger wire from the meter to the control box. Install a larger wire from the control box to the pump. If necessary, have the power company raise the supply voltage. | |
| The intake screen is plugged. | Pull the pump and check the condition of the screen. Clean or replace as necessary. | |
| The valve at the pump discharge is stuck or blocked. | Pull the pump and examine the check valve. Free the check valve. Do not block the check valve with over tightening pipe. | |
| There is air or a milky water discharge coming from the faucet. | Impellers and diffusers are worn. | Make sure the system is clear of obstructions and the pump is in solid water and operating normally. Replace the pump. |
| There is gas in the well water. | Check for the presence of gas in the well water. Remove bleeder orifices; plug tees. Be sure plugged tees do not leak. If necessary, separate gas from air before it enters the pressure tank. | |
| The air volume control is not working (standard tanks only). | Make sure ports and ball check valves are clear. Replace the control if necessary. |
8. Specifications
| Specification | Value |
|---|---|
| Brand | Everbilt |
| Model Number | EFSUB7-123HD |
| Horsepower (HP) | 0.75 |
| Wiring Configuration | 3-Wire |
| Maximum Flow Rate | 10 Gallons Per Minute (660 Gallons/Hour) |
| Head Pressure (ft.) | 40 |
| Maximum Discharge Pressure (psi) | 50 |
| Designed for Well Depth | Up to 100 ft. to 150 ft. |
| Minimum Well Casing Diameter | 4 inches |
| Housing Material | Stainless Steel |
| Inlet Connection | Barb/rib |
| Outlet Connection | Threaded female |
| Self-Priming | Yes |
| Control Box Included | No (Required, sold separately) |
| Run-Dry Capable | No |
| Product Weight | 21.2 lb (27 lb packaged) |
| Certifications and Listings | CSA Listed |
| UPC | 858726005027 |
9. Warranty and Support
Specific warranty information for the Everbilt 3/4 HP Submersible 3-Wire Deep Well Potable Water Pump is not provided within this manual. For details regarding warranty coverage, terms, and conditions, please refer to the documentation included with your product packaging or visit the official Everbilt website. For technical support or assistance, please contact Everbilt customer service.


