1. Introduction
The Walfront MP3 Decoder Board is a compact and versatile audio module designed for integrating into various audio systems. It supports playback of lossless MP3, WMA, and WAV audio formats from multiple sources, including USB flash drives, SD cards, and TF cards. Equipped with a digital LED display and FM radio function, this board offers a comprehensive solution for your audio decoding needs. This manual provides essential information for the proper installation, operation, and maintenance of your decoder board.
2. Features
- Supports lossless MP3, WMA, and WAV audio formats.
- Digital LED display for showing current working status.
- Dual-channel audio output, suitable for devices with an external amplifier.
- Integrated FM radio function (requires external antenna connection).
- Capable of reading audio files from USB flash disks, Storage cards, and MMC cards.
- Includes a remote control for convenient operation.
3. Package Contents
Please verify that all items are present in the package:
- 1 x MP3 Decoder Board
- 1 x Remote Control
4. Specifications
| Specification | Value |
|---|---|
| Brand | Walfront |
| Model Number | Walfront5ybma32cou-02 |
| Voltage | DC 12V |
| Dimensions | 75 x 50 x 25 mm (2.95 x 1.97 x 0.98 inches) |
| Mounting Hole Spacing | 70 x 37 mm (2.75 x 1.45 inches) |
| Item Weight | 3.84 ounces |
| Material | Silver (housing) |
| Batteries Required | No (for the board itself) |
5. Product Overview

Figure 1: Front view of the Walfront MP3 Decoder Board with its accompanying remote control. The board features a digital LED display, control buttons, USB port, and SD/MMC card slot.
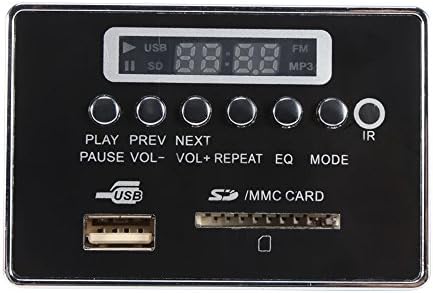
Figure 2: Close-up front view of the MP3 Decoder Board, highlighting the LED display, control buttons (PLAY, PREV, NEXT, PAUSE, VOL-, VOL+, REPEAT, EQ, MODE), USB port, and SD/MMC card slot.
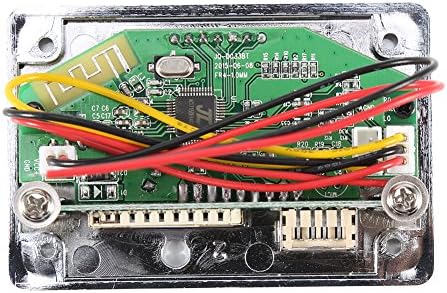
Figure 3: Rear view of the MP3 Decoder Board, revealing the internal circuit board with various components and pre-attached wiring for power and audio connections.

Figure 4: Angled rear view of the MP3 Decoder Board, providing a different perspective of the circuit board, wiring, and connection points.
6. Setup and Installation
This decoder board requires a DC 12V power supply and is designed for use with an external amplifier. Ensure all connections are secure before powering on the device.
6.1 Power Connection
- Locate the power input terminals on the back of the decoder board.
- Connect a stable DC 12V power supply to these terminals, observing correct polarity (positive to positive, negative to negative). Incorrect polarity can damage the board.
6.2 Audio Output Connection
- Identify the dual-channel audio output terminals.
- Connect these outputs to the input of your external audio amplifier using appropriate audio cables.
6.3 FM Antenna Connection (Optional)
- For FM radio functionality, connect an external FM antenna to the designated antenna terminal on the board.
7. Operating Instructions
The decoder board can be operated using the buttons on the front panel or the included remote control.
7.1 Media Playback (USB/SD/TF Card)
- Insert Media: Insert a USB flash drive into the USB port or an SD/TF card (with adapter if necessary) into the card slot. The board will automatically detect and begin playing supported audio files.
- Play/Pause: Press the 'PLAY/PAUSE' button to toggle playback.
- Previous/Next Track: Use the 'PREV' and 'NEXT' buttons to skip to the previous or next track.
- Volume Control: Use 'VOL-' and 'VOL+' buttons to adjust the volume.
- Repeat Mode: Press 'REPEAT' to cycle through repeat modes (e.g., repeat one, repeat all).
- Equalizer (EQ): Press 'EQ' to cycle through available equalizer presets.
7.2 FM Radio Function
- Switch Mode: Press the 'MODE' button to switch to FM radio mode.
- Auto Scan: In FM mode, press and hold the 'PLAY/PAUSE' button (or 'SCAN' on remote) to automatically scan and save available radio stations.
- Tune Stations: Use the 'PREV' and 'NEXT' buttons to navigate through saved radio stations.
7.3 Remote Control Usage
The included remote control provides full functionality for the decoder board. Point the remote control towards the IR receiver on the board for optimal response.
- All functions available on the board's buttons are also accessible via the remote.
- Additional buttons on the remote may include direct track selection (number pad), USB/SD mode selection, and mute.
8. Maintenance
To ensure the longevity and optimal performance of your MP3 Decoder Board, follow these simple maintenance guidelines:
- Cleaning: Use a soft, dry cloth to gently wipe the surface of the board. Avoid using liquid cleaners or abrasive materials.
- Environment: Keep the board in a dry environment, away from direct sunlight, extreme temperatures, and high humidity.
- Handling: Handle the board by its edges to avoid touching the electronic components directly.
- Power Off: Always disconnect power before performing any maintenance or making changes to connections.
9. Troubleshooting
If you encounter issues with your MP3 Decoder Board, please refer to the following common problems and solutions:
| Problem | Possible Cause | Solution |
|---|---|---|
| No power/LED display off | Incorrect power connection; Power supply issue; Board malfunction. | Check DC 12V power supply and polarity. Ensure connections are secure. Test power supply with another device. |
| No sound output | Incorrect audio connection; Amplifier issue; Volume too low; Unsupported audio format. | Verify audio output connections to the amplifier. Ensure amplifier is powered on and functioning. Increase volume. Check if audio files are in supported formats (MP3, WMA, WAV). |
| Cannot read USB/SD/TF card | Improperly inserted card/USB; Unsupported file system; Corrupted media; Incompatible card type. | Ensure media is fully inserted. Format media to FAT32. Try a different USB drive or card. Ensure micro SD/TF cards use an adapter if needed. |
| FM radio not working/poor reception | No antenna connected; Weak signal; Incorrect mode. | Connect an external FM antenna. Perform an auto-scan for stations. Adjust antenna position for better reception. Ensure the board is in FM mode. |
| Remote control not responding | Remote battery low/dead; Obstruction between remote and board; Remote not pointed correctly. | Replace remote control battery. Remove any obstructions. Ensure remote is pointed directly at the IR receiver on the board. |
10. Warranty and Support
Walfront products are manufactured to high-quality standards. For specific warranty information, please refer to the purchase documentation or contact your retailer. For technical support or further assistance, please reach out to Walfront customer service through the official channels provided at the point of purchase or on the Walfront brand website.


