
Samsung ME9114GS
Samsung ME9114GS 32 Liter Microwave Oven User Manual
Model: ME9114GS
1. Introduction
Thank you for purchasing the Samsung ME9114GS 32 Liter Microwave Oven. This manual provides essential information for the safe and efficient operation, maintenance, and troubleshooting of your appliance. Please read this manual thoroughly before using the microwave oven and retain it for future reference.
This microwave oven is designed to make your cooking tasks easy and enjoyable, featuring a 32-liter capacity, 1550 watts of power, and 10 power levels. It also includes a child lock system for safety and various automatic cooking programs for convenience.
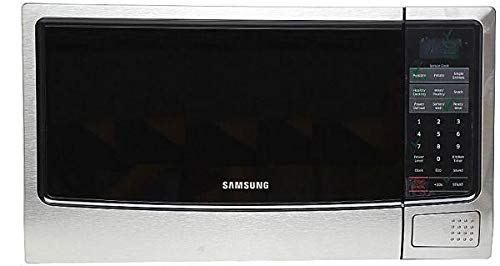
Image 1.1: Front-side view of the Samsung ME9114GS 32 Liter Microwave Oven, showcasing its silver finish and control panel.
2. Important Safety Information
To reduce the risk of fire, electric shock, injury to persons, or exposure to excessive microwave energy when using your appliance, follow basic precautions, including the following:
- Read all instructions before using the appliance.
- Do not attempt to operate this oven with the door open as this can result in harmful exposure to microwave energy.
- Do not place any object between the oven front face and the door or allow soil or cleaner residue to accumulate on sealing surfaces.
- Do not operate the oven if it is damaged. It is particularly important that the oven door closes properly and that there is no damage to the: (1) door (bent), (2) hinges and latches (broken or loosened), (3) door seals and sealing surfaces.
- The oven should not be adjusted or repaired by anyone except properly qualified service personnel.
- Ensure the appliance is properly grounded.
- Do not heat liquids or other foods in sealed containers since they are liable to explode.
- Always use microwave-safe cookware.
- Supervise children closely when the appliance is in use. The microwave features a child lock system for added safety.
3. Setup and Installation
3.1 Unpacking
Carefully remove the microwave oven from its packaging. Remove all packing materials, including any protective film or tape from the oven surfaces and accessories. Check the oven for any signs of damage during transit.
3.2 Placement
- Place the microwave oven on a flat, stable surface that can support its weight and the heaviest food item likely to be cooked in it.
- Ensure adequate ventilation. Maintain a minimum clearance of 10 cm (4 inches) at the rear, 20 cm (8 inches) at the top, and 5 cm (2 inches) on both sides. Do not block any ventilation openings.
- Keep the oven away from heat sources such as radiators, heat registers, stoves, or other appliances that produce heat.
- Avoid placing the oven near water or in damp areas.
3.3 Electrical Connection
Ensure your power supply matches the voltage specified on the microwave oven's rating label. Plug the oven into a properly installed and grounded electrical outlet. Do not use extension cords or adapters.
3.4 Turntable Installation
Place the roller ring in the center of the oven cavity. Then, place the glass turntable tray securely on top of the roller ring. Ensure the turntable rotates freely.

Image 1.2: Close-up view of the control panel of the Samsung ME9114GS Microwave Oven, showing buttons and digital display.
4. Operating Instructions
4.1 Basic Microwave Cooking
- Place food in a microwave-safe container on the glass turntable. Close the oven door securely.
- Press the 'Microwave' button.
- Use the number pad to enter the desired cooking time.
- Press the 'Power Level' button repeatedly to select the desired power level (1-10). Level 10 is full power.
- Press 'Start' to begin cooking.
4.2 Power Levels
Your microwave oven offers 10 power levels, allowing precise control over cooking intensity. Higher power levels cook faster, while lower levels are suitable for delicate foods or simmering.
| Power Level | Description | Recommended Use |
|---|---|---|
| 10 (High) | 100% Power | Fast cooking, boiling liquids, reheating. |
| 7-9 (Medium-High) | 70-90% Power | Cooking dense foods, baking. |
| 4-6 (Medium) | 40-60% Power | Roasting, simmering, gentle cooking. |
| 1-3 (Low) | 10-30% Power | Defrosting, softening butter, keeping food warm. |
4.3 Auto Cook Programs
The microwave oven features 10 automatic cooking menus for various food types. Refer to the specific auto cook menu guide (usually printed inside the door or on the control panel) for details on each program. To use:
- Place food in the oven.
- Press the 'Auto Cook' button.
- Select the desired program number using the number pad.
- Enter the weight or quantity if prompted.
- Press 'Start'.
4.4 Defrosting
The auto defrost function allows for efficient thawing of frozen foods. To use:
- Place frozen food in the oven.
- Press the 'Defrost' button.
- Select the appropriate defrost program (e.g., meat, poultry, fish) and enter the weight.
- Press 'Start'. The oven may prompt you to turn the food over during the cycle.
4.5 Timer Function
The timer can be used independently of cooking functions. To set the timer:
- Press the 'Timer' button.
- Enter the desired time using the number pad.
- Press 'Start'. The timer will count down without activating the microwave.
4.6 Child Lock
To prevent accidental operation, especially by children, activate the child lock:
- To Activate: Press and hold the 'Stop/Cancel' button for 3 seconds until a lock indicator appears on the display.
- To Deactivate: Press and hold the 'Stop/Cancel' button for 3 seconds again until the lock indicator disappears.
5. Maintenance and Cleaning
Regular cleaning and proper maintenance will ensure the longevity and optimal performance of your microwave oven.
5.1 Cleaning the Exterior
Wipe the exterior surfaces with a soft, damp cloth. For stubborn stains, use a mild detergent. Avoid abrasive cleaners or solvents that could damage the finish.
5.2 Cleaning the Interior
- After each use, wipe the interior with a damp cloth to remove food splatters.
- For dried-on food, place a bowl of water with a few lemon slices inside the oven and microwave on high for 2-3 minutes. The steam will loosen the food, making it easier to wipe away.
- Do not use abrasive cleaners or sharp objects inside the oven.
5.3 Cleaning the Turntable and Roller Ring
The glass turntable and roller ring can be removed and washed in warm, soapy water or in a dishwasher. Ensure they are completely dry before placing them back in the oven.
5.4 Door Seals
Regularly clean the door seals and adjacent parts with a damp cloth to ensure proper sealing and efficient operation.
6. Troubleshooting
If you encounter issues with your microwave oven, refer to the following common problems and solutions before contacting service personnel.
| Problem | Possible Cause | Solution |
|---|---|---|
| Oven does not start | Power cord not plugged in; Door not closed properly; Child lock activated. | Ensure plug is secure; Close door firmly; Deactivate child lock. |
| Food not heating | Incorrect cooking time/power level; Microwave-safe cookware not used. | Adjust time/power; Use appropriate cookware. |
| Turntable not rotating | Turntable or roller ring not positioned correctly; Obstruction. | Reposition turntable/roller ring; Remove any obstructions. |
| Sparking inside oven | Metal in oven; Food splatters. | Remove metal objects; Clean oven interior. |
7. Specifications
| Feature | Specification |
|---|---|
| Brand | Samsung |
| Model Number | ME9114GS |
| Capacity | 32 Liters |
| Power Output | 1550 Watts |
| Power Levels | 10 |
| Control Type | Button |
| Special Features | Auto Cook, Child Lock, Timer Function |
| Heating Method | Microwave Radiation |
| Defrost System Type | Auto Defrost |
| Material (Exterior/Interior) | Stainless Steel |
| Color | Silver |
| Frequency | 50 Hz |
| Included Components | Turntable, Manual |
8. Warranty and Support
For warranty information, please refer to the warranty card included with your product or visit the official Samsung website for your region. If you require technical assistance or have questions not covered in this manual, please contact Samsung customer support.
You can find contact details for customer support on the official Samsung website or in the documentation provided with your purchase.
Related documentsME9114GS


Ask a question about this manual
Ask about setup, troubleshooting, compatibility, parts, safety, or missing instructions. Manuals+ will review the question and use this page’s manual context to help answer it.